Travelin’ Nana here, (aka Donna). We are in Florida now for the Winter. Much warmer than Kentucky was when we left there at -1 degrees.
Our challenge this week was Stocking Stuffers. I had a hard time with this challenge, but attempted something anyway. Please excuse the pictures, as I do not have a white wall or area to take pictures in the RV.
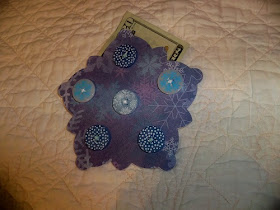
I made a Snowflake and Santa Hat that will hold either money or a gift a card, a Stocking to hold candy (couldn’t find those Mini Candy Canes here), and a Door Knob Holder that has a little envelop for money, a gift card, or a note.
Supplies:
Joys of the Season, Christmas, and Christmas Cheer Cartridges
Red and Blue Card Stock
Sparkling White Card Stock
Blue Patterned Snowflake Paper
DCWV Handmade Christmas Stack
Pearls, Bling, and Buttons
Glue Dots, Glue Pen, and Tape Runner
Christmas Ribbon
Red Bazzill Edge Strip
Graphic 45 Christmas Sheet
Small Green Envelope 1 ½ X 2
Foam Snowflakes
Recipe for Santa Hat:
Cut (2) Santa Hats at 5.70X5.47 height from the Joys of the Seasons Cart. Use Red Sparkly Card Stock from the DCWV pack. (flip flop one)
Adhere the two red hats together using tape runner with a glue dot here and there so they will stay together. (Leave the top open to fill.)
Cut another Santa Hat from the Sparkling White using the same sizes.
Cut the Ball and Cuff from the Sparkling White hat and adhere it to the front of the Red hat.
Adhere three Foam Snowflakes to the front of the red hat.
Stuff with money or gift card
Recipe for Stocking:
Cut (2) Stockings at 3.98X7.24 height or larger from the Christmas Cheer Cart. Use a piece of paper from the DCWV pack. (flip flop one)
Adhere the two stockings together. (Leave top open.)
Cut Bazzill Strip to fit across top area of stocking.
Add pearls.
Add Christmas Buttons down front.
Stuff with small candy canes.
Recipe for Snowflake:
Cut (2) Snowflakes in blackout mode at 4.91x4.65 height, using the Christmas Cheer Cart. Use Blue Card Stock. (flip flop one)
Cut (1) Snowflake out of the Blue Snowflake Pattered Paper the same size (don’t use blackout),
Adhere the Snowflake Patterned Paper piece to one of the blue card Snowflakes. This will be the front.
Adhere the front piece you just made to the other blue card stock snowflake to make the pocket.
Put Snowflake Buttons where all the cutouts are on the front of the Snowflake.
Adhere all but the top of the pocket with glue stick or tape runner.
Stuff with money or gift card.
Recipe for the Door Knob Holder:
Cut (2) Door Knob Holders at 7 inches height, from the Christmas Cart., using Red Card Stock. (flip flop one)
Adhere the two Door Knob Holders together except at the top of the pocket.
Use Graphic 45 cutouts and Green Bling to embellish front.
Adhere Dec 25th from Graphic 45 Sheet to front of a little envelop and tuck it in the pocket.
Tie Graphic 45 “Night Before Christmas” tag with Christmas Ribbon and adhere to top right of Holder.
Stuff with money, gift card, or note.


Very very cute :) Thanks for sharing! I will definitely be making these for next year! :)
ReplyDeleteLike the holder..seem like a gift card put into Gift Card envelopes...thanks you share it with us.
ReplyDelete