MyFreeCopyright.com Registered & Protected
Showing posts with label Christmas Cheer. Show all posts

December 30, 2011

Thanks so much!

I don't know about you, but I feel that when someone has gone to the time and trouble to give you a special gift, they should receive a special thank you. So the theme this week at SweetSassyDive is 'Thanks For The Gift'.
The card base is from Birthday Bash, cut at 5". The presents are from Christmas Cheer and are cut at 1.5". The paper and ribbon are from my collection. The sentiment and image are Stampin Up and the punch is Stampin Up xlg oval . 
This card was very quick to put together, after I got the  presents cut.... when will I learn to NOT try to cut things smaller than my Cricut likes to cut them????? Oh well... it all worked in the end :)
I want to wish you all a very Happy New Year !!! Being a part of this AMAZING design team is such a great treat for me. I can't wait to see what new and exciting projects are in store for 2012!!

Mindy


December 22, 2011

Snow Globe!

 This weeks theme at SweetSassyDiva is Let It Snow... make something with a snowflake, snowball, snowman... you get the idea, and of course, use your Cricut ! I am afraid we are going to have a white Christmas here in New Jersey, so I had to make my snowman from paper. I scraplifted this idea from a fellow blogger, but I am sorry to say I didn't save the site. So I am sending out a big thank you to whoever it was :) I kind of got carried away with the snow theme... snow globe, snowman, snow flakes. I started with the snow globe from Doodlecharms - sized at 4.23, copied, flipped and welded together.
                              The outer circle was done using a tag from Doodlecharms, sized at 3.72
 and a second, sized at 3.24 and centered inside the larger one. 
                                                                                   The trees are from Winter Woodland sized 2.41.
                                                                    The snowman is from Christmas Cheer, cut a t 2.41
           After some stickles, puffy paint, gel pen and ribbon I was happy with my snowman, snow globe.
Supply list: Cricut Doodlecharms, Christmas Cheer, Winter Woodland Papers - Stampin Up, DCWV, Hobby Lobby Ribbon - Hobby Lobby, Stickles Puffy Paint Gel Pen Merry Christmas everyone !
- Mindy!

November 11, 2011

Sleighing Christmas Cheer!

Hello everyone. Mindy here from Grammies Craft Room with my first Christmas card of the season. I would really like to have a stack of cards done and ready to send by now... BUT that hasn't happened! So, I am trying a few designs to find just the right one that I can make multiples of quickly and simply.


The sleigh is from Christmas Cheer. I wasn't sure what size I was going to want, so I cut it in 2 sizes - 2 " and 1.5". I ended up using the 2" one on the front and had palnned on using the smaller one on the inside, but I tested my glimmer spray on the smaller one and it came out awful.... so it went to the trash :(


I set the cuts up on my Gypsy. One pointer - always check your pressure and speed settings - I changed the pressure to 5 as I was using heavy card stock.


I placed my paper on the mat like so ( I am using a well loved mat and use the purple tape to help hold my paper on ),loaded the mat and pressed cut.


I ran the red, top layer through the Cuttlebug using the herring bone folder.


I sponged the edges of the red layer with Cherry Cobbler and assembled.


I added Crystal Efffects to the runners.


The sentiment is from Stampin Up.


Some ribbon, a snowflake button and crystal like gems finish it off.
This card went together very easily  and I could use the auto fill feature to get as many cuts from one sheet of paper as possible to make lots of cards. This one is a serious possibilty!


The supplies I used:


Cricut Christmas Cheer - Sleigh
Stampin Up  card stock - Ivory, Cherry Cobbler
Stampin Up ribbon - CHerry Cobbler
DCWV - patterend paper
Snowflake button - Hobby Lobby
Crystal - like gems - Hobby Lobby


So go dig out that 'old' cartridge, get cutting and start making your holiday cards !

July 23, 2011

Where is Mr. & Mrs. Clause?

Hi there! Do you ever wonder what Mr. and Mrs. Clause do during the summer? Well here is what I think they do! ;)
I placed my images on my Gypsy according to how I want them to cut.
I placed all the color pieces for the correct images. (I was able to use all scraps too)


Mr. and Mrs. Clause love to relax on their own tropical island! Who wouldn't want to? I hope you enjoyed the card!

Card Recipe:
Green cardstock from Joanns
Blue patterned paper from Sizzix Mat Stack
Island and tree is from Life is a Beach cartridge
Bikini is from Life is a Beach
Santa Hat is from Christmas Cheer
Sentiment is from Pink By Design

To see my other projects visit me on Facebook; or my blog;!

Happy Crafting!

Kim

July 22, 2011

Summer Blooms!

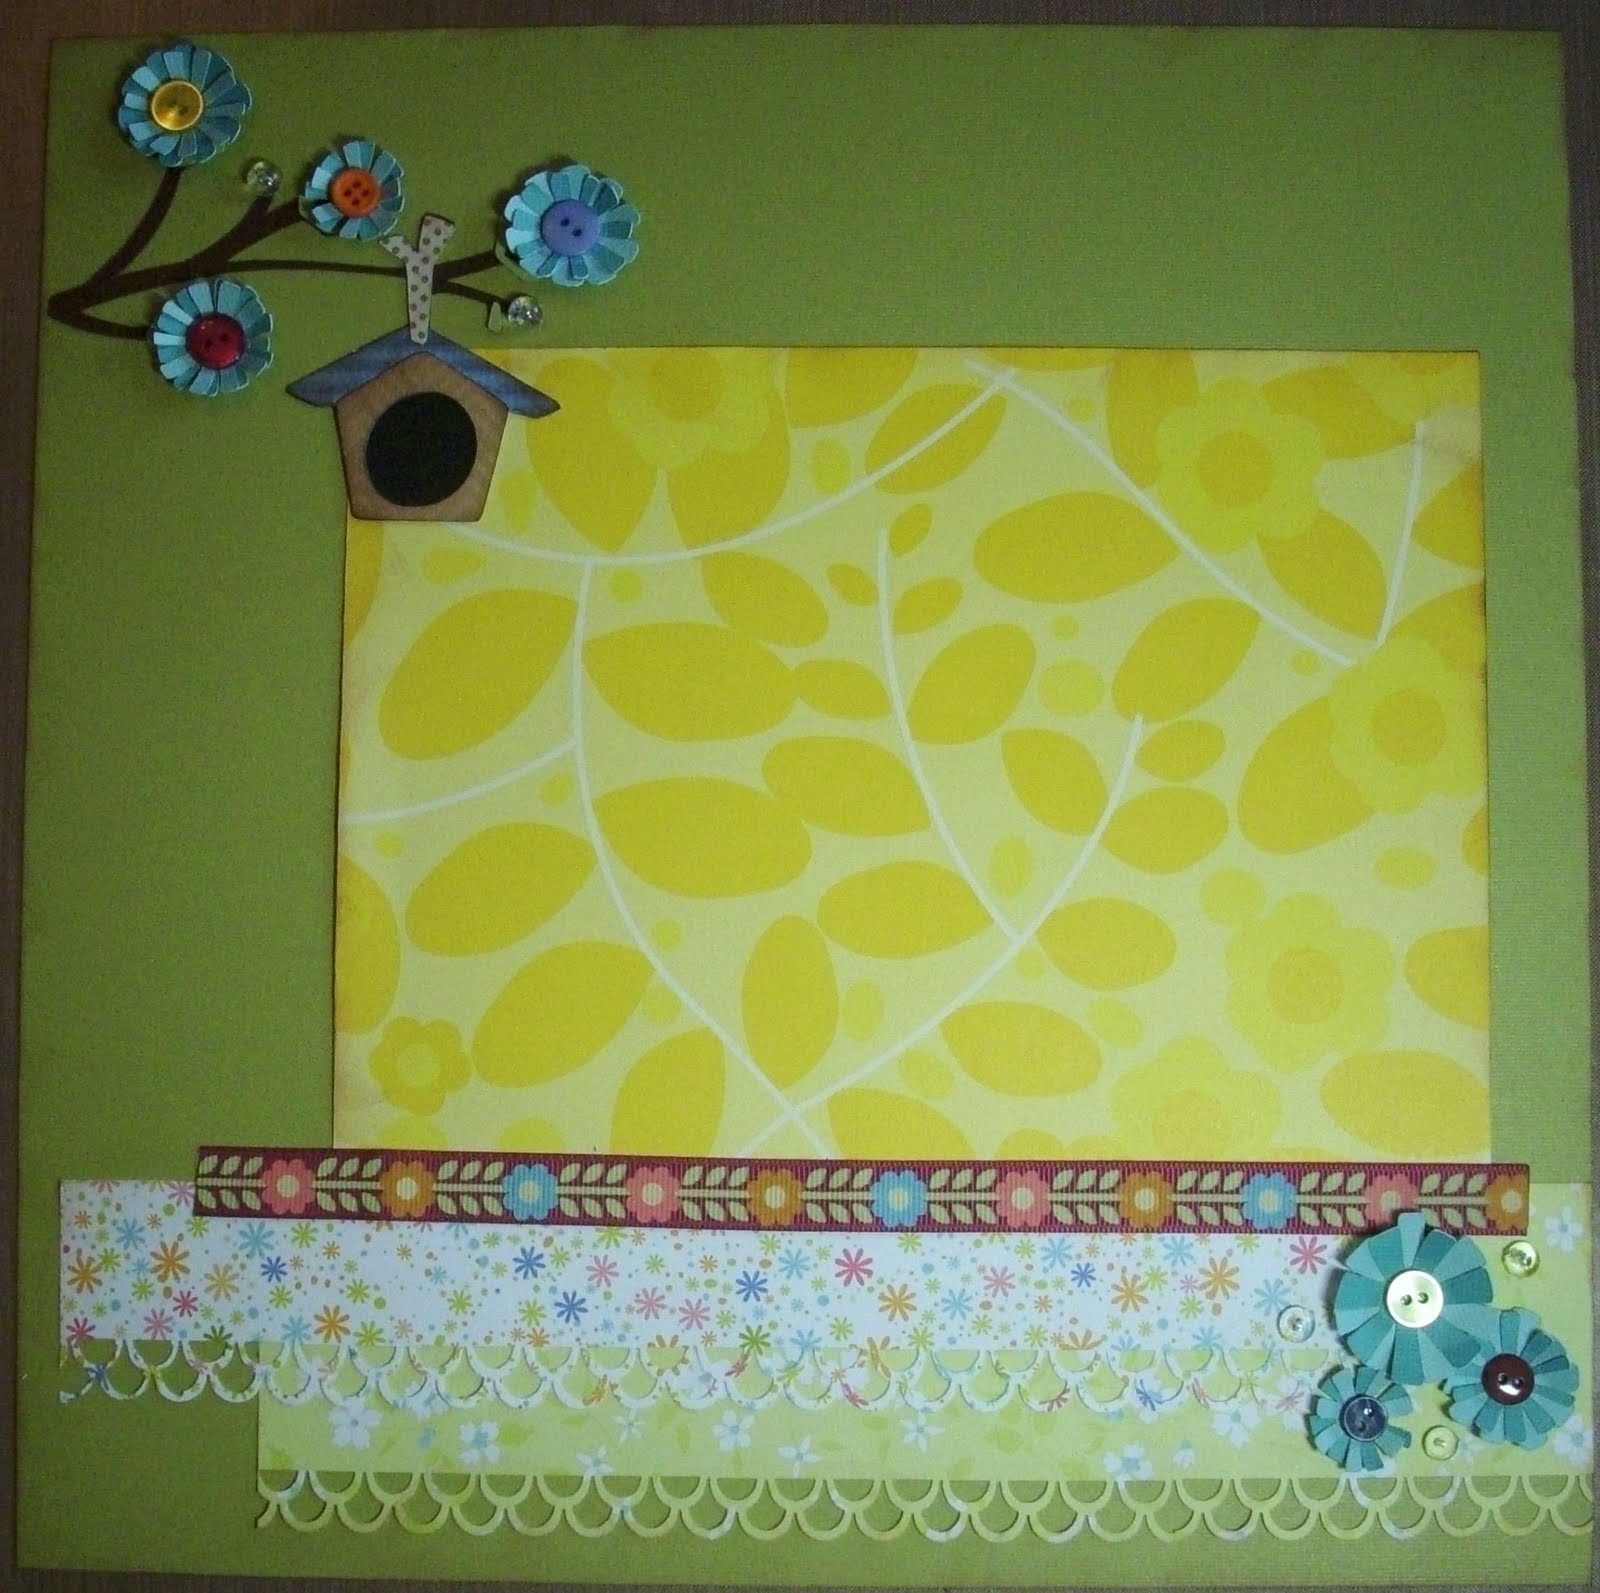
This week at Sweet Sassy Diva the design team was asked to use a Christmas cart and put a summer spin on it. I was so excited about this challenge but for some reason it just wouldn't pull together for me. I think I just had brain overload the last couple of weeks and couldn't focus. In the end I did use the flowers that was part of the original idea but the whole layout to a life of it's own and is nothing like what I set out to do. LOL I hope you enjoy my Summer Blooms layout!

 My original idea was to do a card with these flowers made from the snowflake cut on Christmas Cheer. I loved the little flowers but the card cut just wouldn't happen. I started with snowflakes cut from 1/2" to 1 1/4" in two different colors of blue. I stacked them on top of each other and then curled up the edges with a button in the middle to create a flower.

 Here's a side view so you can see the dimension. Aren't they the cutest?
 For the bottom I used a Martha Stewart punch to trim a couple of borders then added a piece of ribbon.

 For the birdhouse I used a great little birdhouse from Winter Frolic. I added a piece of black card stock behind the opening and cut a blue piece for the roof to create different layers. Of course I inked it all up with my cat eye inks. You know I love them! I added more of my snowflake flowers over the branches and a couple more dew drops to create some buds on the branch help balance the whole design out.
I hope you enjoyed my layout this week and all of the other designers. I'd love for you to come visit me at my blog for more great layouts!
Hugz

Details:
Winter Frolic - Birdhouse cut at 4 1/2"  Pg 63
Christmas Cheer - Flowers cut at 1/2" - 1 1/2" Pg. 106
Ribbon - Karen Foster
Martha Stewart punch
DCWV paper stacks
Buttons
Dew Drops

December 28, 2010

Christmas Cheer Snowman!

A quick and easy tag/ornament is by using the Christmas Cheer cartridge and the Imagine More Cartridge for the Cricut
Imagine.  It's so convenient when you only need a white sheet of cardstock
and the Imagine does all the coloring for you!


Don't forget, SweetSassyDiva is the place where it's all at!


Blessings!


December 24, 2010

Deck the Halls!


My son has been ill this past week.  To brighten his day, I cut some paper ornaments and decorated a small tree for him.  I used some small felt snow flakes in white and red.  I added some red tinsel.  I also picked up some mini red lights but, hadn't added them, when I took this picture. 

The ornaments were made using the Chomas Creations mini gel pen holder and silver gel pen.  You can get your Chomas Creations Gel Pen Holders from Vist http://amychomas.blogspot.com/

I chose the ornaments from the Christmas Cheer Cricut cartridge.  You can see a tutorial by clicking here!

I strung the ornaments on the mini red tinsel ribbon.  My son helped to decorate the tree.  It gave him a little Christmas cheer for his room.


I used two ribbons to tie around the base.  A wider red mesh ribbon and an off white ribbon with the words "Merry Christmas". 

He wanted to add the chocolate bulb ornaments to it but, they were too heavy to tie onto the tree.  We added them to the base of the plant by adding aluminum foil as a liner.  He put them for decor and I'm sure we will know he is well, when he decides to eat them. 

Hopefully, he is better when Santa arrives tomorrow.  Although I'm sure when he sees his new toys, he will perk up at least long enough to open them. 

Merry Christmas!

Gift Card or Money Holders!

Travelin’ Nana here, (aka Donna). We are in Florida now for the Winter. Much warmer than Kentucky was when we left there at -1 degrees.

Our challenge this week was Stocking Stuffers. I had a hard time with this challenge, but attempted something anyway. Please excuse the pictures, as I do not have a white wall or area to take pictures in the RV.

I made a Snowflake and Santa Hat that will hold either money or a gift a card, a Stocking to hold candy (couldn’t find those Mini Candy Canes here), and a Door Knob Holder that has a little envelop for money, a gift card, or a note.


Supplies:

Joys of the Season, Christmas, and Christmas Cheer Cartridges
Red and Blue Card Stock
Sparkling White Card Stock
Blue Patterned Snowflake Paper
DCWV Handmade Christmas Stack
Pearls, Bling, and Buttons
Glue Dots, Glue Pen, and Tape Runner
Christmas Ribbon
Red Bazzill Edge Strip
Graphic 45 Christmas Sheet
Small Green Envelope 1 ½ X 2
Foam Snowflakes


Recipe for Santa Hat:


Cut (2) Santa Hats at 5.70X5.47 height from the Joys of the Seasons Cart. Use Red Sparkly Card Stock from the DCWV pack. (flip flop one)

Adhere the two red hats together using tape runner with a glue dot here and there so they will stay together. (Leave the top open to fill.)

Cut another Santa Hat from the Sparkling White using the same sizes.

Cut the Ball and Cuff from the Sparkling White hat and adhere it to the front of the Red hat.

Adhere three Foam Snowflakes to the front of the red hat.
Stuff with money or gift card
Recipe for Stocking:


Cut (2) Stockings at 3.98X7.24 height or larger from the Christmas Cheer Cart. Use a piece of paper from the DCWV pack. (flip flop one)

Adhere the two stockings together. (Leave top open.)

Cut Bazzill Strip to fit across top area of stocking.

Add pearls.

Add Christmas Buttons down front.

Stuff with small candy canes.

Recipe for Snowflake:


Cut (2) Snowflakes in blackout mode at 4.91x4.65 height, using the Christmas Cheer Cart. Use Blue Card Stock. (flip flop one)

Cut (1) Snowflake out of the Blue Snowflake Pattered Paper the same size (don’t use blackout),

Adhere the Snowflake Patterned Paper piece to one of the blue card Snowflakes. This will be the front.

Adhere the front piece you just made to the other blue card stock snowflake to make the pocket.

Put Snowflake Buttons where all the cutouts are on the front of the Snowflake.

Adhere all but the top of the pocket with glue stick or tape runner.

Stuff with money or gift card.


Recipe for the Door Knob Holder:


Cut (2) Door Knob Holders at 7 inches height, from the Christmas Cart., using Red Card Stock. (flip flop one)

Adhere the two Door Knob Holders together except at the top of the pocket.

Use Graphic 45 cutouts and Green Bling to embellish front.

Adhere Dec 25th from Graphic 45 Sheet to front of a little envelop and tuck it in the pocket.


Tie Graphic 45 “Night Before Christmas” tag with Christmas Ribbon and adhere to top right of Holder.

Stuff with money, gift card, or note.

December 23, 2010

Christmas Cheer Gift Tags Tutorial!


Isn't this so cute!?  See video tutorial below.


I made these with Christmas Cheer and a really cool tool!


You can see that this is not your normal cricut blade housing.  It fits right where it normally goes though.  It uses a variety of color pens and gives you some alternatives to the cricut markers. 


For making my Gift Tags, I used the Silver Glitter gel pen.  I really liked how it sparkled against the red cardstock.


After using the Chomas Creations Mini Gel Holder and Silver Mini Gel pen for the detail, I replaced the cricut cutting blade housing. 

I cut the shadow feature of the ornaments.
Below you see how it will look after you use both the gel pens and then, cut with the shadow feature. 


I used these for gift tags and wrapped a present with some beautiful Ribbon.  To attach the tag to the present, use some thin red tinsel ribbon. 

VIOLA!!

Here is the video tutorial:


If you are on email subscription, please click my blog logo to view.


Merry Christmas!