Hi Everyone
Rebecca here. This week over at Sweet Sassy Diva, Bobbi Jo asked us to make a project for either Valentines Day or for a Birthday. So I decided to make a Valentine's Day card for my husband. For this card I used Happy Hauntings.
Recipe
Happy Hauntings- Frankenstein and Bride of Frankenstein cut at 3"
Black Pen
Yellow, green, black, purple and white card stock
I-rock
Patterned Paper
I just thought this would be a cute and unusual Valentine's Day card. This is the 1st time I have made smaller cuts with this cart and I will say piecing the two monsters together was a bit difficult. I would recommend cutting them a little bigger. To see more visit my blog:
Showing posts with label Card. Show all posts
January 18, 2011
Monster Love!
January 15, 2011
Just Because!
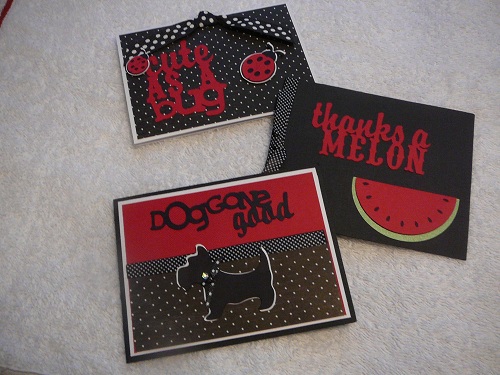
I didn't get any new cartridges for Christmas, so I decided to go with one of my Favorite Cartridges. I just love, "Just Because Cards," because it is so easy to use. All the planning and ideas have already been done, you just need to copy the picture and you have a cute card.
I did three cards that are some of my favorites. The "Thanks a Melon" card, "Cute As A Bug" card," and "DogGone good" card. These cards are so simple.
Supplies Needed:
Just Because Cards Cricut Cartridge
Black, Red, White, and Green, Card Stock
Black and White Polk a Dot Patterned Paper
Three different sizes of Black Polk a Dot Ribbon
Adhesive and Glue Dots
Pop Dots
Ribbon Glue
Bling
Recipes:
Thanks a Melon Card
Make a card out of Black Card Stock, using one from the cartridge or cut one using your trimmer. I made my card at 4X4 1/2 folded. Or 4X9 before folding.
Cut a red melon at 2.92X3.59 in Layer 1 mode. Gypsy size.
Cut a black melon the same size in Layer 2 mode to go underneath the red one.
Cut a green melon at 3.11X 3.82 in Layer 2 mode. Gypsy size.
Cut the red "thanks a Melon" at 4.03X3.71 Gypsy size.
Adhere the black melon underneath the red melon.
Adhere the red/black melon onto the green melon rind at the top center.
Adhere the "thanks a Melon" to the top of card. (Opening of card is at the left).
Adhere the Melon to the bottom right of card.
Adhere a black polk a dot ribbon with small dots to the left side of card. (I wrapped it inside the card and tied it in a bow on the front of the card.)
Cute as a Bug
Make a card out of White Card Stock, using one from the cartridge or cut one using your trimmer. I made this card to fold at the top at 4 1/2 when folded by 5 1/2 from left to right.
Cut a piece of black and white polk a dot paper 1/8th inch smaller than the front of card and adhere it to the front of card.
Cut two white lady bugs from Layer 1 mode. One 1 inch high and one 1 1/2 inches high.
Cut two black lady bugs from Layer 1 mode just a little smaller to go on top of the white ones.
Cut two red lady bugs using Layer 1 Shift mode just a little smaller than the black lady bugs and adhere to the top of the black layer.
Cut the red "cute as a bug" using Word mode 2.53.X4.65 inches high.
Make a knot from large black and white polk dot ribbon and glue dot it to the top of card.
DogGone good
Make a card out of Black Card Stock, using one from the cartridge or cut one using your trimmer. I made my card at 4X4 1/2 folded.
Cut a White Card Stock piece 1/8th inch smaller than the black card.
Cut a Red Card Stock piece 1/8th inch smaller than the white piece.
Cut a Black Polk a Dot Patterned piece one half the size of the Red Card Stock piece.
Cut a white dog at 2.28X4.53. Gypsy size.
Cut a black dog at 2.34X4.65. Gypsy size.
Cut a black "DogGone good" at 3.73X5.59. Gypsy size.
Adhere the White Card Stock piece to the Black Card.
Adhere the Red Card Stock piece to the White Card Stock.
Adhere the Black Polk a Dot piece to the bottom of the Red Card Stock piece.
Cut a ribbon the length of the Red Card Stock and glue it with ribbon glue over the top of the black polk a dot piece.
Adhere the "DogGone Good" to the center of the top of the card.
Tie a small black polk a dot ribbon to the dogs neck.
Put a bling on the ribbon around the dogs neck with glue dot.
Adhere the Dog to the middle of the front of the card.
I did three cards that are some of my favorites. The "Thanks a Melon" card, "Cute As A Bug" card," and "DogGone good" card. These cards are so simple.
Supplies Needed:
Just Because Cards Cricut Cartridge
Black, Red, White, and Green, Card Stock
Black and White Polk a Dot Patterned Paper
Three different sizes of Black Polk a Dot Ribbon
Adhesive and Glue Dots
Pop Dots
Ribbon Glue
Bling
Recipes:
Thanks a Melon Card
Make a card out of Black Card Stock, using one from the cartridge or cut one using your trimmer. I made my card at 4X4 1/2 folded. Or 4X9 before folding.
Cut a red melon at 2.92X3.59 in Layer 1 mode. Gypsy size.
Cut a black melon the same size in Layer 2 mode to go underneath the red one.
Cut a green melon at 3.11X 3.82 in Layer 2 mode. Gypsy size.
Cut the red "thanks a Melon" at 4.03X3.71 Gypsy size.
Adhere the black melon underneath the red melon.
Adhere the red/black melon onto the green melon rind at the top center.
Adhere the "thanks a Melon" to the top of card. (Opening of card is at the left).
Adhere the Melon to the bottom right of card.
Adhere a black polk a dot ribbon with small dots to the left side of card. (I wrapped it inside the card and tied it in a bow on the front of the card.)
Cute as a Bug
Make a card out of White Card Stock, using one from the cartridge or cut one using your trimmer. I made this card to fold at the top at 4 1/2 when folded by 5 1/2 from left to right.
Cut a piece of black and white polk a dot paper 1/8th inch smaller than the front of card and adhere it to the front of card.
Cut two white lady bugs from Layer 1 mode. One 1 inch high and one 1 1/2 inches high.
Cut two black lady bugs from Layer 1 mode just a little smaller to go on top of the white ones.
Cut two red lady bugs using Layer 1 Shift mode just a little smaller than the black lady bugs and adhere to the top of the black layer.
Cut the red "cute as a bug" using Word mode 2.53.X4.65 inches high.
Make a knot from large black and white polk dot ribbon and glue dot it to the top of card.
DogGone good
Make a card out of Black Card Stock, using one from the cartridge or cut one using your trimmer. I made my card at 4X4 1/2 folded.
Cut a White Card Stock piece 1/8th inch smaller than the black card.
Cut a Red Card Stock piece 1/8th inch smaller than the white piece.
Cut a Black Polk a Dot Patterned piece one half the size of the Red Card Stock piece.
Cut a white dog at 2.28X4.53. Gypsy size.
Cut a black dog at 2.34X4.65. Gypsy size.
Cut a black "DogGone good" at 3.73X5.59. Gypsy size.
Adhere the White Card Stock piece to the Black Card.
Adhere the Red Card Stock piece to the White Card Stock.
Adhere the Black Polk a Dot piece to the bottom of the Red Card Stock piece.
Cut a ribbon the length of the Red Card Stock and glue it with ribbon glue over the top of the black polk a dot piece.
Adhere the "DogGone Good" to the center of the top of the card.
Tie a small black polk a dot ribbon to the dogs neck.
Put a bling on the ribbon around the dogs neck with glue dot.
Adhere the Dog to the middle of the front of the card.
January 14, 2011
Nifty Fifties!
Hi, SweetSassyDiva here! In honor, of the MPS blog hop, I am giving away a cricut cartridge from my own stash! The cartridge will be Nursery Rhymes which also has a wonderful font.
Please enter a comment on this post and a winner will be drawn. I would be honored if you would also become a follower.
To see the project I made for the MPS challenge. Click Here!
Now, on to another wonderful project....
Hey everyone! Kristin from The Crafty Kitchen here. This week our challenge for the SSD Design Team was to use one of our new cartridges. I don't own any of the new, NEW cartridges (Nate's ABCs, Mothers Day Bouquet, etc) YET, I'm hoping to snag them cheap on eBay :) However, I DID get Nifty Fifties during PCP's $13 cart sale, and I was dying to use it!
I used the dress form and the dress and cut everything at 4 3/4". My Gypsy was charging in the other room, so I made this card WITHOUT my Gypsy, and it was a totally weird feeling ;).
Recipe:
*Nifty Fifties Cartridge
*DCWV Black Currant Stack (for dress and pink mat)
*DCWV Latte cardstock stack (for dress form and grey card base)
*Jolees Swaroski Crystal Elements
*i-Rock
*Martha Stewart Pearl in Obsidian
*My Pink Stamper "Pinkalicious Puns" Stamp Set
Please enter a comment on this post and a winner will be drawn. I would be honored if you would also become a follower.
To see the project I made for the MPS challenge. Click Here!
Now, on to another wonderful project....
Hey everyone! Kristin from The Crafty Kitchen here. This week our challenge for the SSD Design Team was to use one of our new cartridges. I don't own any of the new, NEW cartridges (Nate's ABCs, Mothers Day Bouquet, etc) YET, I'm hoping to snag them cheap on eBay :) However, I DID get Nifty Fifties during PCP's $13 cart sale, and I was dying to use it!
I used the dress form and the dress and cut everything at 4 3/4". My Gypsy was charging in the other room, so I made this card WITHOUT my Gypsy, and it was a totally weird feeling ;).
Recipe:
*Nifty Fifties Cartridge
*DCWV Black Currant Stack (for dress and pink mat)
*DCWV Latte cardstock stack (for dress form and grey card base)
*Jolees Swaroski Crystal Elements
*i-Rock
*Martha Stewart Pearl in Obsidian
*My Pink Stamper "Pinkalicious Puns" Stamp Set
It's a....

This week the SweetSassyDiva Dt was asked to make something using either a new cart or our fav cart.. I used Simply Charmed, which my husband got me for Christmas.. so its new, but it's also quickly becoming one of my favs!
I made this for my sister-in-laws sister... shes expecting twins one boy and one girl. :) I'm so excited for her!
I cut both the baby boy and girl out at 2.5inches. The background paper is wrapping paper I got when I first got pregnant with my baby, I cut the wrapping paper to fit the card. I wrote "It's a..." with a black Glaze pen and the "BOY!" & "GIRL!" are both the $1 glitter glue from Michaels. Fairly easy and super cute!!
Supplies:
Paper - 2 shades of blue, 3 shades of pink, black & patterned paper (wrapping paper for mine)
Other - blue glitter glue, pink glitter glue, ATG gun, Zig glue, black Glaze pen, Simply Charmed
Thanks for stoppin' by and have a great day!
January 11, 2011
Hubby's B-Day!
I made this card for my DH's 33rd birthday! I used the Lacy Labels cartridge and my Gypsy with the Gypsy Wanderings cartridge for the sentiment. I cant wait to use these cartridges more often! The Lacy Labes is going to be my go-to cart for this year....I CAN FEEL IT....can you feel it?....cause I CAN FEEL IT!
~*recipe*~
~*Lacy Labels cart
~*Gypsy Wanderings cart
~*DCWV carstock
~*blue and brown ribbon
~*blue fabric paint
~*Jen*~
Labels:
Card,
Gypsy,
Gypsy Wanderings,
Jen,
Lacy Label
December 18, 2010
Imagine Lori's Garden Thank You Card!
Hello all!! This is Carissa!! This week I have a Thank You card made from the Cricut Imagine cartridge Lori's Garden! I really love how it turned out!! I saw the square design a couple of different places and really wanted to try it. Just a little note... My color ink says it is low! Still looks great so I'm going to see how long it lasts. I have another ink cartridge on standby though!!
Recipe:
Cricut Imagine Lori's Garden Art Cartridge
Sentiment cut at 1.9
Pattern - Small square cut at 1.8
Yellow pattern - Larger square cut at 1.9
Solid background - Square cut at 5.2 (This was cut down to fit the card better)
White cardstock
Ribbon
3D foam squares
Chestnut Roan Colorbox Chalk Ink
This is how my mat was arranged. I started with larger sizes but used fit to page so I could only use one sheet of white paper!!
I decided that I wanted another layer after it was put together... There would be room to add the layered piece and still only use one sheet of paper!! I inked all of the edges and layered the sentiment and butterfly with 3D foam squares!! The butterfly is my favorite!!
Have a great week!!
-Carissa
Labels:
Card,
Carissa,
Cricut Imagine,
Lori's Garden
December 5, 2010
Let It Snow Christmas Card
I decided to do something really different for my card since I do so many traditional ones. This one has a pocket vs an envelop to hold it.
Supplies:
Post-It Full Adhesive Papers in White, Glacier and Cobalt
Card Stock in Cobalt Blue
Teal Patterned Paper
Snowflake with Teal, Lavendar, White and Blue Patterned Paper
Foam Rubber Sparkly Snowflakes
Scallop Circle 3 Inch Punch
Winter Frolic Cricut Cartridge
Plantin Schoolbook Cricut Cartridge
Cuttlebug Snowflake Folder
Blue Ribbon
Merry Christmas Scallop Stamp
Snowflake Sticker with Blue, Lavender, and White
Sanding Block
Purple Ink
Sponge
Recipe:
Cut two tags at 7 inches from the Plantin Schoolbook Cartridge. One from Cobalt Card Stock and one from Snowflake Patterned Paper. (if you cut the patterned one just a little bigger it will make the pocket easier to use)
Tear the Snowflake paper so you have about a 3 inch pocket from top to bottom
Adhere Snowflake pocket to cobalt blue card stock tag using glue stick just around the sides and bottom leaving enough room for the smaller tag/card to fit in the pocket
This tag/pocket will be the envelop for your smaller tag/card
Cut Let It Snow from the Winter Frolic Cartridge and adhere it to the front of the pocket
Adhere two large and one small foam snowflakes to pocket around Let It Snow
Cut three 5 1/2 inches tags from the same cartridge. One from very thin cardboard, one from teal patterned paper and one from Glacier Post-It paper
Adhere teal paper to one side of cardboard and Glacier post-it paper to the other. (this is so the card will be firm)
Run the tag/card through the Cuttlebug using the Snowflake Folder
Use the sanding block on the side of the card with the teal paper
Ink the Glacier side lightly with purple ink using a sponge
Stamp Cobalt Blue Post-It Paper with Merry Christmas Stamp. (It works well on Post-It paper)
Use Scallop Punch and punch out Merry Christmas scallop you just stamped
Adhere the Merry Christmas punch out onto the Glacier Post-It paper side of the tag/card. (this will be the front of card)
Adhere small White Foam Snowflakes to the tag/card. Three at the top and three to the bottom. All around the Merry Christmas punch out
Tie Blue ribbon through top of tag
Cut three 1 inch snowflakes from one of the Christmas Cartridges and adhere to the back of the tag/card
Place the tag/card inside of the pocket of the larger tag
- Donna
You can also use these as gift tags and it has the card built-in to it! Great idea Donna. I hope you all enjoyed the blog hop yesterday.
- SweetSassyDiva
Labels:
Card,
Donna,
Plantin Schoolbook,
Winter Frolic
November 3, 2009
Welcome to my G-Spot!
Welcome to my first official blog. This is my Gypsy Spot where I will post my latest creations. With my new Gypsy, I am not limited to the computer to create. I can create anywhere whether at my son's sporting events, swimming or sitting in the doctor's office. Where is your favorite spot to create?
My first project was for the contest by Gypsy and Michael's craft store. I made a thank you card that I used for my daughter's christening.
Please remember all content on my blog including but, not limited to my photos and videos are copyright © 2009 Bobbi Jo H.
how does anyone get that many votes?
here's the entries and winners:
http://www.cricut.com/gypsy/designchallenge/entries.aspx?Page=2&St=1
My first project was for the contest by Gypsy and Michael's craft store. I made a thank you card that I used for my daughter's christening.
Please remember all content on my blog including but, not limited to my photos and videos are copyright © 2009 Bobbi Jo H.
how does anyone get that many votes?
here's the entries and winners:
http://www.cricut.com/gypsy/designchallenge/entries.aspx?Page=2&St=1
Labels:
Card,
Gypsy,
Gypsy Font,
Gypsy Wanderings,
SweetSassyDiva,
Wild Card
Subscribe to:
Posts (Atom)