MyFreeCopyright.com Registered & Protected
Showing posts with label Picturesque. Show all posts

April 24, 2011

Spring Wreath!

Good Morning! This is Jen from 3 Cats and a Bug. This week SSD asked her DT to make a home decor project and I played along this week too. I've never done anything like this before, having only been doing scrap-booking and card making for a few years. I think it took me longer to think out the project then to actually do it! lol


I started with a wreath form from Joann's~ with a coupon it was about $3.50. This way if it didn't work I wasn't out much!


I then took 1.5" purple ribbon and wrapped it around the wreath form. Still not knowing if this would work or not, I only scotch taped it on. :) {Please excuse the very dirty table, as soon as it warms up I will clean all the glue off of it!}


I used 3 different carts for the flowers: Serenade, Pagoda and Sweet Treats. All the flowers with lose petals (not glued down) I ran my thumb nail over them to give them a slight curl.


The large flowers with the blue base were cut from Serenade at 2 3/4, 2 1/2, 2 1/4 and 2. For the smaller flowers, still from Serenade, they were cut at 1 3/4. I used stickles and a white gel pen on some of them.


For the large flowers with the pink base, I used Pagoda. The large were cut at 2 3/4, 2 1/2 and 2 1/4. The small ones with the dark pink base were cut at 1 3/4. The yellow ones were cut at 1.3, .9 and .6 on my imagine. The blue one, also cut on the imagine was cut at 3.0, 2.5, 2.0 and 1.5.


After I took these pictures, I went and used Viva Decor violet pearl pen to add purple dots.


For the large flowers with the purple base, I used Sweet Treats. They were cut at 2 1/5, 2 1/4, 2 and 1 3/4. The smaller flowers were cut at 1 3/4. I added yellow stickles to some of the centers.


I used Picturesque for the leaves. For the large flowers the leaves were cut at 2 3/4 and for the small flowers they were cut at 2. On almost all of the leaves I cut out the center leaf and used it elsewhere on the project.


The butterflies were cut from Sentimentals at 1.7 and 1.5


That brought me to the fun part... using the hot glue gun with 3 cats!! 1 of them is fearless and will stick her nose in everything she shouldn't. Not much different than my kids when they were little! LOL


FYI ~ the scotch tape I used on the ribbon worked just fine!! For those of us who can't make all those pretty 3D paper flowers (I hope I'm not the only one!!), these are a great alternative. Thanks for looking!

January 29, 2011

Mini Album!

Hi Jen from 3catsandabug.  I have the world's GREATEST In Laws, so I wanted to make something special for my MIL's birthday and this is what I came up with.  {Click on the picture to view it larger}  I used several cartridges for this: Mother's Day 2010, Celebrate with Flourish, Picturesque, Elegant Cakes, Straight From The Nest, Gypsy Wanderings, Story Book,  Tinker Bell and Friends and George and Basic Shapes.


The Fence was cut at 4 X 4 3/4 and the grass at 1 3/4 X4 1/4 welded


Happy was cut at 1 1/2 from Elegant Cake and decorated with stickers.


The butterfly corners were cut at 1in and the butterfly at 3.  The letters and numbers were cut at 1 1/4 and 1 1/2.


BDay was cut 1 1/2 and 1 1/4.  All the paper is K and Company, Tim Coffey's Cottage Garden and on this page matching 3D stickers. 


The banner was cut at 1 1/4 and the floral was cut at 4 1/8, embellished with brads and stickles.  I also used a Martha Steward punch and some ribbon.  Mama was cut at 2 X 5 1/2 and also embellished with stickles.


The flowers were cut at 1 and the butterfly at 2.  The vase and other butterflies were stuff I had in my drawer.


The scrolls were cut from StoryBook at 1 1/2 and the Happy Birthday was from Gypsy Wanderings at 4 1/2


It was all put together using the Cinch and 1in wires.

May 18, 2010

Picturesque Cherry Blossom


You can view the video above on the blog or double click on it to view in youtube.  I cut the Cherry Blossom using some fruit roll up as my medium.  What is cooler than making edible images especially for or with your little ones? 

It even cut out the cute little circles within the cut.  It just had to be picked out.

May 16, 2010

Picturesque Tulip Cake

I posted my Picturesque Tulip Cake the other day but, what goes into it? I think you grow a greater appreciation for cake decorators when you make your own.

First, you need to select what type of cake that you want. There are so many different types of cakes that could be made. And although you would think that everyone's favoite would be chocolate...it is not! Some people do not like chocolate cake. Stranger so is if they love chocolate but, not chocolate cake. hmmm yes there are those out there. For this cake a white was selected but, it was not a wedding white because I used whole eggs and butter rather than egg whites. It made it not a true white.


After I baked the cake according to the recipe, I let it cool on a rack.  Afterwards, I leveled the cake with a knife and sliced it into layers. 

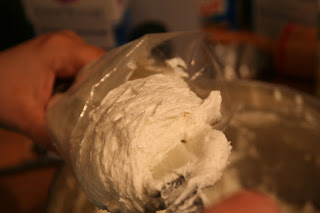
As I wanted to add a filling, I made some buttercream frosting from scratch for the outside of the cake and a bit for inside. I put it into a bag with a tip to be able to pipe it more evenly.  I spooned it into the bag by folding the inside of the bag out.  It makes it a lot easier to get it into the bag with not so much mess.


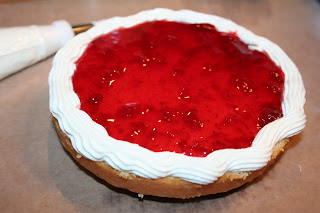
I piped some frosting on one of the halves creating a well to put the filling in.  This helps to avoid the filling from oozing out of the cake. 


Now it is time to add the filling!  For this cake the flavor of choice was strawberry....yum! 


Now it is ready for the other layer to rest on top and it will seal the strawberries inside the cake. 


On to the next step which is the crumb coat!  This is where you put a thin coat of frosting on the cake and unfortunately the cake crumbs will mix into it.  Place it in the fridge for a few minutes to set. 


Now the real fun starts!  Your final coat of frosting goes on and smooth it over. As you can see, the above picture is more bumpy.  Apply your buttercream and smooth it over with a clean knife to get it smooth.  I would dip my knife in a glass of hot water and wipe it clean.   

I used the large star tip to put a decorative bead around the border of the cake as well as the bottom.  I also added my decorative cuts that I made out of gum paste.  Those were cut from the picturesque cricut cartridge. 

Below is the final cake. 


 You could also add some cuts to go around the sides of the cake but, I opted to keep the focus on the beautiful tulip cut on top.  My son sure was eyeing up the flower and spied that for his plate.  The cake was a huge success!  Not only was it quality time with my family in making it but, it was also something to talk about and it tasted great too!  It was overall a huge hit! 

Be sure to become a follower by clicking on the 'follow' button on the right hand side.  Also, please add my botton to your blog.  The button can be found on the upper right hand side of this post.

May 15, 2010

Picturesque Cake


Here's a yummy cake that I made from scratch including the buttercream frosting.  Considering that I have never had any cake decorating training, I think it turned out pretty cute.  I did not do a fondant base on this cake instead I used buttercream.

I used the Picturesque cartridge.   For sizing details, see the youtube video just click here!  Come back Sunday to see more on the making of the cake.