MyFreeCopyright.com Registered & Protected

June 30, 2011

Make your own Smash book!

Hello!! This is Kim from Ricketts Cricuts! I have been hearing about Smash Books on several blogs but haven't seen them in the stores where I am yet so I decided to make my own! I love notebooks and have them for everything! Bobbi Jo SweetSassyDiva was really nice to send me a youtube video explaining what a smash book was! I fell in love!! I always check the adorable notebooks in the dollar bins at Michaels and Joanns and found a really cute hot pink and white striped notebook. It has a little green turtle and a postmark on the lower corner. I knew that I could turn it into a smash book! Here is how I did it:
Here is the notebook from Michaels!
I added the red double sided tape for some rick rack.
I added some green rick rack!
placed my cuts on my E2 from the Life is a Beach Cartridge
Placed my paper accordingly!
Here are my cuts ready to assemble!
Here is my Smash Notebook ready to fill! :)
I added some white faux stitching with my new gel pen!
Now that my Smash Book is done I can fill it with all my treasures! I hope you like it! I know I sure did!
If you want to see more of my creations you can check out my facebook page here;!

Dont forget to come back and check out all the other Sweet Sassy Diva Design team projects! They have some amazing creations!

Happy Crafting,

Kim <3

June 29, 2011

Just Call Me 'Sketch'y!

What a whirl wind weekend I have had! We got back from Valdez Friday night at around 11:30pm and then I threw a baby shower for my sister on Saturday. I still have things that need to be unpacked and put away. I will get to that today. I enjoy having my house in order so it just kills me to walk in and see stuff that is not where it is supposed to go. At least the sun is out today and I can enjoy my day with no where to be. This week was a stripes theme. I signed up for this with one project in mind but then decided to use another. Funny how that happens. I have been putting together a scrapbook for my sister and her soon-to-be-born baby. I am just doing the pages and leaving it open for her pictures and journaling. For this 2 page layout I went with a sketch I found on the Sketch Savvy blog She has a ton of great sketches. Its nice when you need a little more of an idea. I have not done a scrapbook in forever so I too needed a little boost in the idea department :D ~*Jen*~
Picked out my paper. This is from K&CoGot my ribbons all picked out...


Started to lay it all out...


Put my top pieces on over the ribbons


And this is the part where you think your done but something is missing
AHHHHHHH faux stiching...there we go!

~*Recipe*~


~*K&Co Carstock

~*Core'Dinations Cardstock

~*Ribbons

~*Photo mats from SweetSassyDiva scrapbook kit 

~*White gel pen

June 28, 2011

Firecracker!

Hi everyone! This week at Sweetandsassydiva we were asked to design something using stripes for the 4th of July. I knew exactly who I had in mind when I started my project. I have an Aunt who is a "Firecracker" lady, so I decided this would be just for her.
This card was simple and easy to make. It was inspired by Card Maker, Folding Techniques magazine. I am really liking that magazine.
The card itself is a 4x6 that I rounded the edges on. (red is DCWV neutral stack) The blue background is a 3 1/2 x 5 1/5 also rounded. The dress is made from scallop flowers cut from the lacy labels cartridge. (paper is from DCWV Nantucket stack) I cut 2 flowers at 3, one at 3 1/2 and one at 4. Then I folded them all the same way...which I will show you now ;)
First fold in 1/2
Then fold in 1/2 again
Now that gives you your middle, you are going to fold down each edge towards the middle.
That's it...all of the folding needed. For the top of the dress I turned one of the 3 in folded pieces so that the folds were on the back and the scallops were on the top. For the dress portion I layered them so that the folded pieces made a line on the front, and folded the very bottom scallop under. I used some ribbon and a flower for the waist and added a few self stick gems for more color.
It is a very easy folded piece to make, even easier since we can cut it with the cricut. This dress looks cute in pastels for little girls, and whites for wedding dresses, and can be dressed up many different ways. I hope you try it out. Have a safe and wonderful 4th of July.
*recipe*
Lacy Labels cartridge
DCWV Nantucket, neutrals stack
misc. ribbon
self stick gems
small flower
blue ink for edges

June 27, 2011

Patriotic Stamp!

Hi Everyone!  It's Liza from Hoo's
Crafty!
   Very excited to be back here on SweetSassyDiva for
another wonderful project week.   This week we are doing STRIPES for
the 4th of July.  When I decided to do this, I thought....sure, that's
easy!  Three colors, some stripes, some stars, tada!  Oh, but the
catch..... TRY NOT TO USE STARS!   My brain froze.  How do you do
4th of July without stars???

After some thinking and staring at the wall I knew exactly what I wanted to do!


I decided to make a new door hanger for the holiday

I used Recollection, DCWV and Core'dinations papers
Gypsy Wanderings for the postage stamp cut {11.25"}
I hand cut the white mat {9.75" x 9.75"} and layered that with the blue mat
{9.75" x 5"}
I did ink the edges of those mats with Tim Holtz distress ink before adhering
together.
I cut a border from the kraft paper with a Fiskars punch and placed it below the
blue mat.
Wrapped red bakers twine around the bottom of the white mat to add some color
and texture.
I added some faux stitching all the way around with a white marker.


The red and white stripes were cut {1" x 5"} and {1" x 9.75"}
I doubled up on the reds and placed 3D foam between to give those stripes more
dimension

For my medallion,  I made an accordion fold rosette from some patterned
paper.  I used two {1" x 12"} strips glued together. 
For the number I used Sweet Treats with REAL DIAL SIZE {2"} and did some faux
stitching in white.
The letters were welded together on the Gypsy using BATMAN font {1.25"}, faux
stitched and layered onto the number.


The rocket cuts are from Designers Calendar {2.25"} in varying colors.  I
popped up the center rocket for dimension and added some white dots with a Gelly
Roll pen.
I tucked those in behing the rosette and adhered down.


As you can see...I stayed away from the stars by using white buttons.
I added some polka dot grosgrain ribbon from SU! to the back and proudly hung on
my front door.

Hope you are all having a wonderful week and have been coming back to see some
of these great projects from the Design Team.   Visit me over at Hoo's Crafty! to see some more of
my projects.


You can get baker's twine by Clicking Here! be sure to tell them that sweetsassydiva.com sent you!

June 26, 2011

Stripes for 4th of July Challenge!

Hi!  Lori here from ScrappinMyStressAway!  My challenge for 
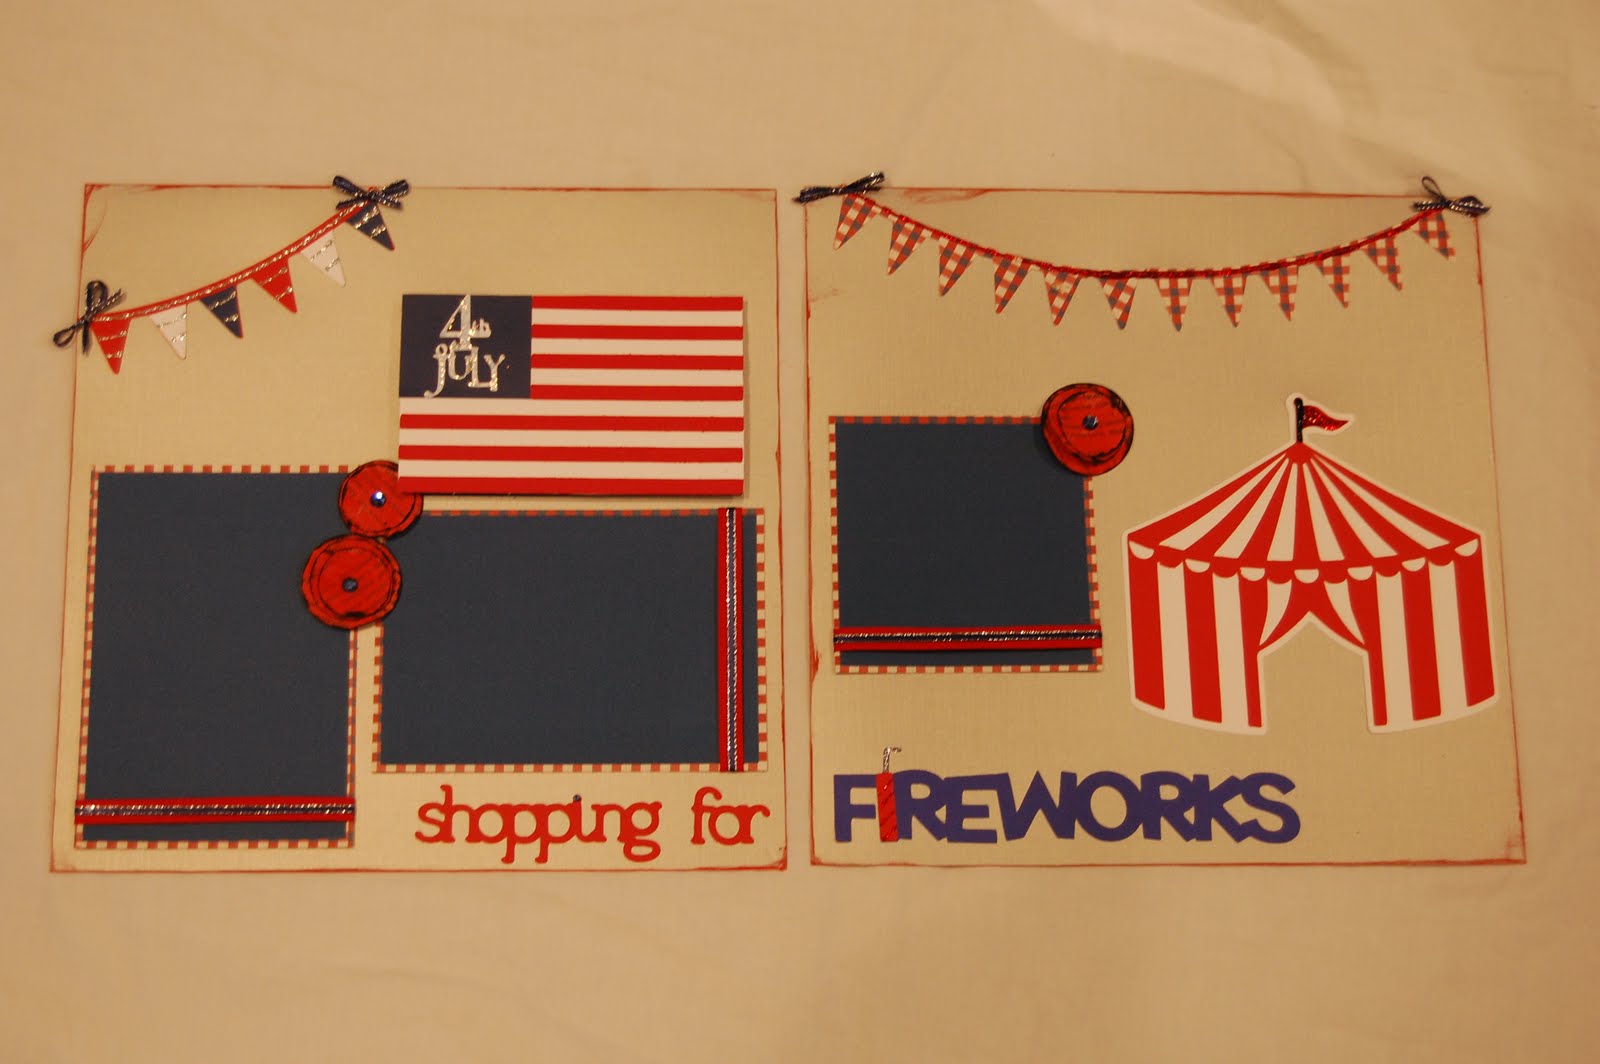
SweetSassyDiva was to create a 4th of July project using stripes but no stars.  This was not as easy as I thought it would be!!  I started out thinking about making a card and was thinking about the flag without using stars.  I thought it was too plain for a card, so I merged this idea with another one I started a while back ~ a layout about shopping for fireworks!

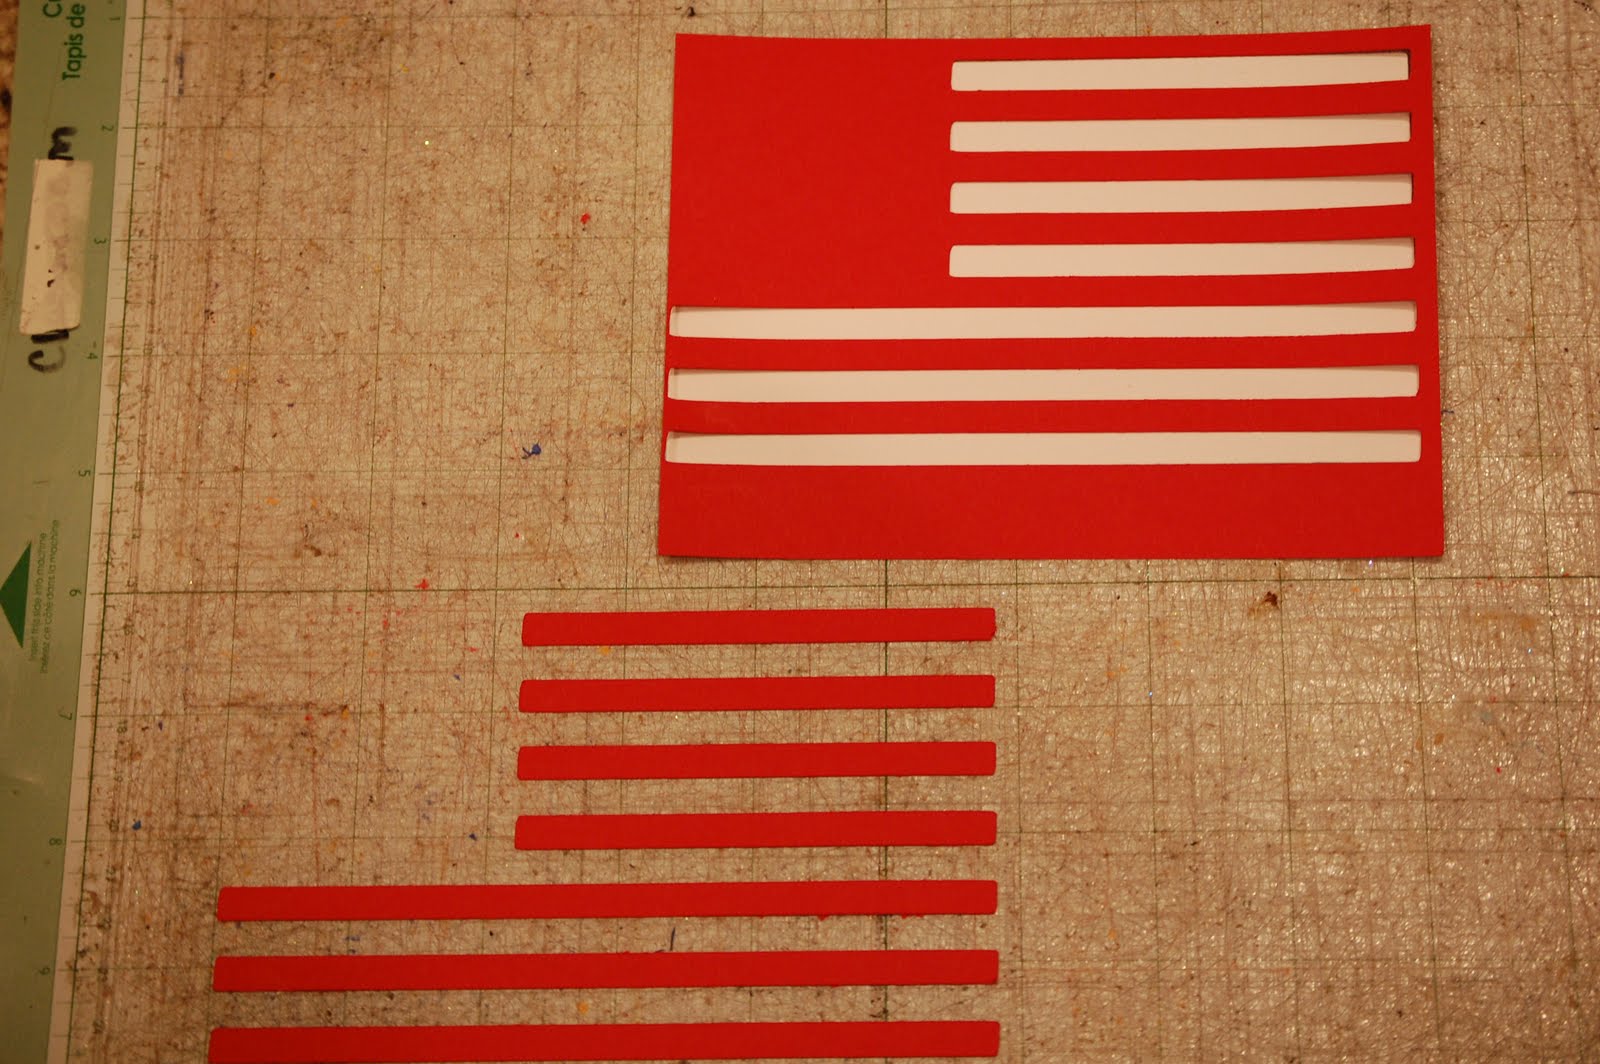
I found this flag on Independence Day and cut it out at 5.96w x 3.50h.  I cut out the flag in white and stripes in red.

I cut out 4th of July from Stand and Salute to fit in the square where the stars would go.  I wasn't sure if I was going to put white on blue or blue on white, so I cut out both.

I ran the stripes through my Xyron.

I used the negative piece as a template to adhere the stripes to the flag.

I pulled off the negative piece.  As you can see, I leave the pieces on the mat until I am ready for them.  This way I don't lose anything!!

Nope....did not like this look!

Much better!  But the blue looked too long, so I looked it up online and realized the first long stripe is white.  I trimmed the blue and resized and recut the 4th of July.

Then I cut out the tent and banners from Carousel.  The tent is sized at 6.58w x 5.75h..  I cut out the banner at 5.67w x 2.23h.

I cut out the base of the tent and more banners on the next layer.

I used the font on Batman for the word FIREWORKS at 1.31h.  I cut an extra I in red and welded a fuse (a lower case L from Lyrical Letters) to the first L.  I welded the fuse to the L and welded the word together.  I welded and cut out the words shopping for (at 1"h) from Lyrical Letters

I cut apart the blue and white banners and glued them to the red one.


I took these circles (3 different sizes) that I punched out from a thesaurus.

I crinkled them up.

I painted them red with acrylic paint.  I used a little black paint to ink the edges.

I layered them into flowers with a blue crystal in the center.
I took my flag and made it into a secret journaling flap.  Or maybe I will have an extra picture to stick inside...

I like hidden photos and journaling!!

Here is my little firework.  I used stickles to stripe it and to cover the fuse.

I inked the edges of the paper with red paint.  I added stickles to the 4th of July.  I added stickle stripes to the banner.  I also added a stripe of ribbon (or two) to the photo mats.

Here is the other page.

In our family, shopping for fireworks is a big tradition!  My husband (biggest kid in the family) goes as often as I allow him to!!  We have a big party every 4th!

Now, what to do with my discards and scraps.....well make a card of course!!

  
I kept with the stripe theme and glued down some stripes.

I took this scrap and just cut out three circles.  I crinkled them and inked the edges with black paint.

I added some gems and the white 4th of July (the one that was too big for the flag)!

Thanks so much Bobbi Jo for having me on your blog for the 4th of July Stripes Challenge!!!
,