MyFreeCopyright.com Registered & Protected

November 22, 2011

Pre-Black Friday Deal!


If you're in need of a some pre-Black Friday savings, the Cricut Cake is now on sale for $49.99 (reg. $199.99) at Cricut.com!

I'm thinking that it would make a great Christmas present!  I know I'd love to get it for Christmas! 

November 20, 2011

Disney Blog Hop!


If you arrived here from Kim then, you are in the right spot!  I am honored to be a part of this blog hop that Shawn and Melissa so graciously are hosting.  If you arrived at my blog first, please after enjoying my project, go to Shawn's site.  I know you will not want to miss any of the amazing projects that all the creative and tallented bloggers have created over the two days.

For this hop, I created a 12x12 scrapbook page layout titled "Here Comes..".  I am working primarily with the colors of yellow, black, white and red.  I did however throw in some blue this time around. 


I used cricut cartridge sweethearts for the font and my trusty hide contour that is on the Gypsy. I really like this feature. Unfortunately, it doesn't have a shadow feature. I cut out one in black and yellow. To mimic a shadow feature, I off set the two and viola! The clear rhinestones gave some additional bling to the title.


I took the straight candy striped ribbon from my stash and made a bow.


I cut three shadow Mickey head icons an inch smaller than the next. This cut is from the cricut cartridge Mickey font.


On the bottom left hand side is a candy stripe journaling tag.


Above is the full 12x12 layout. Doesn't he look dapper sporting his hat? He's just waiting for three photos for the black mat.

Can you guess which Cricut Cartridge was used to make Mickey's hat?  I bet you know how to search for that now.  If not, the secret is on Shawn's site.  I can tell you that from my personal experience that while the Gypsy has a search feature, mycutsearch pulls up more choices. 

Papers:
Ek success Mickey paper pad
Creative imaginations black streamer and Red star sheets
Pinecone press papers happy memories
Stampin up Crushed Curry cardstock
White cardstock

Now on to Blog candy!  We have a GRAND PRIZE for this Blog Hop donated by ContainYa Crafts! You can have YOUR CHOICE of a Scrap'n Tote or a Scrap'n Easel! Each blog in this two day hop has a special letter, and when all of the letters are put together they spell out a secret phrase.
Once you have stopped at each blog in the hop and collected all of the letters, simply email the phrase they create to bloghopcontests at gmail dot com. All entries must be in by Midnight on Monday, November 21st. The winner will be announced on Tuesday, November 22nd at http://craftychicsblog.blogspot.com/

Be sure to check out the next stop to find out the next letter.  Jenny is next. 

I hope that you will become a follower of my blog if you haven't done so already.  Each day we have a new project and this week the SweetSassyDiva Design team are working on a Thanksgiving DT challenge.  Be sure to check each day to see what wonderful creations we are sharing with you.  Also, be sure to collect letters along the way during this blog hop.  My letter is M. 

I hope you have a wonderful Holiday season and a joyous Thanksgiving as well this week.

November 19, 2011

Thank you for being my Friend!

It's time to say thank you....or what I might be thankful for. This project wasn't hard it was just hard to narrow down. I'm thankful for a million things. Counting my blessings is a daily event around here.
So I'll show you what I come up with...
As you can see I made a little box ;) (It's going to be filled with something yummy!) I followed the directions from my scoreboard.
I used 2 pieces of DCWV cardstock from the new fall stack...I cut them both to 8x8 size. I scored one sheet at 2 in and at 6 in, turned it and scored it again at the same 2 and 6. Then cut 2 folds on each side and glued together.
The lid is off set by 1/8in...if I remember right. I again scored at 2 in and then 6 1/8...repeat same as top.
I cut a tag from Tags bags boxes and more...stamped it with a sentiment from Studio G in Brick red ink from dew drop. I used some fuzzy ribbon, blue stick ons, and a blue flower from K&Company.
Now just to make the yummy stuff to put inside it...either rock candy, fudge, or some sort of cookie....and then to hand it off to my friend.
Thanks for looking. I hope you chose to sweeten up your friends this year.

*recipe*
DCWV fall stack cardstock
K&Company chipboard flower
Cricut cartridge, tags bags boxes and more
blue stick on gems
ribbon

Angie

November 18, 2011

I am Thankful....

I have been so crazy busy this week its just been....crazy! We got almost 3 feet of snow! I have plowed our driveway 4 times and now need to plow again! I am starting to wonder when it goes from doing the job of plowing to just playing around...tee hee hee. I was trying to think of a project I could do this week but was just at a loss. Like I said I was just so crazy busy I really didnt have time to draft for myself. So I thought I would share the card I made his week for an order. I have also picked up my crochet hook and started filling orders for my flower headwraps. I am Thankful for the oportunity I have to use my skills and hands to create. Not only to create but to be paid to create. I am a lucky girl!


November 17, 2011

My 3 Little Pumpkins...

Tis the season to share what we are thankful for and that is the theme for the
Design team this week at Sweet
Sassy Diva
.  I knew right away that I wanted to share how thankful I am
for my three granddaughters.  They are such a blessing and mean the whole
world to me.  They make every day such a joy and I love being a grammy.
 So here are my little blessings that I am so thankful for:
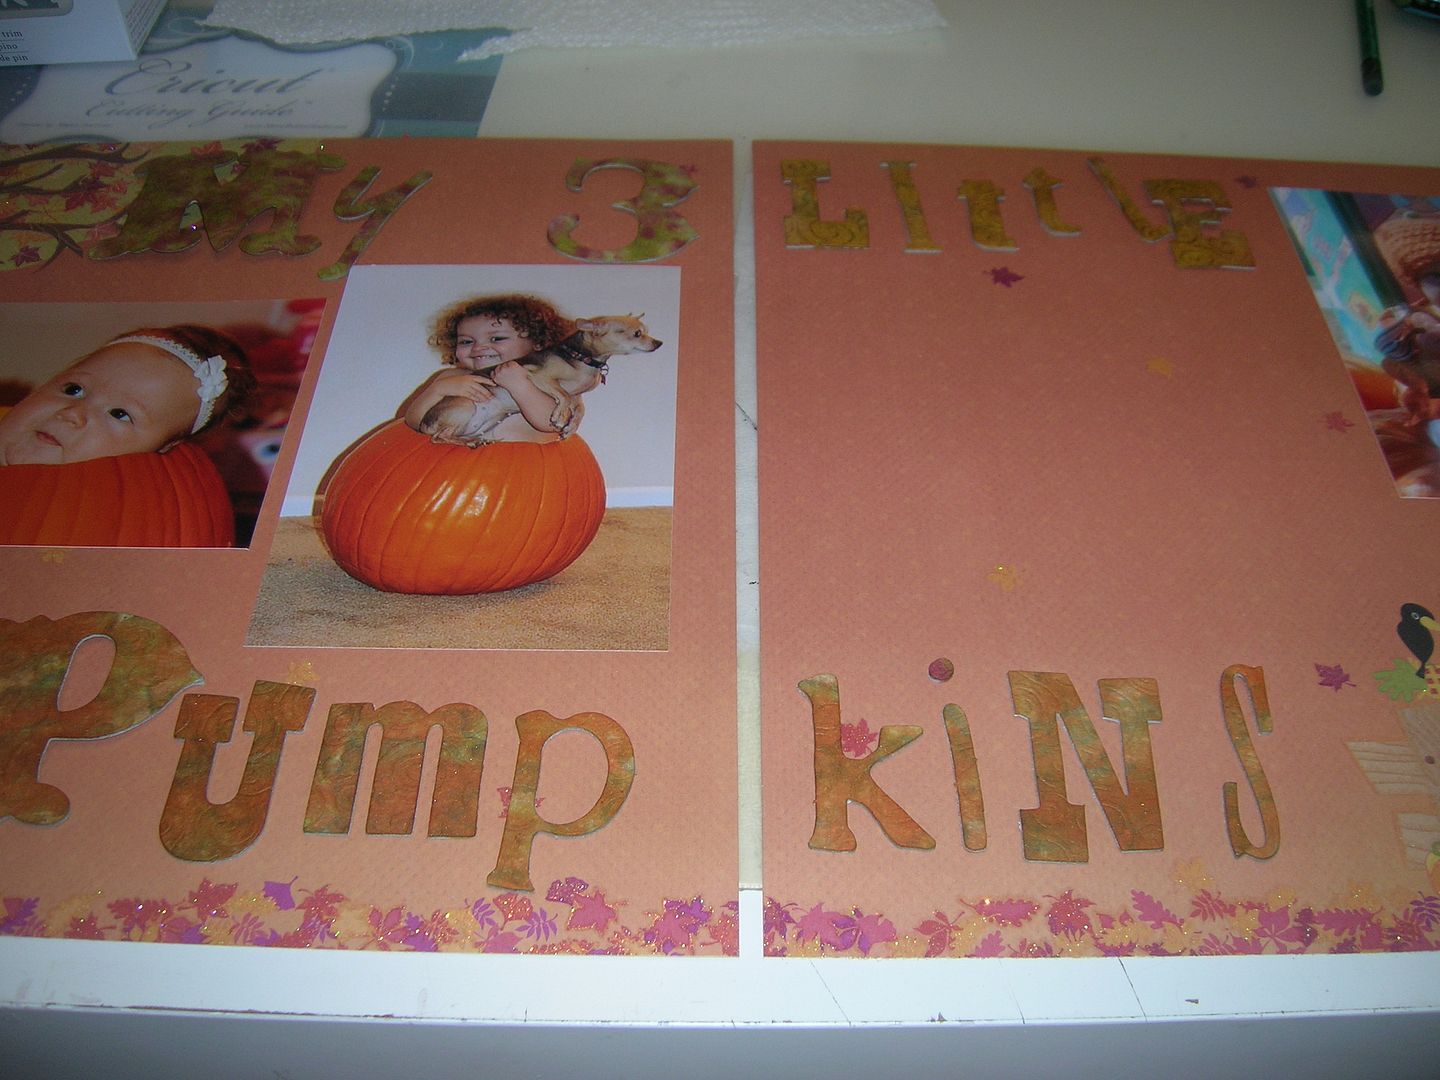
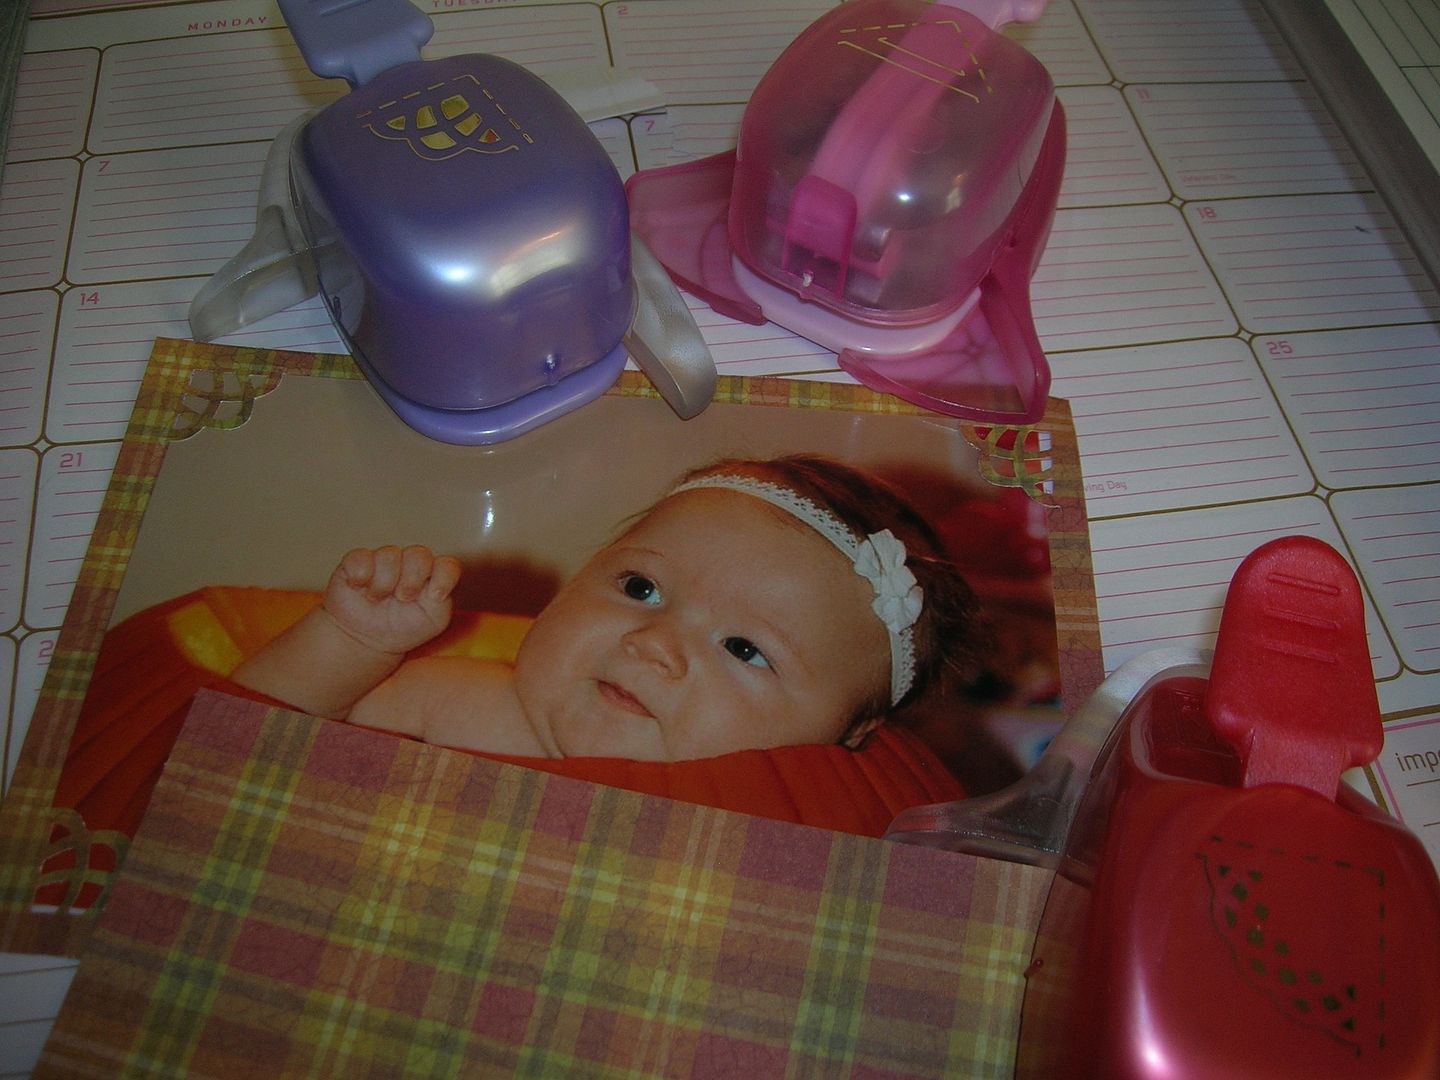
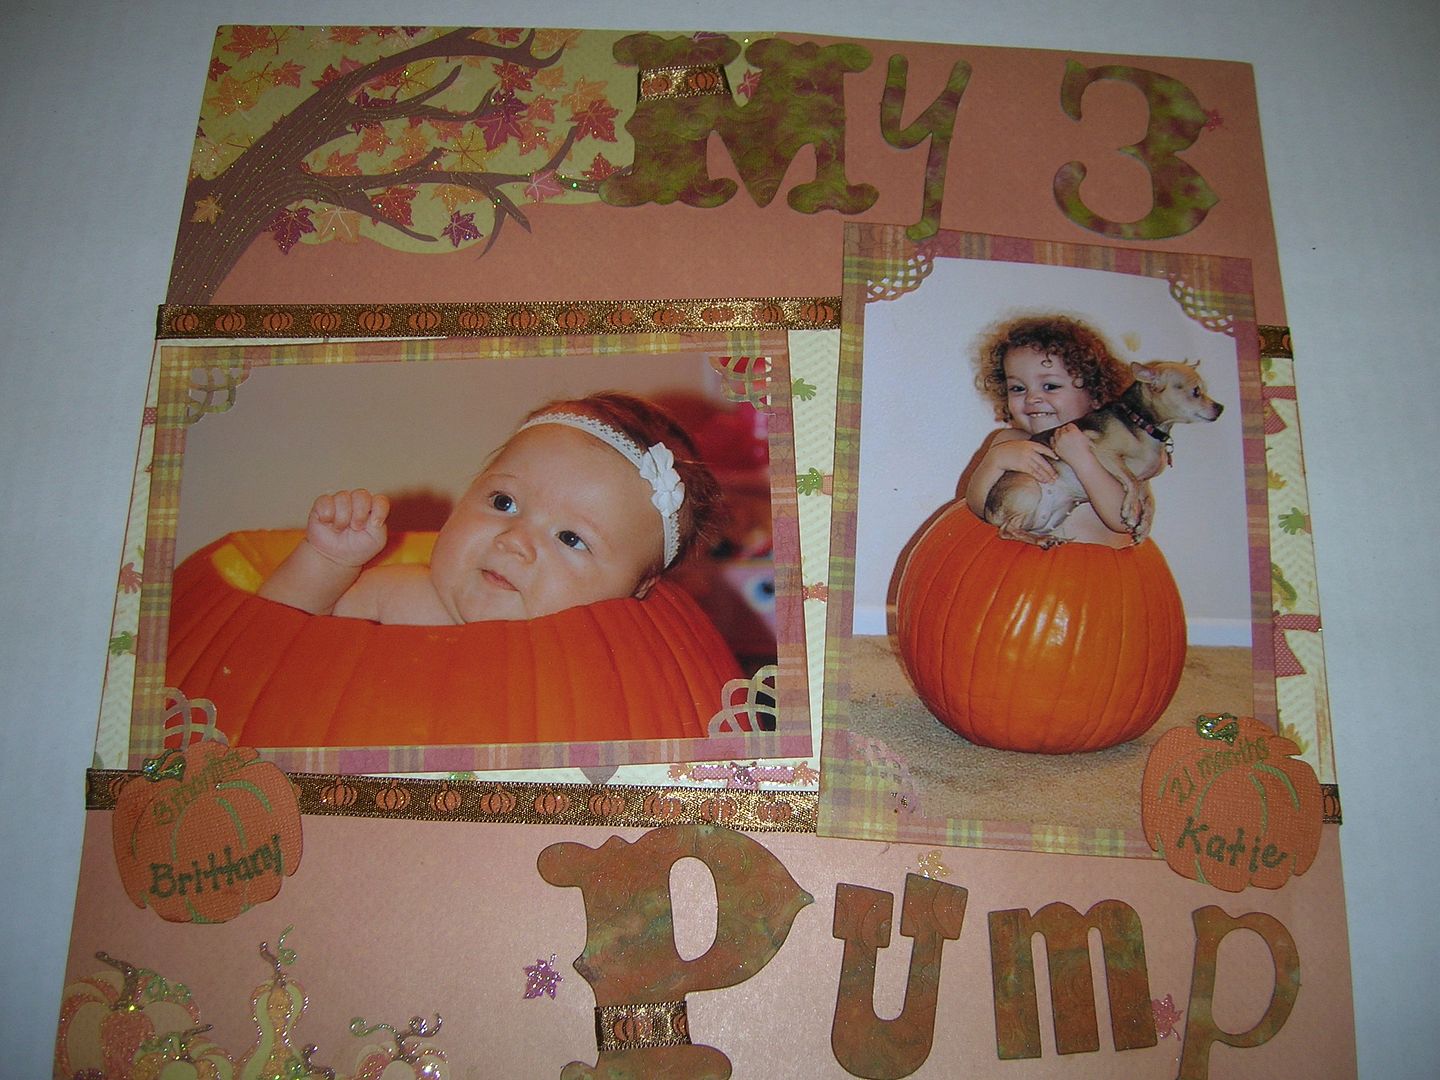
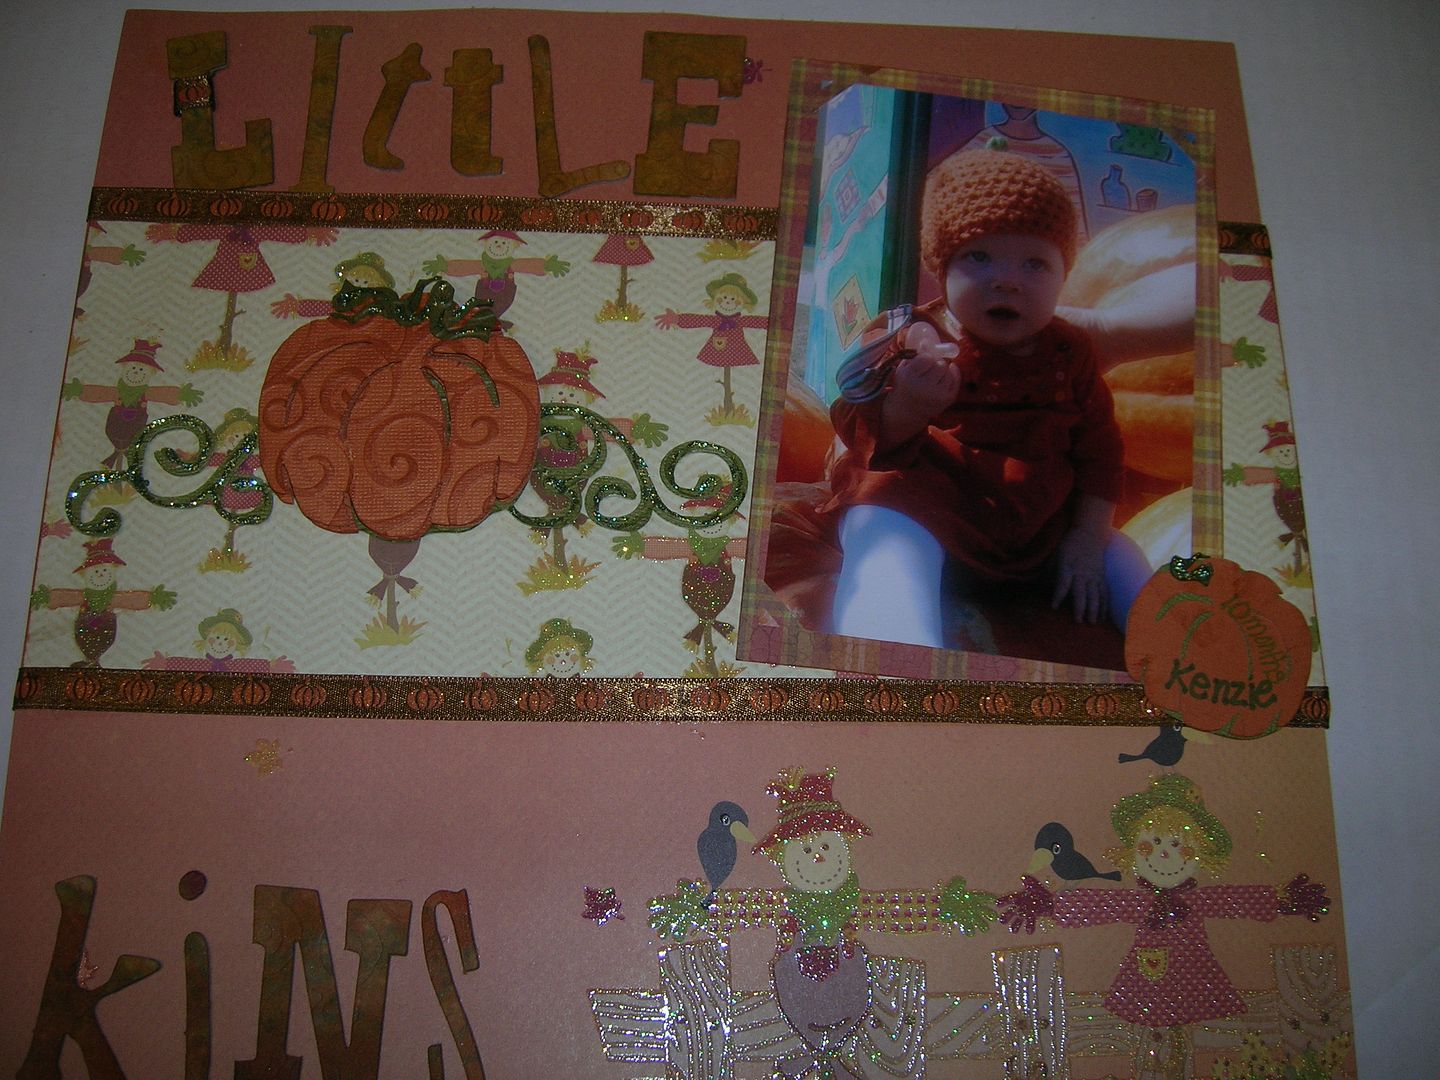
My 3 Little Pumpkins- Brittany 3 months, Katie 20 months and Kenzie 12 months.

Here is the completed two page layout.   
The paper is Paper Best Creations Hello Fall paper from the local LSS.

Months ago I bought a bunch of Tim Holtz grungeboard and I have been enjoying
using it recently with Alcohol Inks and Glimmer Mist.  Here is what the
packages look like.  I got mine at Tuesday Morning.
I inked the mixed letters with Alcohol Inks- yellow, orange, copper, citrus and
cranberry
In this picture I am laying out the letters and the pictures to see how
everything is fitting.
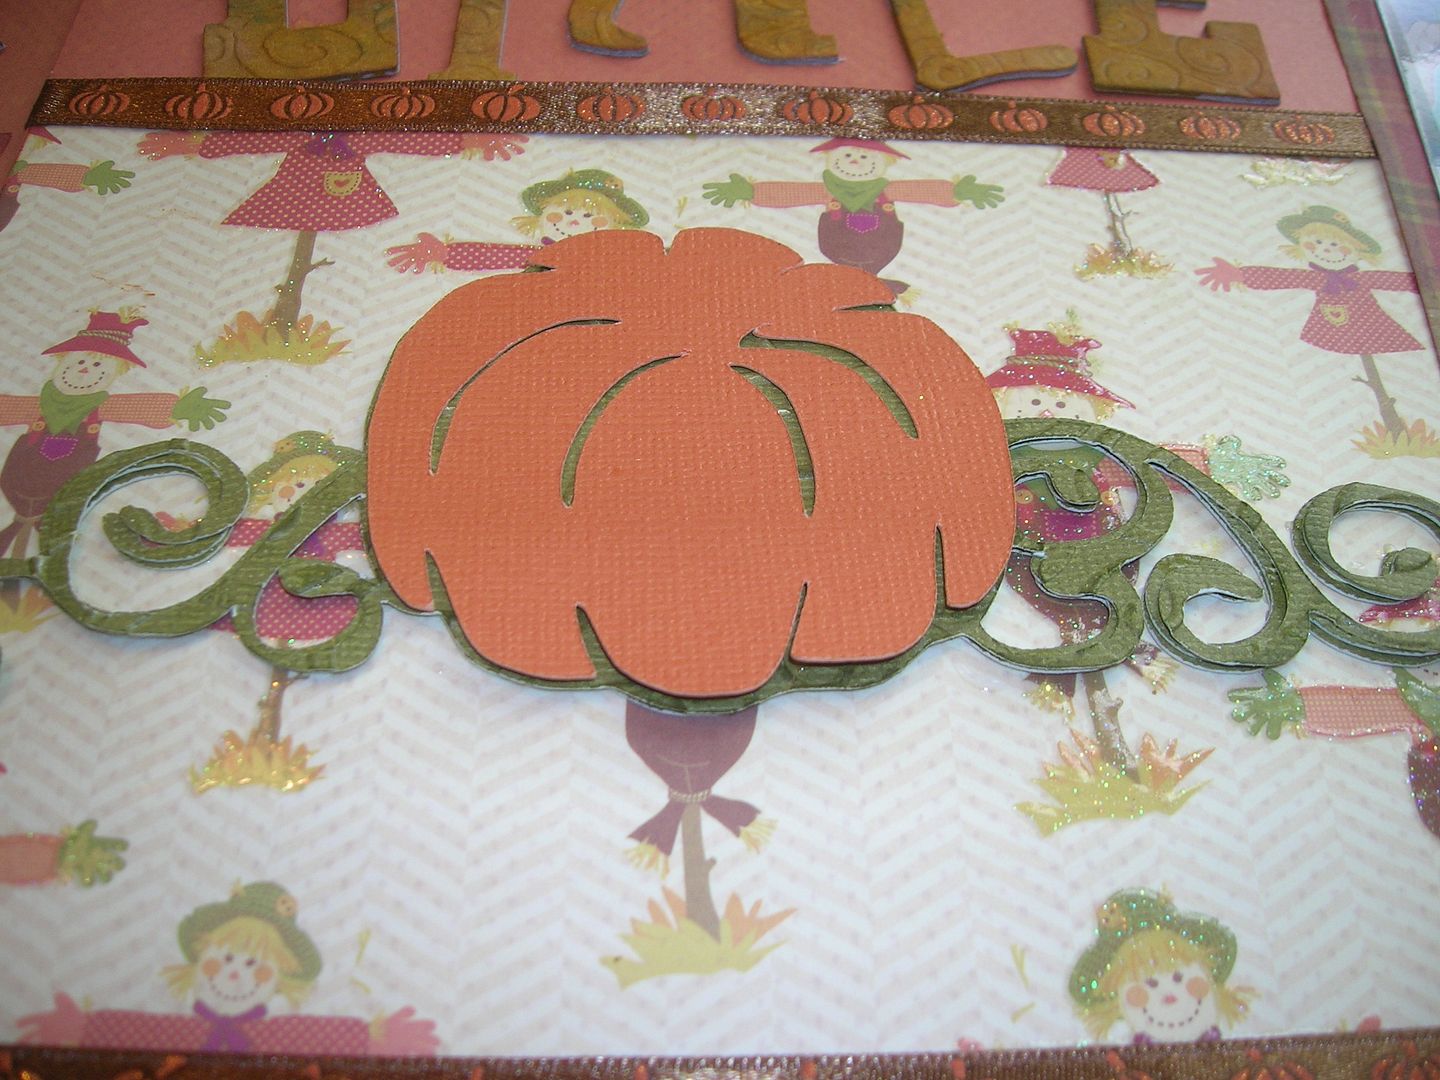
Next I made the pumpkin and flourish from the Thanksgiving cart.  I cut
both pieces 3 times.  I embossed the top flourish and pumpkin and pop
dotted them to give them dimension.
This pic is before I added the embossed pumpkin.  
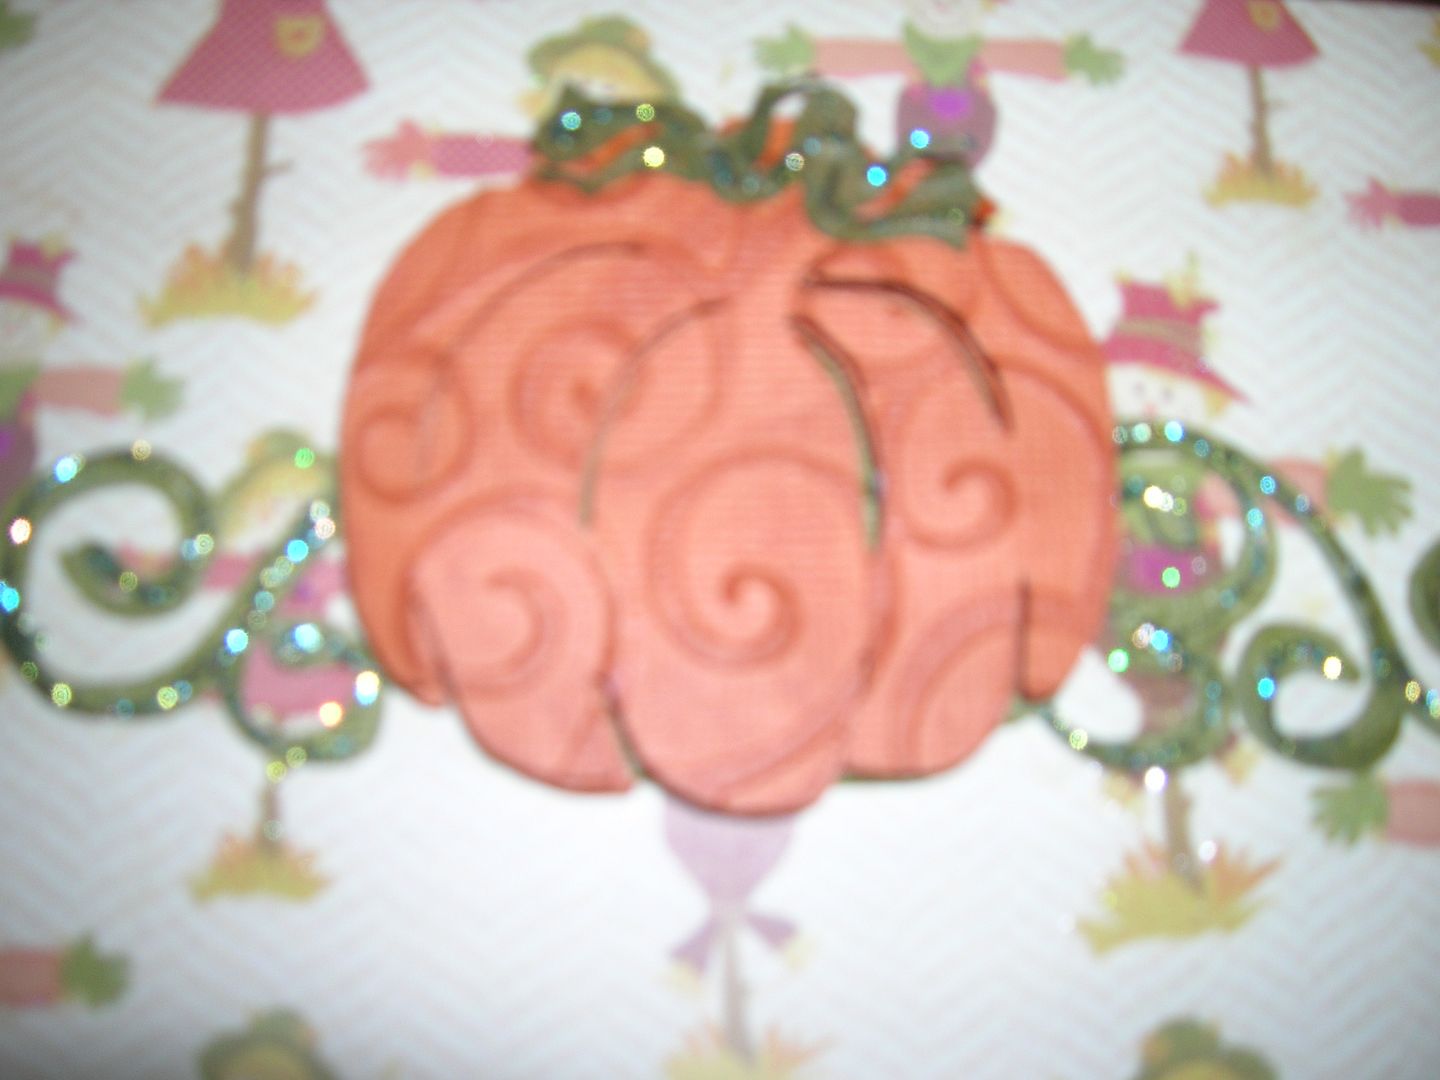
The leaves on the top of the pumpkin cut out with the pumpkin so I used an olive
color Sharpie to color them in.  My Gypsy has gone back to PC so couldn't
hide the shapes and cut them out separately.
Here is embossed pumpkin and then I added Tim Holtz Rusty Hinge ink and
Stickles.
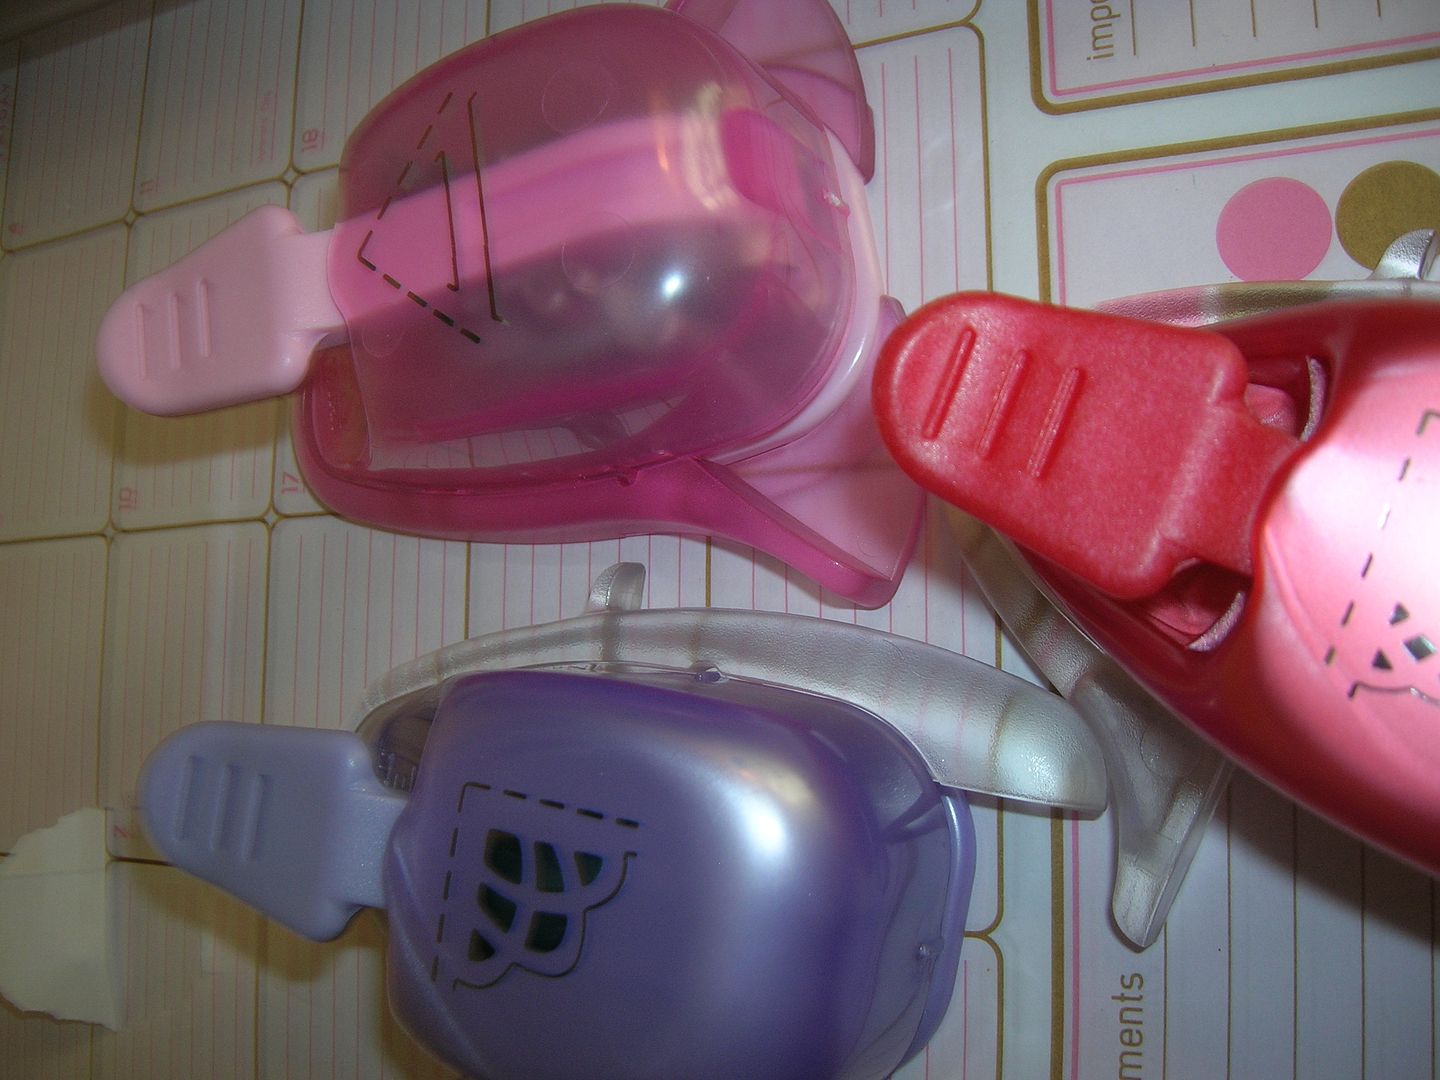
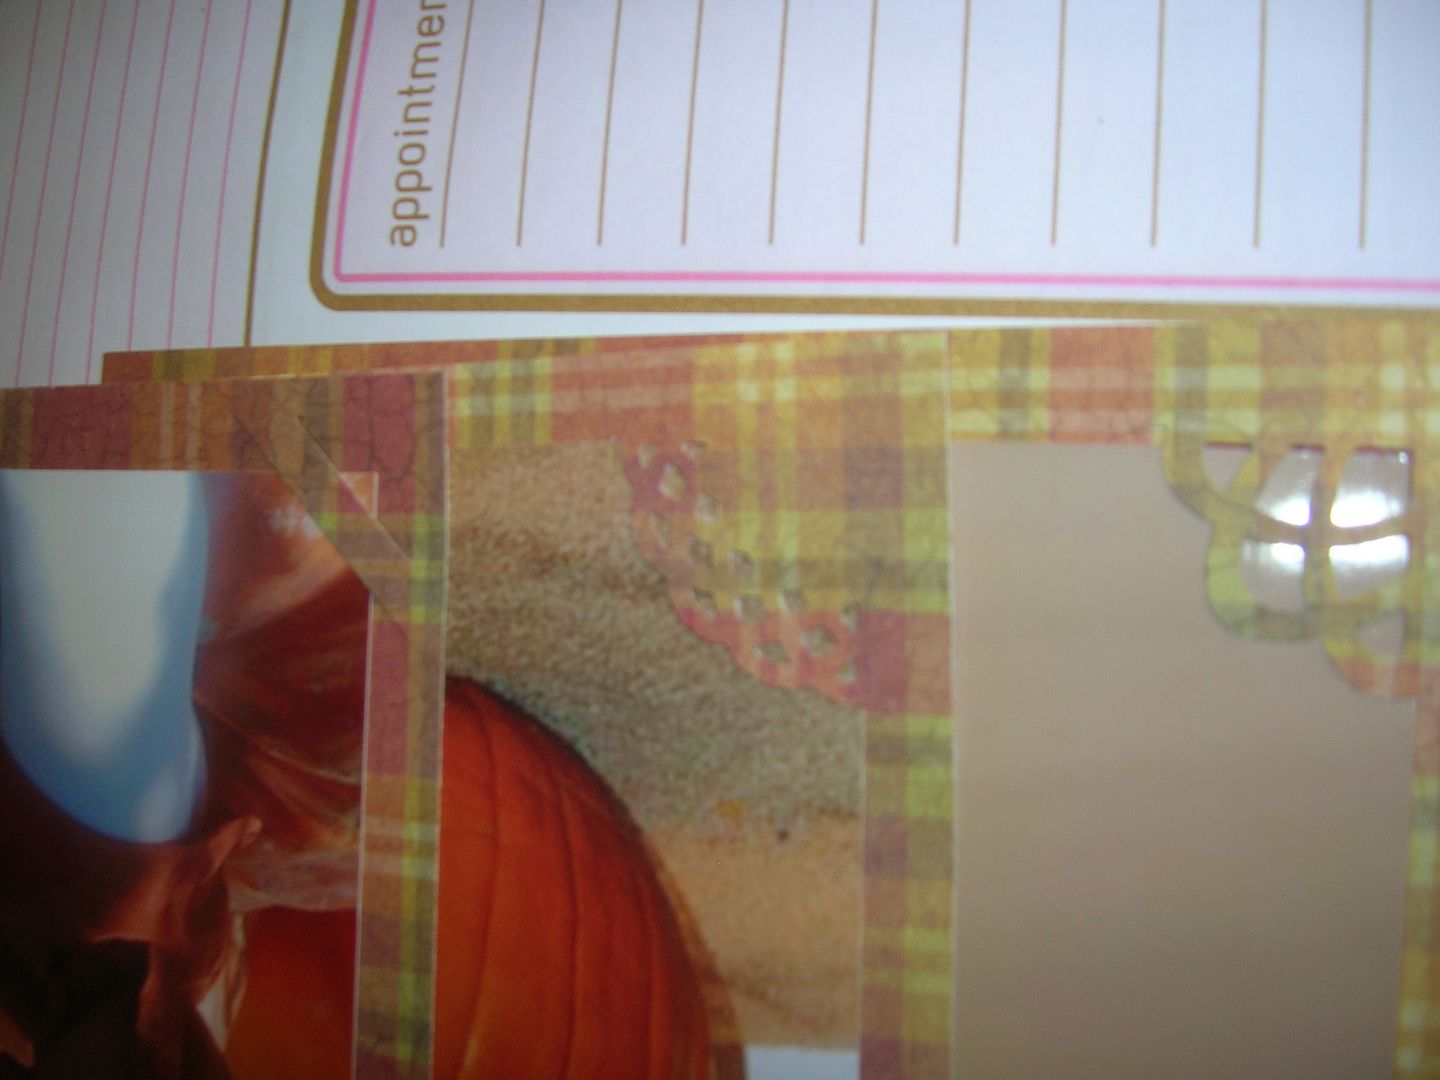
Not sure if you have seen these punches before.  They are called Paper
Shapers punches by EK Success.  I got two at my local LSS and one at
Joann's. I had never seen them before until I took a class at the LSS.
If you look really careful at the paper you can see the three different corners.
 You cut the paper 1/2 inch larger than the picture and then punch all 4
corners.
Then your picture or mat paper slides right in.  
I also cut out three of the same pumpkin from Thanksgiving Cart at 1.5 inches
and hand wrote the girls ages.  I added a little pumpkin ribbon I had in my
stash and everything was put together.
Hope you enjoyed the layout and tutorial.  Would love to read your
comments.  Please come back and join us all week at Sweet
Sassy Diva
to see what else the Design Team has come up with.
Happy Craftin!

November 16, 2011

Dress more than the Turkey!

Hello everyone, Mindy from Grammies Craft Room with a quick project for your Thanksgiving table.


The base for this place card is a tag from Once Upon a Princess. In my Gypsy, I placed two tags, sized at 3.5" , lined the up so one was directly on top of the other one - the lines will turn yellow - then using the arrows, moved one tag up so the 2 just overlap. Hit the weld button and you have a shaped tag .


I cut a strip 3/4" x 3 ", folded the ends and attached to the inside. This will help keep the tag open.... I hope :)


For the cornucopia, I again layed it out on the Gypsy - it's from Celebrate With a Flourish - and cut all the layers at 2".  I cut a small piece of patterned paper to put in where the leaves were going to be.I did some embossing and used a few glitter gel pens to add some zip.


Supplies :
Cricut Once Upon A Princess
Cricut Celebrate With Flourish
Scraps of card stock
Glitter Gel Pens


Remember to check out SweetSassyDiva all week for lots of great Thanksgiving projects !

November 15, 2011

Thanksgiving Blog Hop!

Welcome to the Thanksgiving Blog Hop!!


Thanksgiving Hop


We're so happy you could join us for this super-fun hop showcasing cards, layouts and projects that feature everything to be thankful for!!  You'll find an array of ideas throughout the hop -- From decorations to gift ideas and more, we hope you'll enjoy each and every project along the way!!

If you've just popped in to visit my blog or are reading this via email and you'd like to join our Thanksgiving FUN, then please CLICK HERE to start at the beginning with Lynda's blog because...  It's always FUN to start at the start!! :)  This is a TWO-DAY hop, so be sure to catch both days for maximum ideas (you'll find the entire line-up below my post)!!

I thought about what would be an ideal Thanksgiving project.  The more I thought about what I am thankful for and what the holiday is all about, it came down to doing something with and for my family.  So, I decided that a favor would be an ideal project to make and what better than to make it with my family. 

My darling son has been wanting to make cake pops and keeps on me about making some more.  I decided to try out a new recipe and after mentioning it on facebook this week, I was encouraged to share the recipe.

For the hop today, I've created some yummy cake pop favors .......


cute Pumpkin cake pop favors!

I took a package of the spiced chai tea and added some spice to my cake mixture. 


You just open up the package of the spiced chai package (do not make it as tea), add it to a box of cake mix with a can of pureed pumpkin and 3 large eggs.  Mix the ingredients using a hand mixer on medium for 2 minutes.  Then, bake your cake according to the boxed cake. 

My darling son liked it as is but, I also enjoyed it with chopped walnuts and raisins. 

I dipped them in tinted white chocolate and used a pretzel stick for the top.  The bottom is a white cake pop stick that you can find in the cake decorating section.

Now, I was going to package them and put a cute tag on them but, I have to say that my family was eating them about as fast as I was making them. To say they were a hit, is an understatement.  :) 


How precious would these look on your Thanksgiving table! wow!

If you would like to purchase the chai tea product or any other chocolate items, please email me.  You can see the products by Clicking here!

For blog candy, I am offering up one envelope of the spiced chai tea to one lucky blog follower who posts a comment on this post.  If you are not already a blog follower, I hope that you will decide to become one today. 

We are also showcasing projects all this week at http://sweetsassydiva.com/ showcasing "what I am thankful for..."  Be sure to check them out all this week as the SweetSassyDiva Designers have been making some beautiful projects. 

Thank you again for checking out my project...  Remember to visit all the stops for more chances to WIN (simply follow the sneak peek links below)!!