

Tell her SweetSassyDiva sent you,
http://www.pinkbydesignstore.com/Cameo-Giveaway-Win-a-Silhouette-Cameo-no-purchase-necessary.html
May 31, 2012
May 29, 2012

May 28, 2012
Liberty!

I want to share my appreciation that I have for all the wonderful men and women that serve for our freedoms. Thank you!

I made a layout in Red, White and Blue! The heading is "Liberty" and it features the Statue of Liberty, Fireworks and Stars & Stripes!
I made some embellishments using red stitched ribbon, brads and rhinestones. I also added a hat pin with crystal beads for additonal bling!

I used the Stand and Salute cartridge for this layout. On the dark blue firework cut, I used silver metallic ink and sparkling embossing powder. It has a lot of shine and bling. It really shimmers as the light hits it.

Using red and white striped ribbon, I created folds and used rhinestone brads and adhered it to the bottom of the layout. It is reminescent of the flag's stripes especially with the lace star background against the white cardstock.

The word "Liberty" was cut out in dark blue using the shadow feature. I also cut out the word 'Liberty' in red and white layering them over the shadow. By layering it with pop dots, it gives it great dimension.
I cut out a star frame to showcase the picture from 4th of July in white. Using pigment dark red ink and clear embossing powder, I embossed "Those who reach, touch the stars."
Lady Liberty was cut out in red. By using pigment dark red ink and sparkling embossing powder it highlighted her cuts and added shimmer. She was also cut out in shadow using dark blue cardstock.
Please take a moment to send a thank you to our men and women currently serving as well as our veterans and all their families. Thank you for our freedoms and protecting us so that our babies can live in a safe America!
God Bless America!
May 27, 2012
Fire Up the Grill!
Hi my crafty friends, Brenda here from Friends Craftin' with Friends. This week at Sweet Sassy Diva our challenge theme is "Fire Up the Grill". For my project I decided to go with a card. I'm sorry I have no tutorial for you as it was just a simple A7 card. I used Three Birds on Parade and Elegant Edges for my die cuts. I used some white ink for my title to highlight it and I popped my title up. I hope that you are inspired to scrap your Memorial Day cookout pictures. I want to take this time to thank our military, past and present, for the many freedoms that we have here in American. I am very proud of our Soldiers and very proud of my two Soldiers, my son's Lance and Evan for fighting for their country. Please remember our Veterans and our Soldiers this Memorial Day and everyday. Thanks, have a wonderful Memorial Day my crafty friends!!


May 25, 2012
Graduate Layout!
Hi everyone! This is Tina Gale from tiggersscrapplace I have a great layout to share today of my son's senior pics and a video showing how to use the Imagine when you don't have just the right paper for a project. It's really hard to video the small screen so I apologize it's a little blurry but hopefully it will help you learn a great feature of the Imagine. I can't wait to share with you how easy it is!
If you are following the blog by email, please go to http://sweetsassydiva.com/ to view the video.
 Here's a close up of the banner I made with my Imagine. It's cut from the Imagine More cartridge pg. 27 at 1.7 inches. I changed to the patterned paper found on pg. 44. Be sure to check out the video to learn how to do this. It's super simple and fabulous way to save money on patterned paper!
I used bakers twine and buttons to hang it on my page. Their school colors are burgandy, gold, and black so I chose the black and yellow twine and burgandy buttons to tie in their colors.
 The font is from the Old West cart cut at 3/4 inch. I used an extra pennant to put the year on.
 I decided upon argyle paper and the diamond border to complement the banner.
The border is cut at 2 inches from the Creative Memories Reminisce Accents cart pg. 65. This cart has some fabulous borders on it! I cut two of them and pieced together on my layout. You could also weld them on your gypsy or in the cricut craft room before cutting.

 I hope you enjoyed my layout and video and that it helps you try this great feature if you haven't already.
If you're reading this from sweetsassydiva be sure to come visit me at my blog for more great projects. Also, be sure to check out the rest of the great graduation projects from the rest of the design team being featured all this week.
Have a blessed Day
Tina Gale
If you are following the blog by email, please go to http://sweetsassydiva.com/ to view the video.

I used bakers twine and buttons to hang it on my page. Their school colors are burgandy, gold, and black so I chose the black and yellow twine and burgandy buttons to tie in their colors.


The border is cut at 2 inches from the Creative Memories Reminisce Accents cart pg. 65. This cart has some fabulous borders on it! I cut two of them and pieced together on my layout. You could also weld them on your gypsy or in the cricut craft room before cutting.

I used the negative pieces from the border to put across the middle of the page to help carry through the design. Don't be too quick to throw your trash away! You never know when it can be a great addition to your project.

If you're reading this from sweetsassydiva be sure to come visit me at my blog for more great projects. Also, be sure to check out the rest of the great graduation projects from the rest of the design team being featured all this week.
Have a blessed Day
Tina Gale
May 24, 2012
2012!

Hi! Lori here from ScrappinMyStressAway with another Graduation card!
We have had a lot of Graduation Parties to attend and I really like to make home-made cards for the kids we know.
This one is super simple and can easily be customized to school colors.
I got out my Gypsy and got to designing!!

I used the shadow numbers from Varsity Letter sized to 2.06 inches.
I welded 2012 together. I copied and flipped a set of 2012 and used Hide Contour to hide the inside cut of the "0".
I was able to fit cards on my mat.

I cut these out in white cardstock.
Since our HS colors are blue and white, I did not cut out another shadow layer of the numbers.
For another school, I cut out green shadow layer to cover the white and used a black skinny number (below) inside the green.

I put the numbers on my mat sized to 2.06 and used Hide Contour to hide the outside cuts.

I cut these numbers out in blue and adhered them to the card.
I added a graduation cap from Jolees.
I will make more of these next year (with a 3 instead of a 2) for my son and keep one for his scrapbook!!
Thanks again for having me over Bobbi Jo!!
May 23, 2012
Happy Graduation!


It is Graduation Season!!!
I am typically a scrapbooker, but I do like making Graduation Cards.
My son is a junior and we have been invited to several parties this year so I am taking notes for next year!!
Lori here from ScrappinMyStressAway sharing my Graduation Card at Sweet Sassy Diva's today.

I started out with a purple 8x8 piece of cardstock. Tony's school color happens to be one of my favorites!!
Fold both ways at 4 inches and fold one diagonal. I used my Martha Steward Score Board to score.


I used this circle from Happy Graduation sized at a WIDTH of 3.5.
I sized the width to 3.5 instead of the height as the design measures more wide than tall (see the black square on my mat) and I usually forget to take Real Size off so I measured it as it was.

I cut two pieces of white carstock 3.75" x 3.75" and adhered the circle on one.
On the other, I used one of my CTMH stamps that came with my Art Philosophy bundle and personalized it for Graduation.
I adhered the white cardstock to the inside of my card, the one with the circle to the top (with the tassel) and the one with the sentiment on the bottom.


Here is what the card looks like closed.

Here it is partially opened up.
I went to a Stampin' Up Card Class with my good friend Jenny last week and got this idea from the demonstrator Joyce. She has about a million (it seems) projects in her basement area on display and was helpful enough to share the instructions!!

be sure to check back here to see more details on this card.
May 22, 2012
Congrats!
Hi my crafty friends, Brenda here and this week at Sweet Sassy Diva we are celebrating graduations. Perfect timing as my 5th son (and his girlfriend) graduated from college that Saturday before Mother's Day. It was a beautiful day for graduation. I only wish they could shorten the speeches. lol Anyway for my son I made a card from Wild Card, the graduation hat. But to mix it up a little I welded the scroll to the hat. I also add ribbon to the scroll and a twine tassel along with a metal embellishment (been in my stash forever) that has prongs that punch through the paper and then you push the prongs down. I think it turned out pretty good, DS loved it anyway. lol For his girlfriend and soon to be fiance, I made a Hello Kitty card using Art Philosophy for the card base, Hello Kitty Greeting for Hello Kitty in her graduation gown and Gypsy Wanderings for the sentiment. I pop dotted Hello Kitty's pieces of her gown and hat, then popped them up on the card as well. I used white ink to ink around her graduation gown to make it stand out and it give some depth to the gown. Using glossy accents I made her eyes shine as well as the sentiment. I am pretty please with this card as well. My future DIL loved it as she loves when I make them their cards. I hope that you have gotten lots of inspiration this week here a Sweet Sassy Diva and will give some graduation cards a try too.
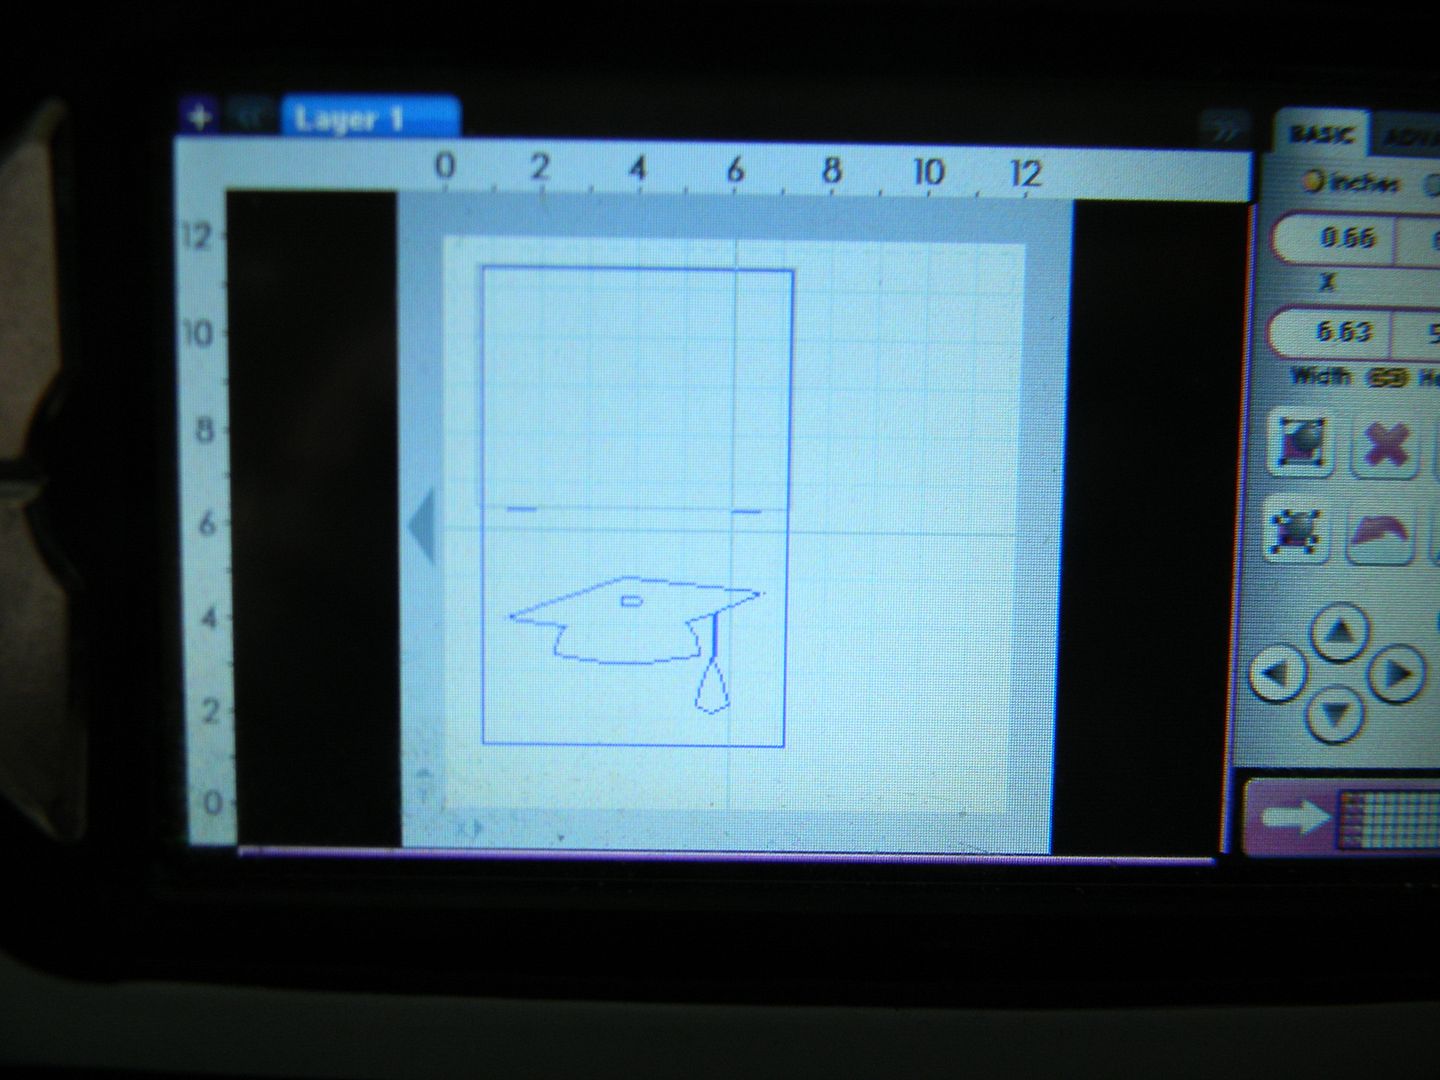
Here is my Gypsy showing that I welded my scroll to the hat as well as welding two if the hats together to make it a shaped card.


 Here is my Gypsy with Hello Kitty layout on the card base. Nothing fancy here, no welding or anything. Simple, easy peasy!


Here is my Gypsy showing that I welded my scroll to the hat as well as welding two if the hats together to make it a shaped card.

Here are some of the cuts, for the white die cuts I used my Spectrum Noir markers to give the cuts some depth.

Here is a close up of the tassel, yeah I know not the greatest tassel but it will do. lol And a close up of the brad and metal embellishment.


Both cards together

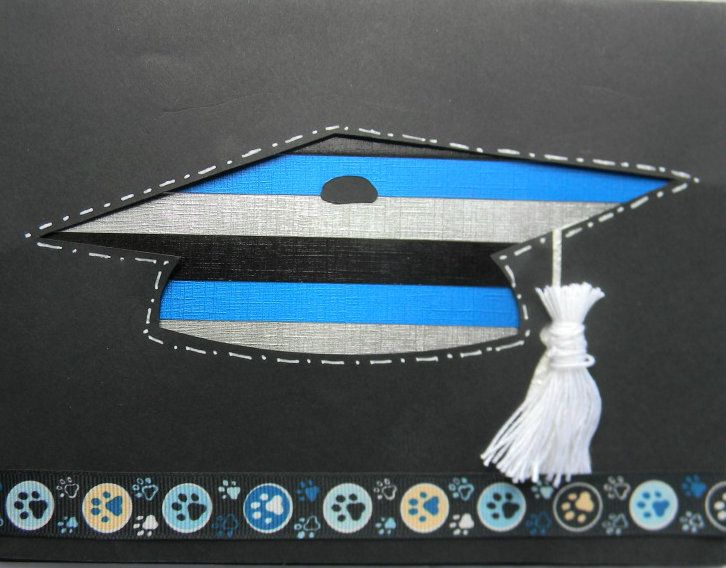
May 21, 2012
Mortar Board!
This week at Sweet Sassy Diva its all about "Graduation". In a way, its also a graduation for me as I complete a year as part of the Sweet Sassy Diva Design Team. One year ago Bobbi Jo gave me the opportunity to be on my first Design Team and I have learned so much and had a great time this past year. However, I have decided to step down at this time to design on other teams. Thank you Bobbi Jo and all my design team buddies for inspiring me this past year. I hope you will continue to follow me and keep in touch on my blog cricutcraftingrammyblogspot.com.
So for my graduation project I made a neighbor for a family friend that is graduating from High School in June. Since my girls and I all went to the same school I decided to use the school colors. The mascot of the school is a Bulldog so I selected this great ribbon I had in my stash.
Here is the front of the card.
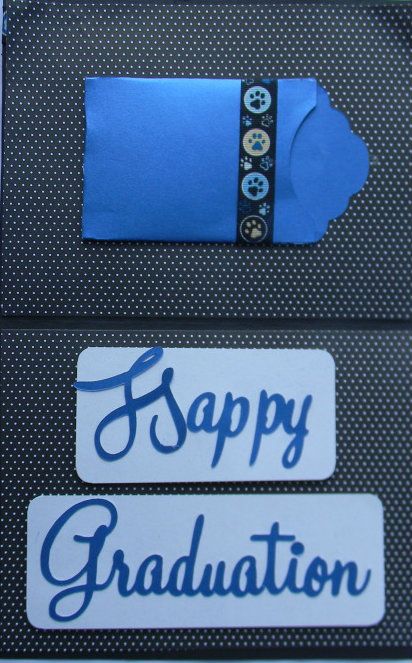
Here is the inside. I covered over the top and bottom 1/2 with dotted black and white paper. This covers the pieces you taped in place.
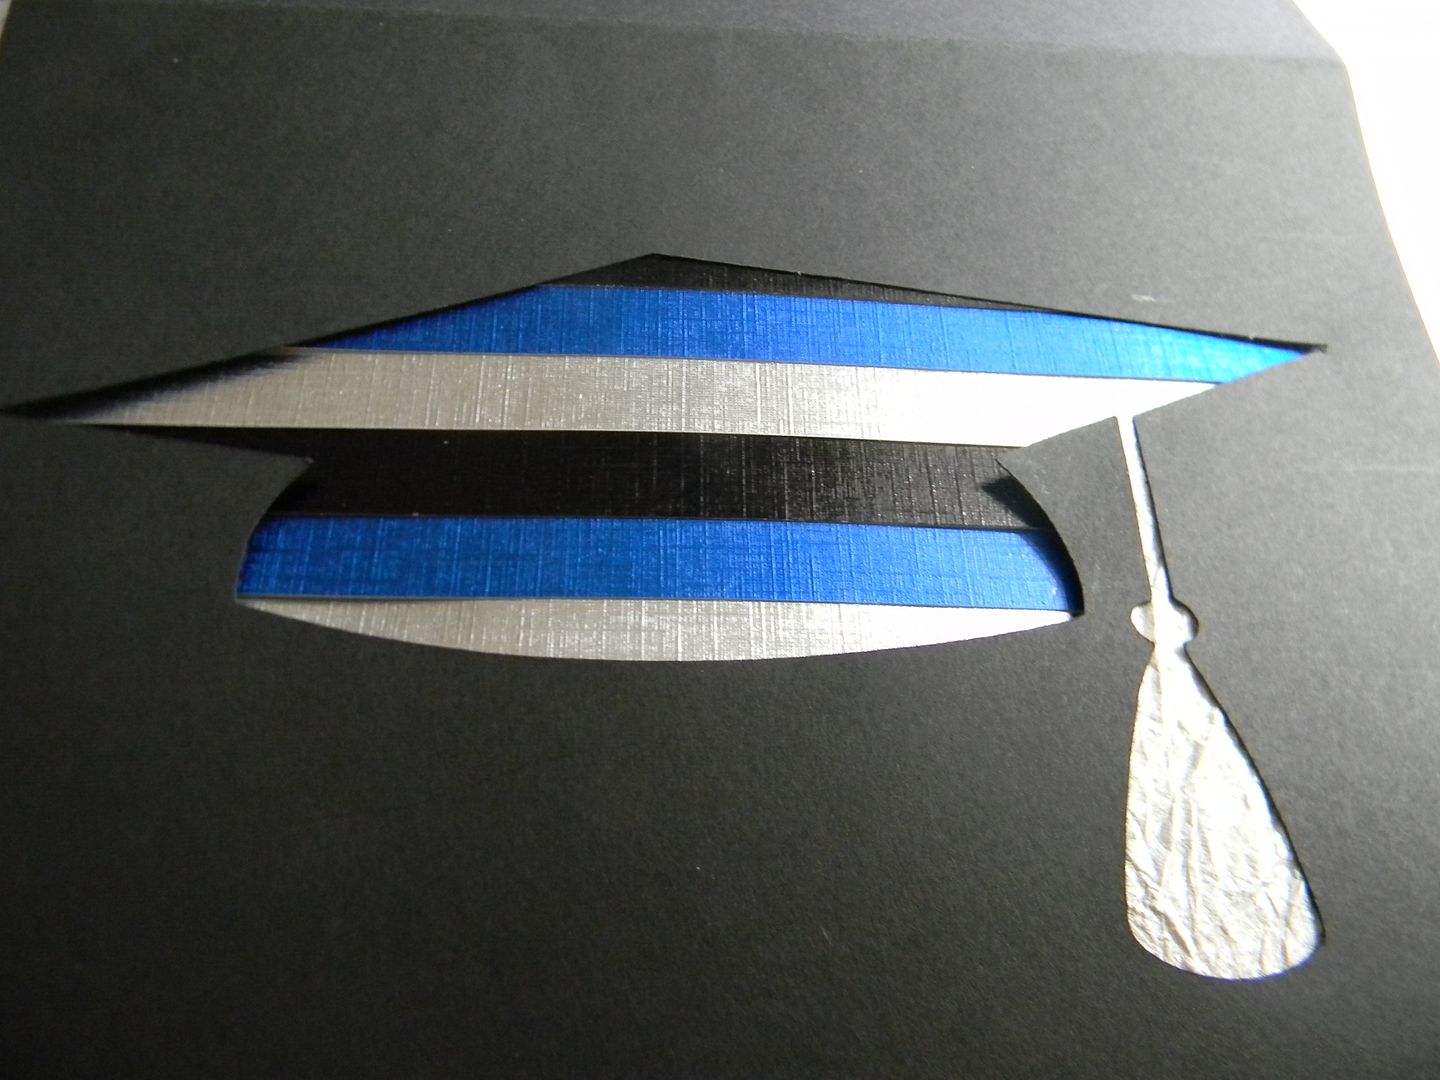
The graduation cap is the card cut from Wrap it Up page 67 cut at 5.75 width.
I covered the tassel with some white crinkly paper on the back side of the card.
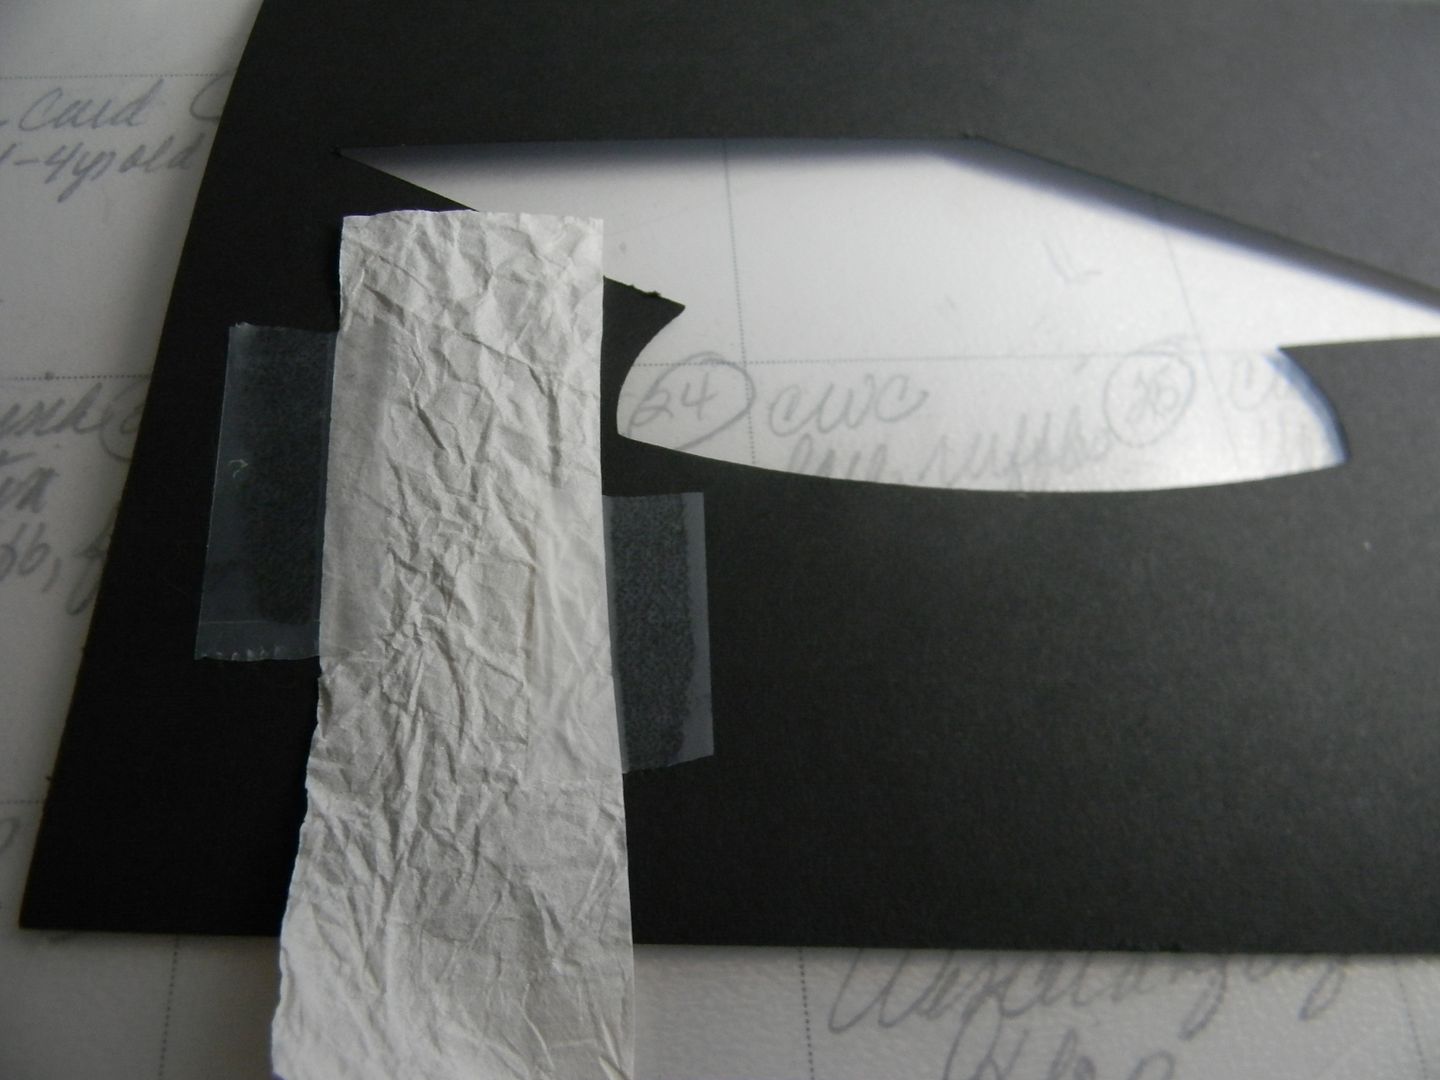
I then cut out 1/2 inch strips of this foil paper from Recollections.
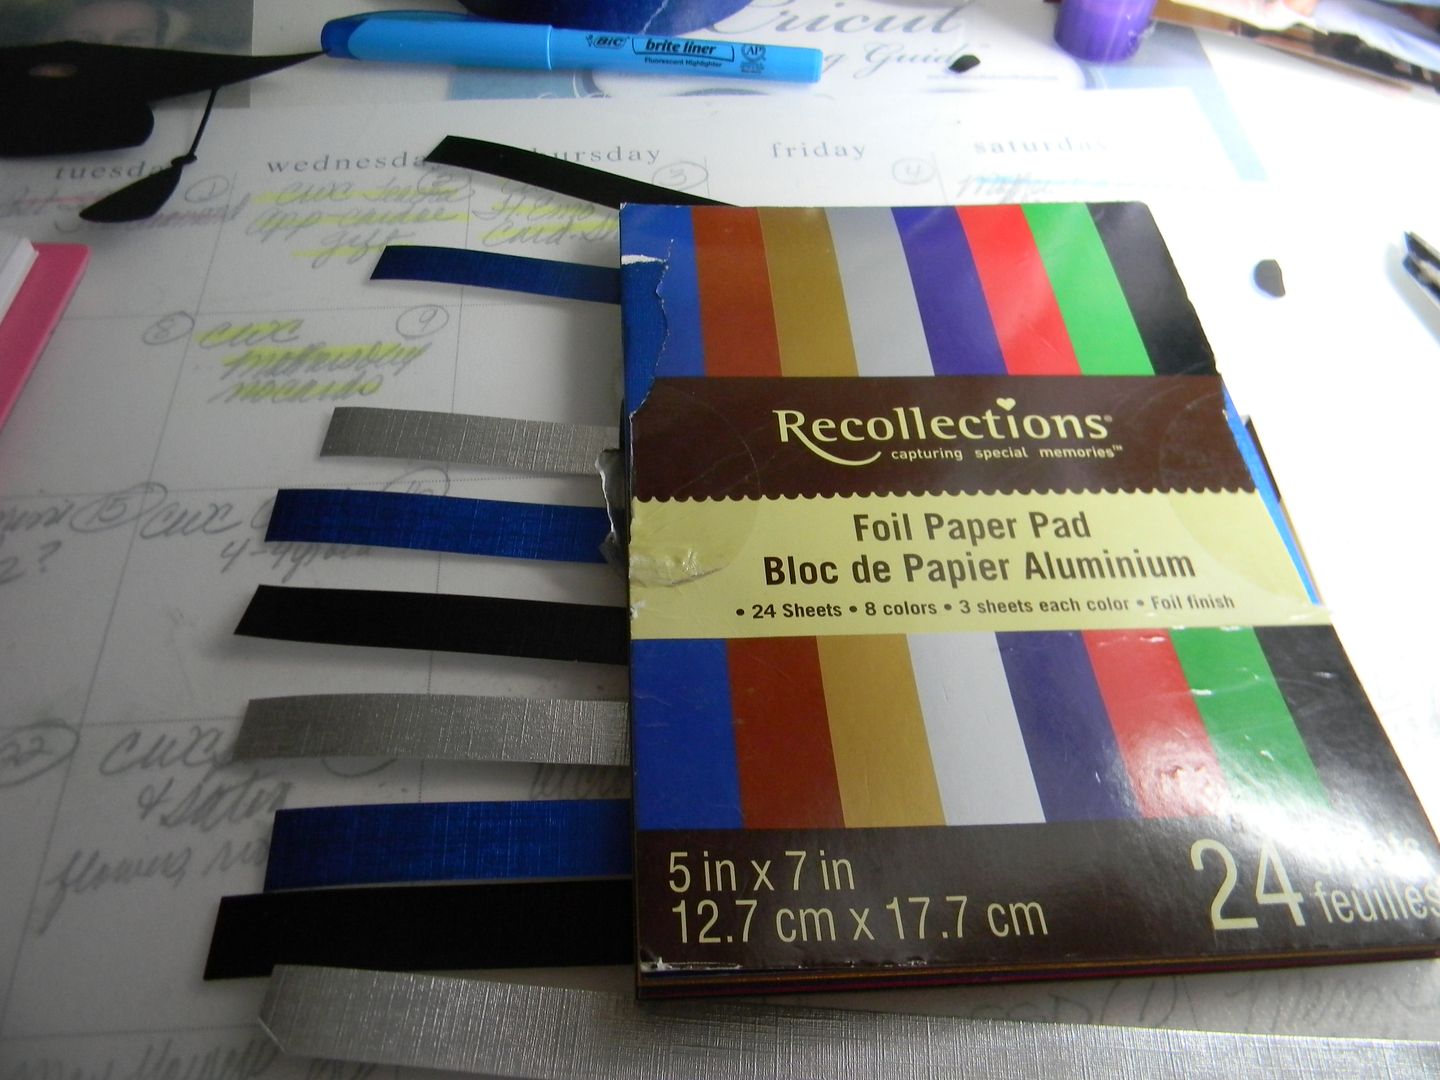
I taped the strips together 9 in total and then adjusted until I liked how it looked and taped it down over the cutout of the cap.
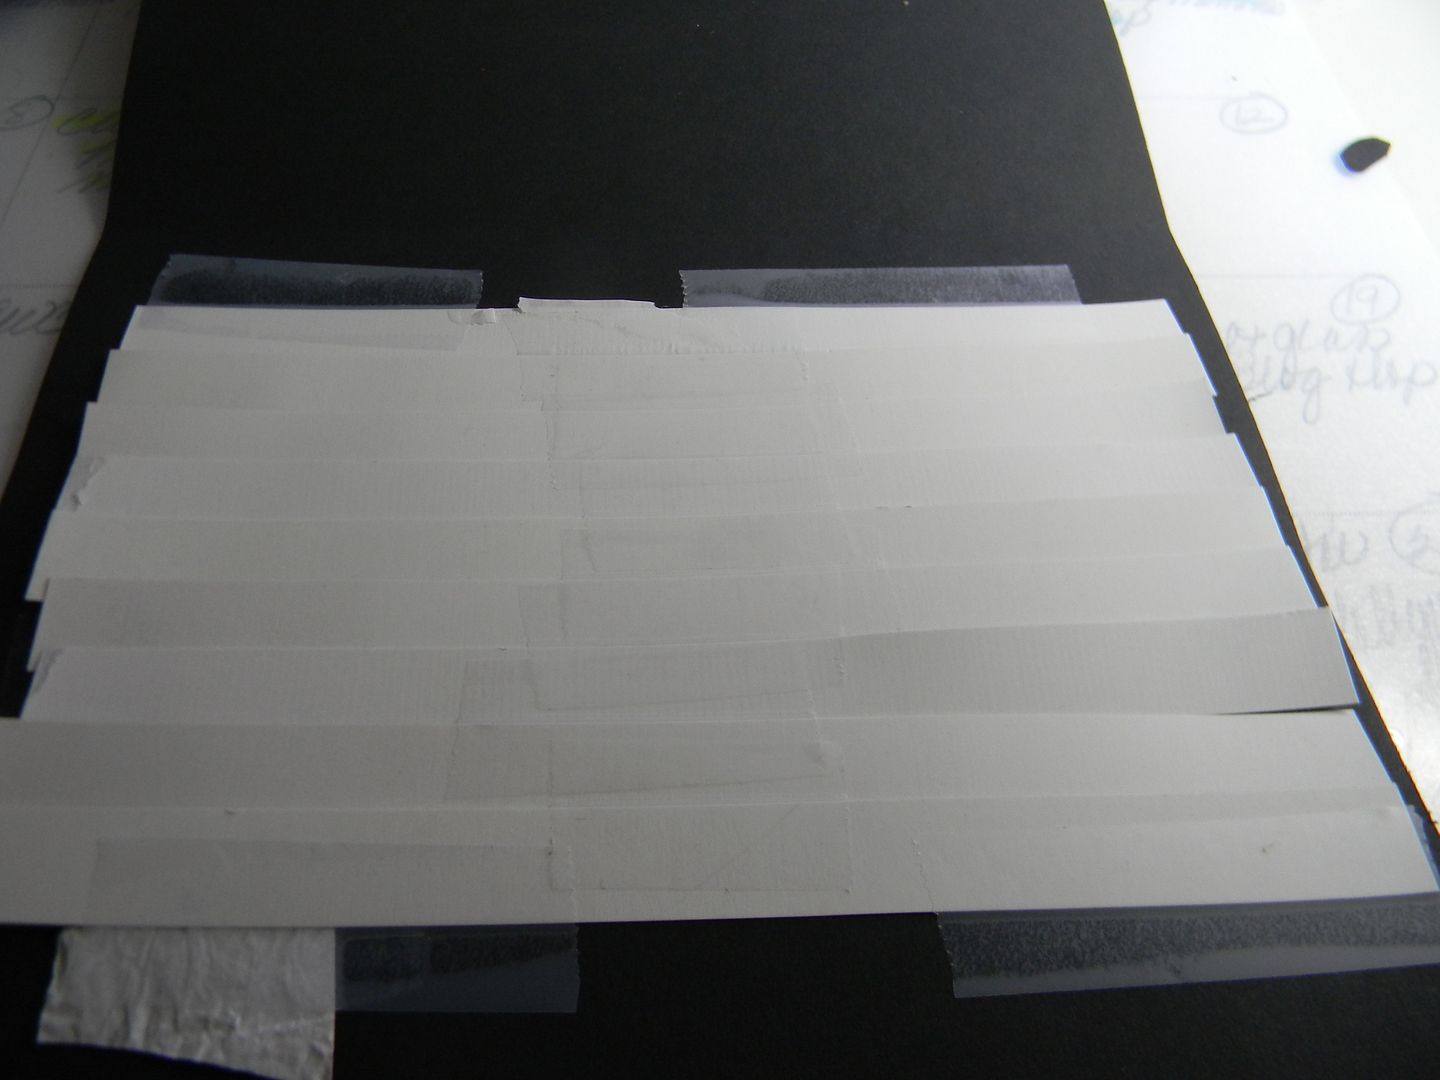
Here is how it came out.
Next I doodled around the edge of the card and added the center button piece.
I then made a tassel out of white crochet thread ti give the card more dimension.

For the inside the Happy Graduation was cut at 1.5 inches from MS Seasonal Cart.
The pocket for the gift card was cut from Tags, Bags, and More page 112 at 9 inches.
Thanks for stopping by and please come back and check out what the other designers have in store for "Graduation."
Happy Craftin.
-- Suzanne
May 20, 2012
All about Mike!

Welcome to the Original Disney Pixar Blog Hop! A special shout out to Shawn and Ellen for organizing and making this hop outstanding!
Did you hear that there is a Grand Prize for one lucky Winner? Yes there is! The grand prize is a ScrapN Easel-Ette! I have the ScrapNEasel and I absolutely love it!
If you arrived here from Kim, then you are in the right spot! If you arrived here first, after you see mine then head over to Shawn because you do not want to miss any of the projects.
I created a banner with the Mike's from the Cricut cartridge Disney/Pixar - Best of Pixar. A special shout out to my friend Missy for cutting them for me. <3 They were cut out at 3 1/2 inches.

I used some stampin up colored cardstock and patterned cardstock from cosmo cricket.
For the banner, I used the cricut cartridge All Mixed up. I also, used it to cut some circles on Mike's background.

I picked up some green tule to string up the banner.

Doesn't Mike just look so cool! When you got to Disney World, be sure to check out his show.

I'd like to say that the spikes were cut on the cricut but, I actually hand cut it.

Be sure to enter for your chance to win the grand prize of a ScrapN Easel-Ette! Thanks Marlo for the donation!
If you love to craft like I do, be sure to check out Blitsy often for amazing deals! I love saving on crafting items and it helps the budget or at least gets you more for your money. <3
I made this to use for a newborn session because Mike just works so well with the Monster hat. I cannot wait for my next session to use the banner.

Your next stop is Jenny.
Here is the line up:
Day Two - May 20th
Shawn http://craftychicsblog.blogspot.com/
Ellen http://cardmonkey-business.blogspot.com/
Kim http://uscrap2.blogspot.com/
Bobbi Jo http://sweetsassydiva-gspot.blogspot.com/ You are Here!
Jenny http://jennyplace26.blogspot.com/ Next
Jessica http://thecreativestamperspot.blogspot.com/
Jenny http://www.crazyaboutcricut.blogspot.com/
Tami http://www.scrappinrabbitdesigns.blogspot.com/
Kathy http://kathyand3kids.blogspot.com/
Kristal http://www.gettingcricky.com/
Subscribe to:
Posts (Atom)


