

December 31, 2011
Lovely Florals!
Good Morning! This week at SweetSassyDiva's; the design team is making thank you cards!
![]() I have several envelopes that aren't standard sizes, so my card for this challenge is 9 X 6.5. The front face of my card was cut @ 4.5 X 6.5.
I have several envelopes that aren't standard sizes, so my card for this challenge is 9 X 6.5. The front face of my card was cut @ 4.5 X 6.5.
![]() From Lovely Floral I cut a red banner @ 6.11 and did some faux stitching with a white gel pen. I cut a green banner @ 5.4 and glued them together.
From Lovely Floral I cut a red banner @ 6.11 and did some faux stitching with a white gel pen. I cut a green banner @ 5.4 and glued them together.
![]() From the Sophie cartridge I cut the floral oval @ 4 1/8 and the background oval also @ 4 1/8. Using the bookmark and shift button, I cut two images. One in green and one in blue. I laid everything out on my gypsy. I placed the blue at the very edge, so that for the blue flower it didn't cut the whole image.
From the Sophie cartridge I cut the floral oval @ 4 1/8 and the background oval also @ 4 1/8. Using the bookmark and shift button, I cut two images. One in green and one in blue. I laid everything out on my gypsy. I placed the blue at the very edge, so that for the blue flower it didn't cut the whole image.
![]() I added two brads to the flower to dress it up a bit. (I also used my white gel pen and added dots along the oval ~ shown in the final picture.)
I added two brads to the flower to dress it up a bit. (I also used my white gel pen and added dots along the oval ~ shown in the final picture.)
![]() I used the Stamping cartridge to cut the words "Thanks so much". I used my gypsy and hide contour to cut the phrase out in two colors.
I used the Stamping cartridge to cut the words "Thanks so much". I used my gypsy and hide contour to cut the phrase out in two colors.
![]() I used my leftover paper from the front to decorate the inside. Then I typed up my sentiment on my computer and printed it out.
I used my leftover paper from the front to decorate the inside. Then I typed up my sentiment on my computer and printed it out.
![]() Please come visit me at 3 Cats and a Bug. Thanks for looking!
Please come visit me at 3 Cats and a Bug. Thanks for looking!
December 30, 2011
Thanks so much!
I don't know about you, but I feel that when someone has gone to the time and trouble to give you a special gift, they should receive a special thank you. So the theme this week at SweetSassyDive is 'Thanks For The Gift'.


The card base is from Birthday Bash, cut at 5". The presents are from Christmas Cheer and are cut at 1.5". The paper and ribbon are from my collection. The sentiment and image are Stampin Up and the punch is Stampin Up xlg oval .
This card was very quick to put together, after I got the presents cut.... when will I learn to NOT try to cut things smaller than my Cricut likes to cut them????? Oh well... it all worked in the end :)
I want to wish you all a very Happy New Year !!! Being a part of this AMAZING design team is such a great treat for me. I can't wait to see what new and exciting projects are in store for 2012!!
Mindy
December 29, 2011
Quick Tag and Gift Idea!
Now, I thought this would be a great gift to bring for any Holiday parties or even into the New Year as you go visiting friends and relatives. I have seen others skipping away into Valentines already the day after Christmas. I just think it's too soon and find that this is a wonderful item even for January. I mean really Winter is still here at least in our area for what seems another six months. OK maybe I exaggerate a bit. I can say that January is getting into the coldest time for here. I do hope that you enjoy the video tutorial and for the new people that just received a cricut, I try to also have a few golden nuggets of information for you as well. If you missed yesterday's tutorial showing you how to set up the Cricut Expression 2 for cutting the ornament and Joy cuts, please click here! to view them.
close up:


Setting up your paper quadrants and loading & cutting using the Cricut Expression 2

Assembly of Cricut Scandinavian Christmas Cards Ornament:
If you are on email subscription, you can view the videos on http://sweetsassydiva.com/
I ordered a personalized mug online and added some yummy dove chocolate discovery items to the mug. Then, I added the tag and tied it with tulle. An instant yummy favor or treat for anyone to enjoy! You can also add a bottle of chocolate martini mix as well. If you are in the Valentine's mood, Click here! for more ideas!
Here is the other Joy cricut cut from the tutorial after assembly:

For the Blitsy items, they brought back the items over the holidays. It changes three times a week and the specials last a week unless oh wait! If it gets blitsed, it is gone so quickly if there is more demand than supply. oh the stress!
So the new site is Blitsy and you can access it by clicking here! you can let them know that I sent you just by clicking the link plus it allows you to become a member as well. Membership is free and no obligation to buy. I think you'll love the savings like I did so, I thought that I'd let you know too. I mean it's a savings big time on so many items that we know and love already! On top of it! Blitsy is offering a chance for you to win a $200 Blitsy credit for you and I each! wow! That sure would bring some Holiday Cheer!
Thank you Gift!

My gift tags... the reindeer is from winter frolic...cut at 3 in the snowman is cut from tags, bags... also at 3 in (decorated with buttons) I love how the colors blended...you can use the blending solution as well. I'm so excited that I finally broke down and bought these. Next to my cricut and my embosser it might be my new favorite thing ;) Happy New Year!
Angie
December 28, 2011
Joy to the World!
Here is a video tutorial using the Cricut and Cricut Expression 2. These can be used to make Thank you cards, New Years cards or work on your Christmas Cards for next year! :) Either way these videos also help you to learn how to space cuts on the mat and cut pieces for paper piecing creating layered pieces for layouts and cards.

Part 1:
Part 2:
Here is the layout on the cricut Expression 2.

You can cut out the pieces on another cricut machine such as cricut expression, cricut imagine or follow my directions in the video above for the Cricut Expression 2. If you are on email subscription, click here! to view the three videos.
Here is the video on the assembly:
I used a number of Tim Holtz items that I purchased on the Blitsy site.

For the Blitsy items, they brought back the items over the holidays. It changes three times a week and the specials last a week unless oh wait! If it gets blitsed, it is gone so quickly if there is more demand than supply. oh the stress!
So the new site is Blitsy and you can access it by clicking here! you can let them know that I sent you just by clicking the link plus it allows you to become a member as well. Membership is free and no obligation to buy. I think you'll love the savings like I did so, I thought that I'd let you know too. I mean it's a savings big time on so many items that we know and love already! On top of it! Blitsy is offering a chance for you to win a $200 Blitsy credit for you and I each! wow! That sure would bring some Holiday Cheer!
I made a second card using the waste of the ornament background along with the assembled joy cricut cut.
If you are not already a follower of this blog, please do so today.
Happy Holidays!

Part 1:
Part 2:
Here is the layout on the cricut Expression 2.
You can cut out the pieces on another cricut machine such as cricut expression, cricut imagine or follow my directions in the video above for the Cricut Expression 2. If you are on email subscription, click here! to view the three videos.
Here is the video on the assembly:
I used a number of Tim Holtz items that I purchased on the Blitsy site.
For the Blitsy items, they brought back the items over the holidays. It changes three times a week and the specials last a week unless oh wait! If it gets blitsed, it is gone so quickly if there is more demand than supply. oh the stress!
So the new site is Blitsy and you can access it by clicking here! you can let them know that I sent you just by clicking the link plus it allows you to become a member as well. Membership is free and no obligation to buy. I think you'll love the savings like I did so, I thought that I'd let you know too. I mean it's a savings big time on so many items that we know and love already! On top of it! Blitsy is offering a chance for you to win a $200 Blitsy credit for you and I each! wow! That sure would bring some Holiday Cheer!
I made a second card using the waste of the ornament background along with the assembled joy cricut cut.
If you are not already a follower of this blog, please do so today.
Happy Holidays!
December 27, 2011
Smiley Cards!


I opted to leave the inside blank as the cards are not very big and I write big!!
-
Did you see what they have added at blitsy today? Plus, they added all the prior offers for a second chance at them. Be sure to check them out before they're Blitzed!
You can access it by clicking here! you can let them know that I sent you just by clicking the link plus it allows you to become a member as well. Membership is free and no obligation to buy. I think you'll love the savings like I did so, I thought that I'd let you know too. I mean it's a savings big time on so many items that we know and love already! On top of it! Blitsy is offering a chance for you to win a $200 Blitsy credit for you and I each! wow! That sure would bring some Holiday Cheer! Hurry before it's gone!
Amazing deals! I must say that you should hurry or things do get sold out or end sometimes sooner than you hope. They add new items Monday, Wednesday and Friday!
December 26, 2011
A Cup of Good Cheer!
Suzanne here and as I promised yesterday, here is the second thank you card I made using the Imagine Yummy Cartridge


The cup is from page 7 cut at 3 1/2 inches on the front and 2 1/2 inches inside -flipped
Corner stamp EK success
Added Stickles, gems, and died seam binding ribbon
Stamps A Cup of Good Cheer from Robins Creative Cottage
Robin has her first two sets of stamps out a snowmen one and Gingerbread one so check them out.
Inside Comfort and Joy stamp from Michaels
Karen Foster paper Merry Mugs
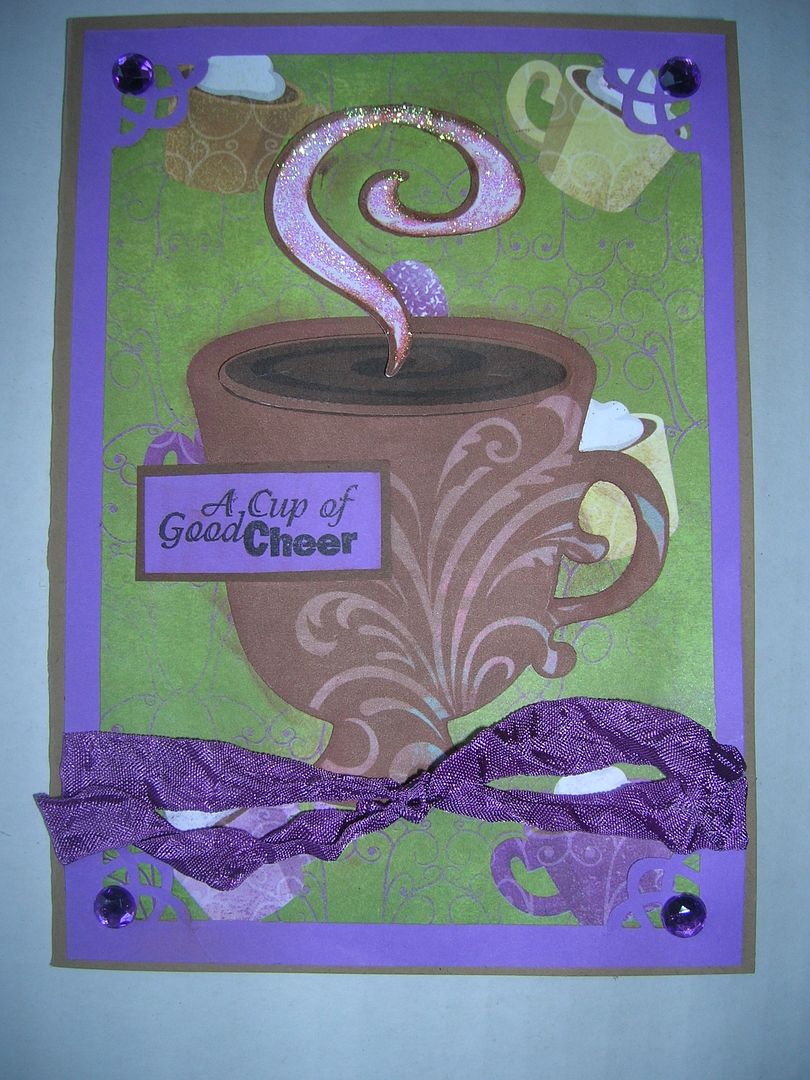
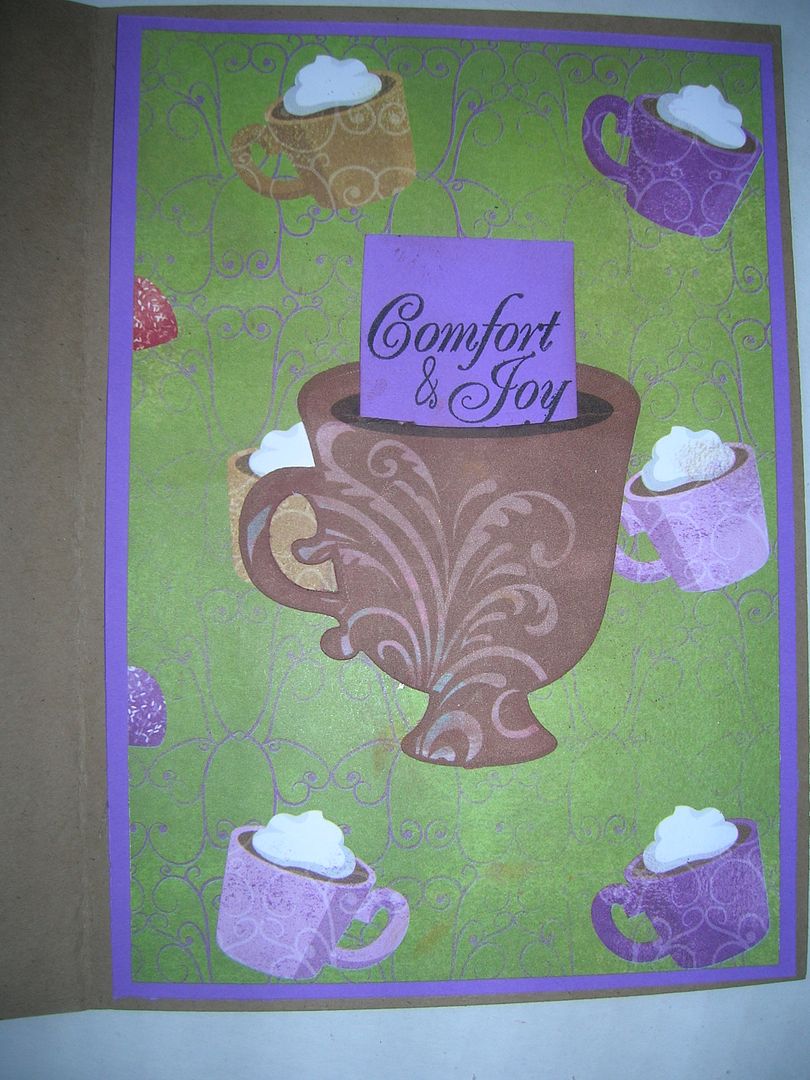
I cut a slit with exacto and placed sentiment inside.
I hope you will come back all week to see what the other DT members design for Thank yous. Thanks for stopping by and I would love to read your comments.
December 25, 2011
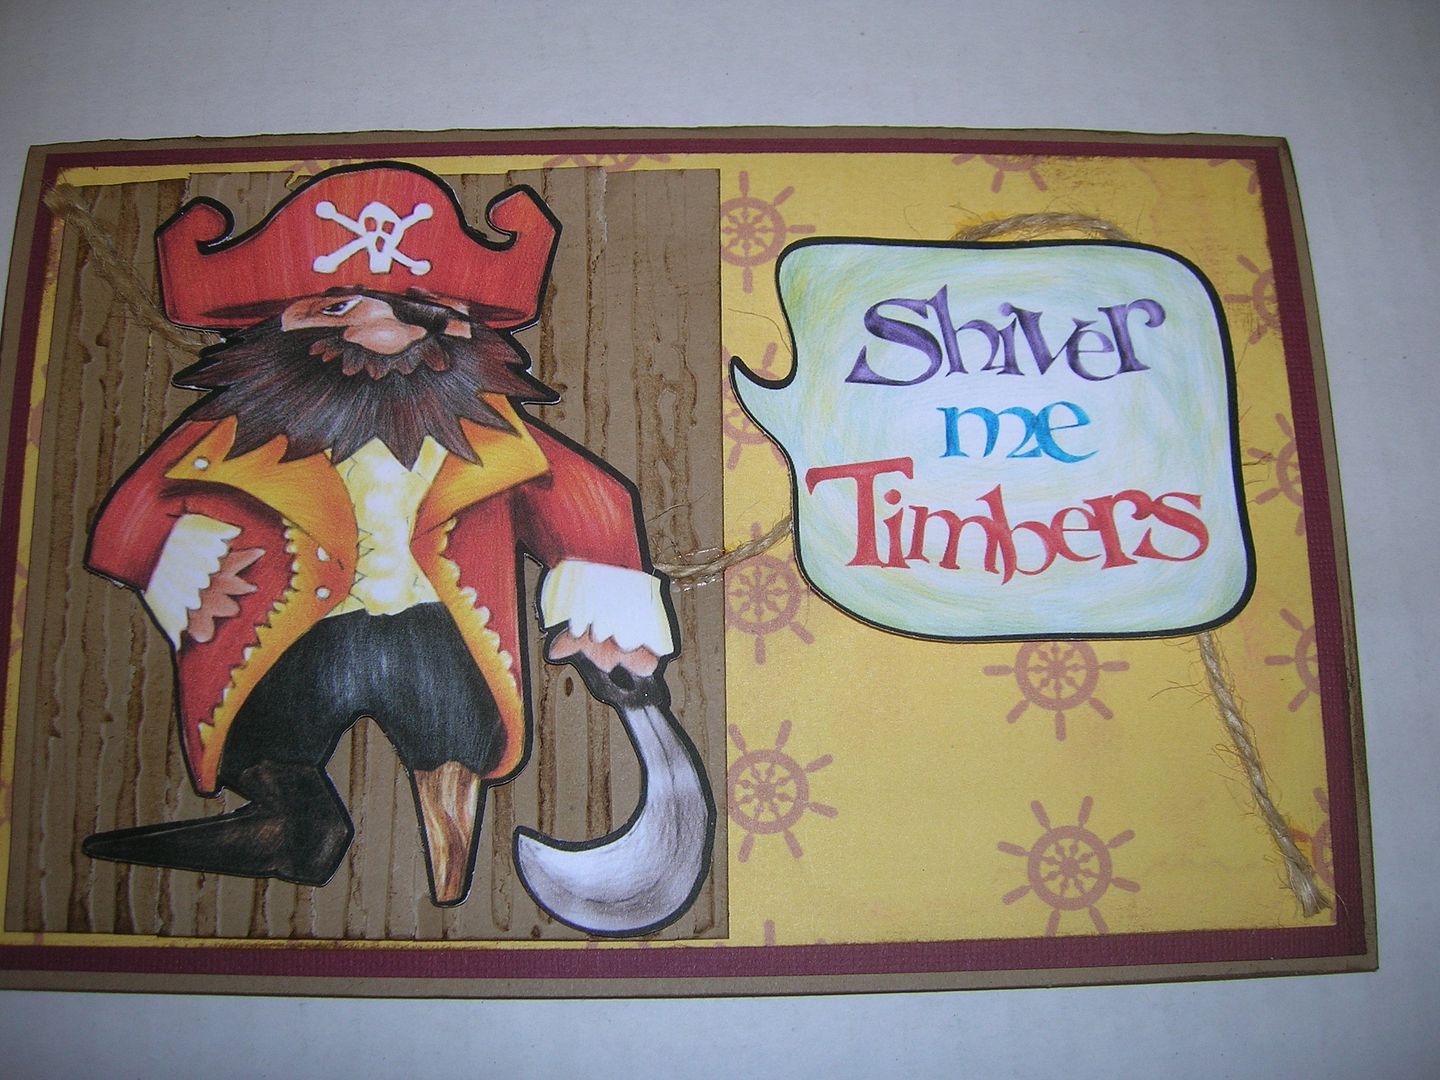
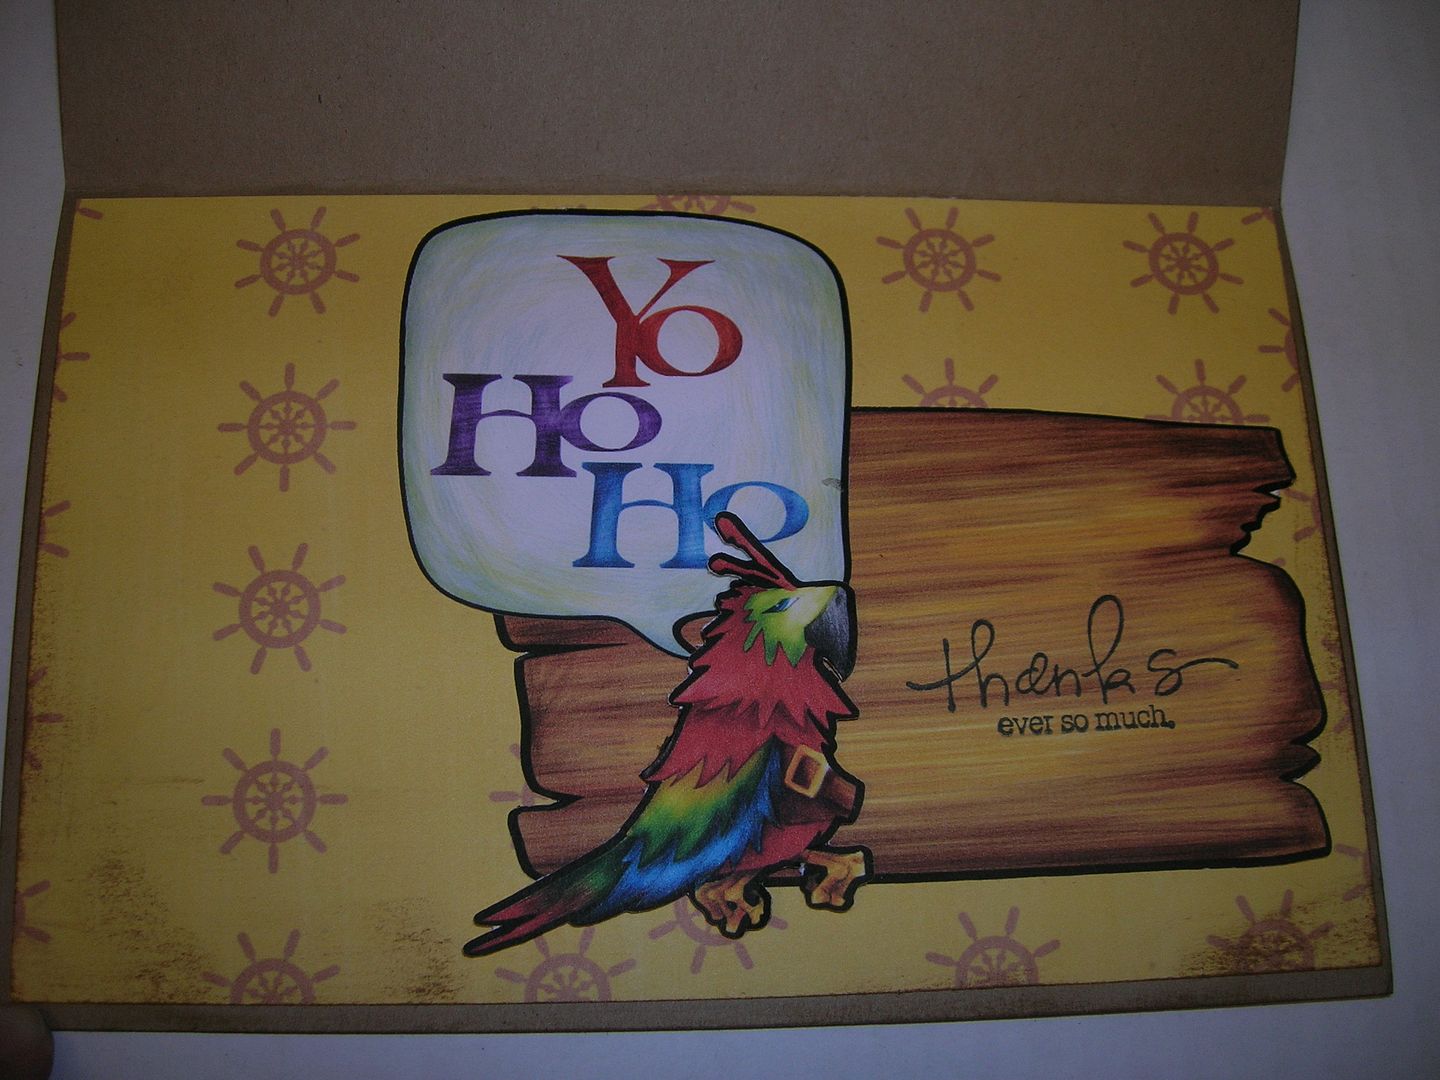
Shiver me Timbers!
Merry Christmas and Happy Holidays to all. This week at Sweet Sassy Diva we were asked to come up with a thank you card. I actually made two cards both with my Imagine.
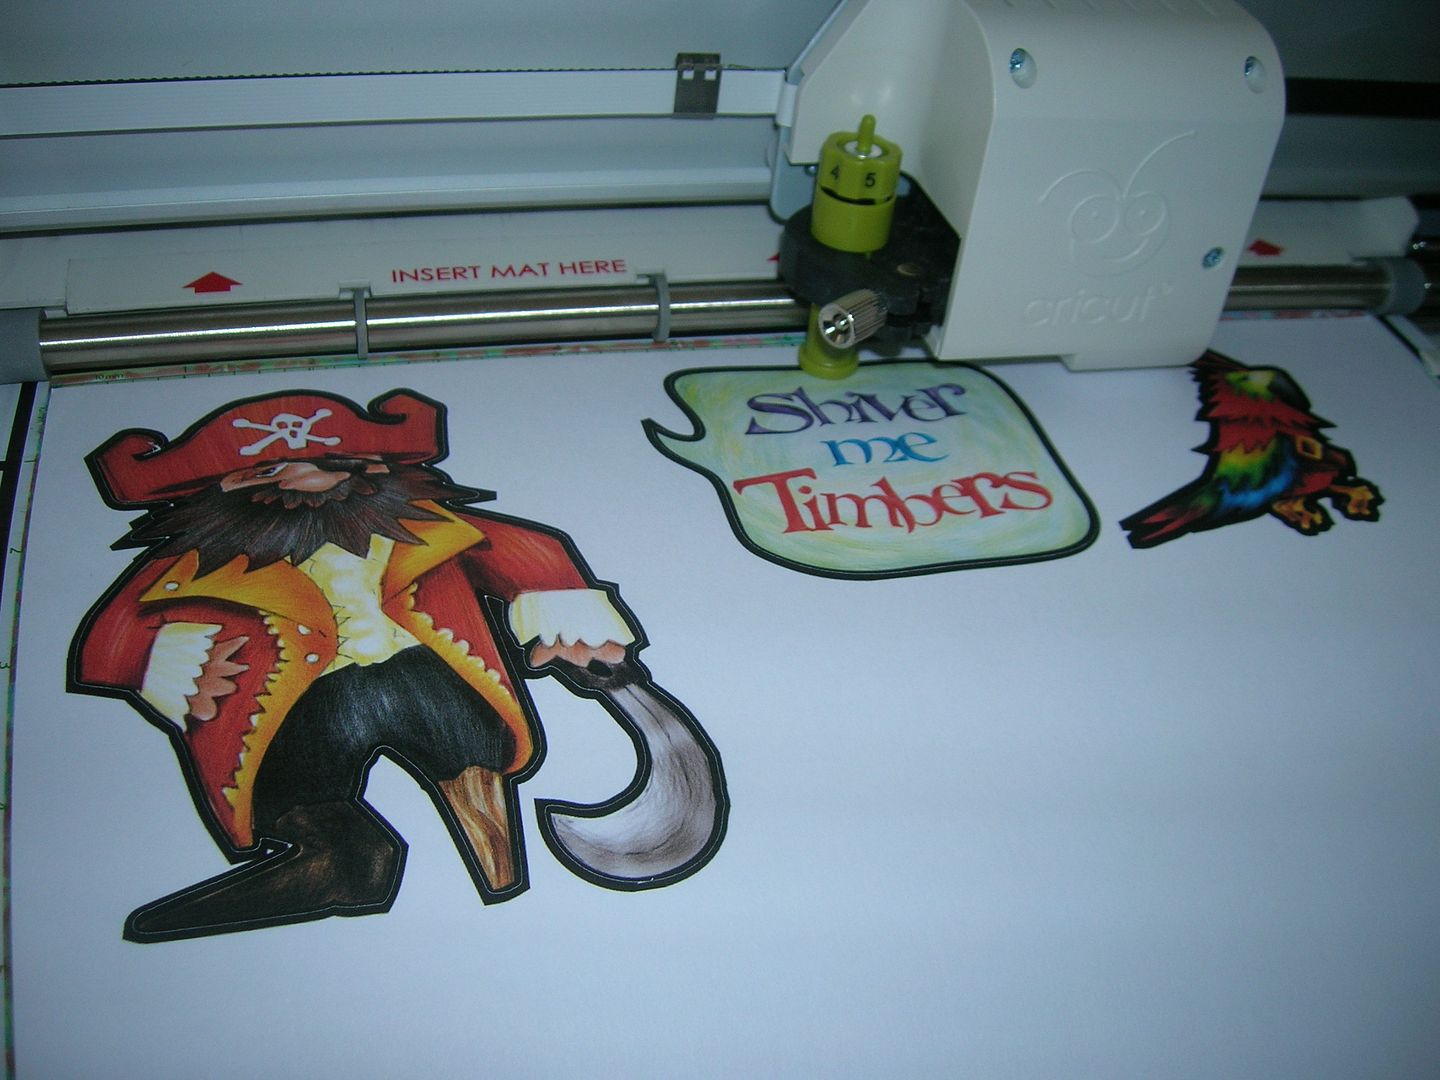
The first is from the Bucaneer cart.
Choosing cuts on Imagine
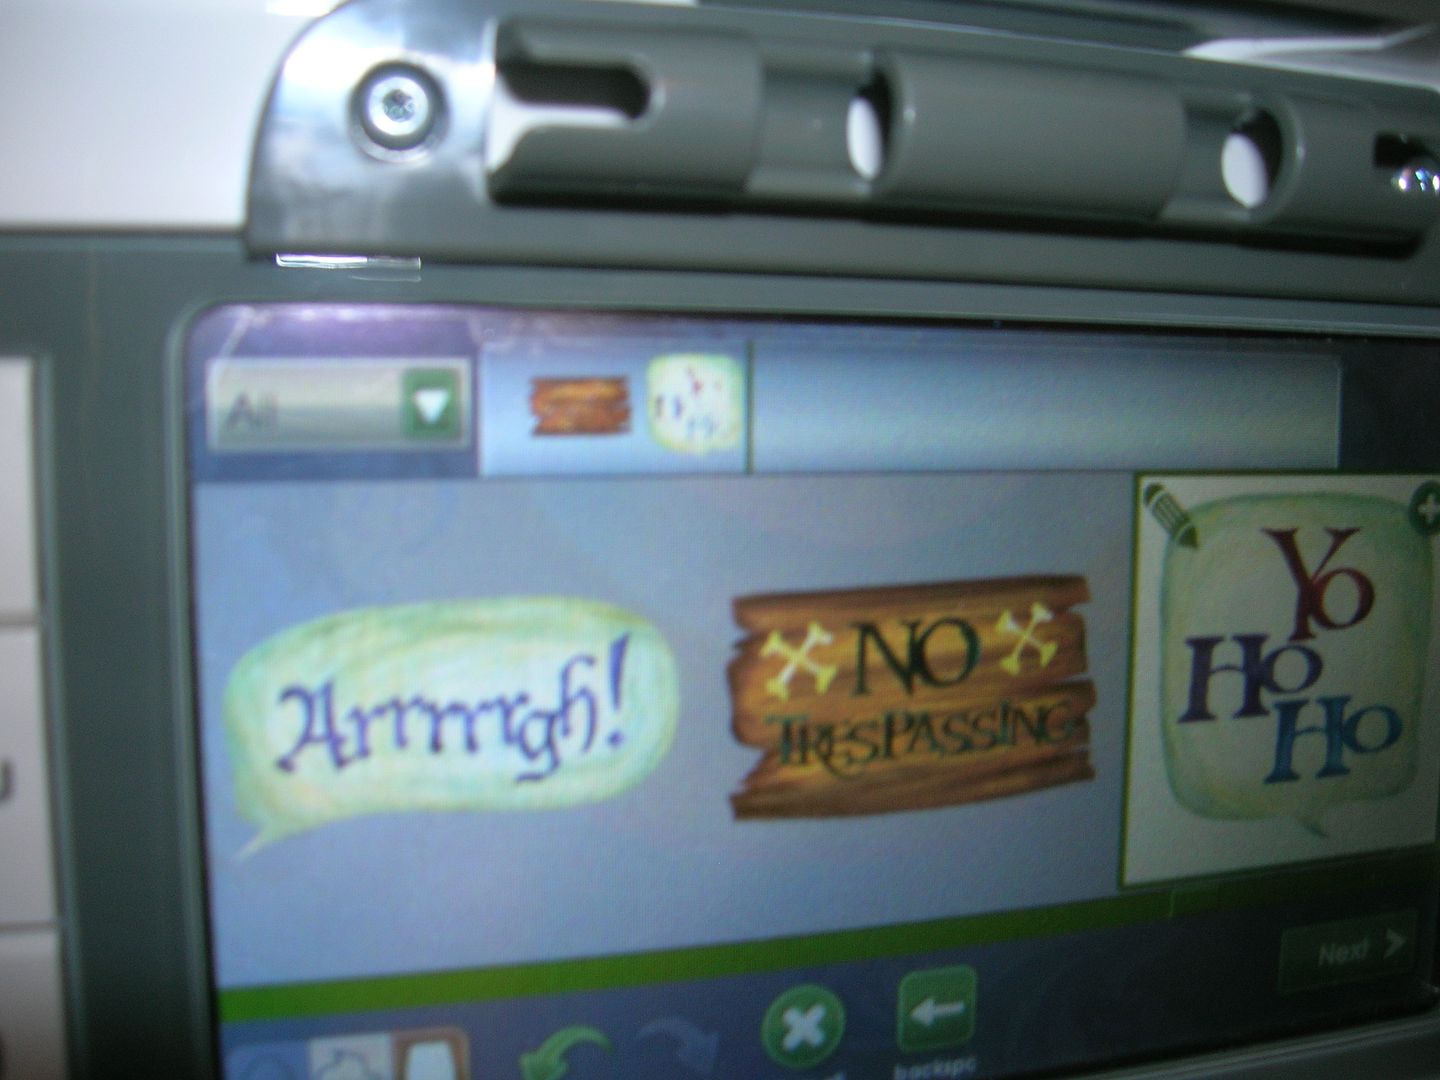
Printed and now cutting
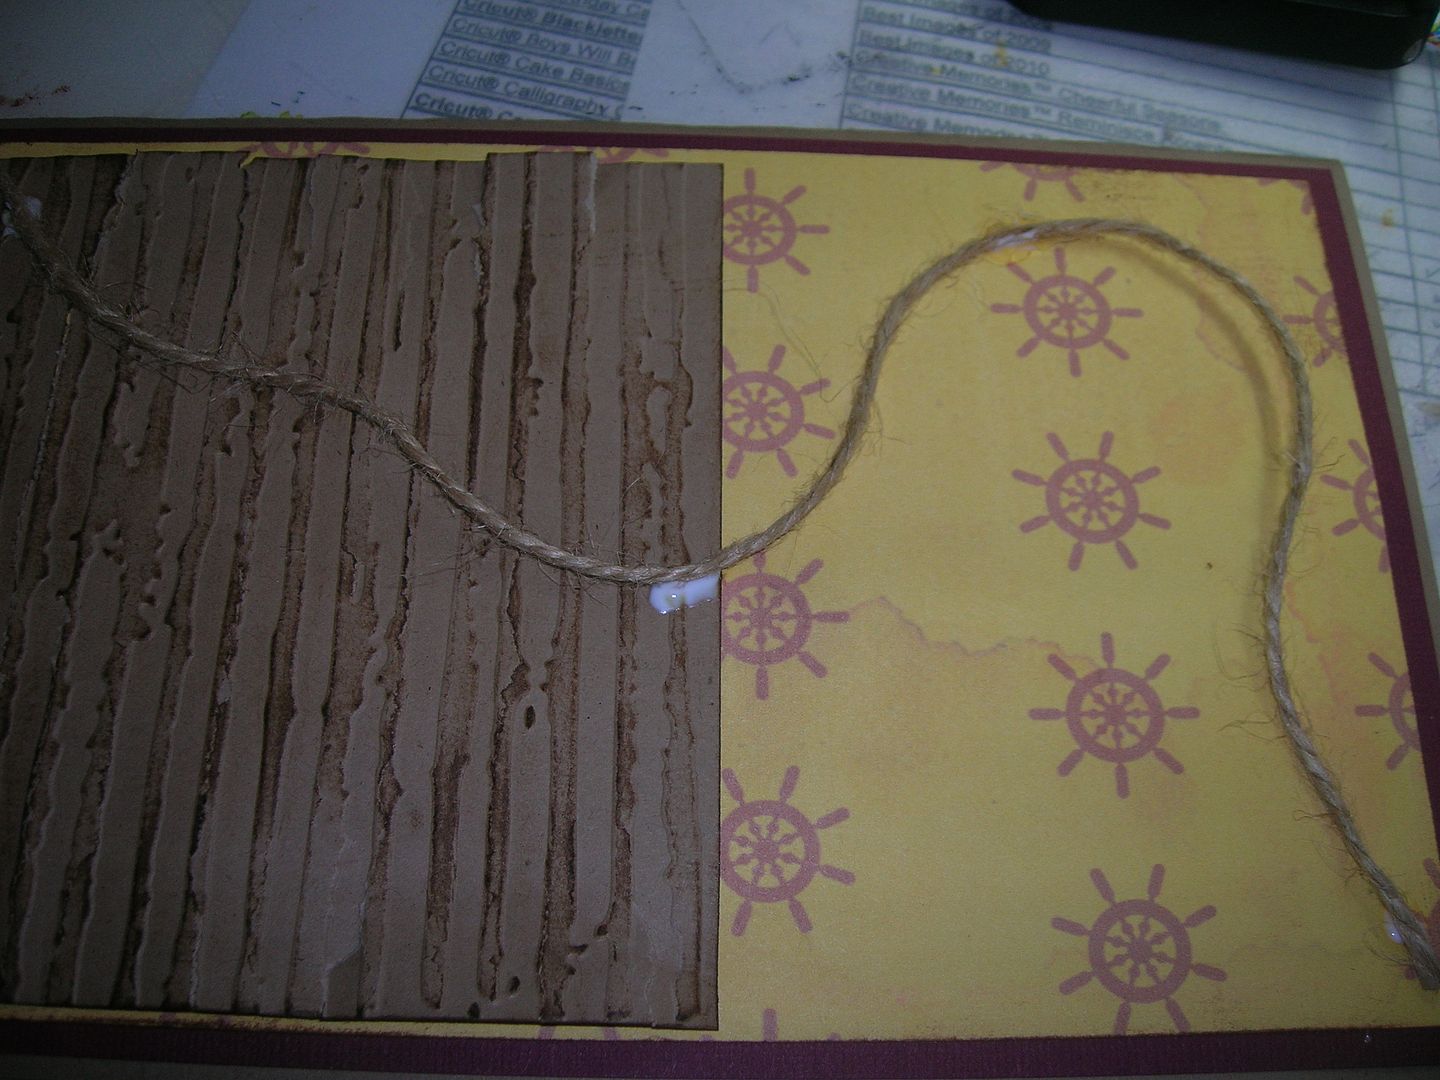
Used Distressed stripe Cuttlebug folder to distress Kraft paper

Inked and tore edges used twine
Bucaneer Cartridge
Pirate p. 3 cut at 4.5 inches-pop dotted
Parrot page 11 cut at 2.5 inches -pop dotted
Shiver me Timbers 2.5
Yo Ho Ho page 27 2.5
No Trespassing Sign page 26 3.0
separated cuts and stamped thanks ever so much
Paper page 43
Card is 8 1/2 x 11 folded in 1/2 Kraft stock
then front cut 5 1/4 x 8 1/4 burgandy
5 x 8 anchor paper from Imagine cart.
Please come back tomorrow to see the second thank you card!
Suzanne
December 24, 2011
Let it snow decor!
Hi it's Angie again. It has been a CRAZY month, and that isn't even adding Christmas into the mix. I think that the few days that I have taken a moment to watch the snow fall outside has been some of the most peaceful moments yet. I love the snow...I love snowmen...I love watching it and how it makes everything look so new. I do not like driving in it...or having to work outside in it. So when this project popped up I knew it was one I wanted to do. I've been working on stockings and gifts for Christmas, this one I can keep up a while longer. So here we go....my let it snow wall plaque.
 I started with a frame, that has 3 3x5 openings....I didn't like the gold trim around it, nor did I like the inside frame...typical white with a black trim. So I "fixed" it. I used my silver alcohol inks with some q-tips and "painted" the gold trim.
 Ahhh much better...now onto the inside frame. Again I took my silver alcohol ink, added some blue stream ink and went to work.
 This looks so much better...not so stark white staring at you. I used the winter frolic cartridge and cut 2 snowmen and the phrase "Let it Snow" I cut all of the pieces in white and used markers and embossing ink to bring them to life. I wanted them more of the blue so that they weren't just for Christmas.
 All that was left was to place them and put it into the frame.
 So this is my new wall hanging. I hope you like it...thanks for looking. My recipe.... a frame Tim Holtz alchol inks in silver and sailboat blue Winter Frolic cricut cartridge embossing powders ...winter wonderland for snowman, light blue for the shadow of "let it snow", clear for everything else Merry Christmas


December 23, 2011
Sweet, Simple and Quick!
This week is Let It Snow at SweetSassyDiva and can we say I am snowed under with last minute gifts to buy, cards to send, and a house to clean. LOL So today is going to be sweet, simple, and quick for that last minute holiday rush we all find ourselves in. This is a little gift card you can make in just a few minutes for those special gifts you hopefully have already bought. Ha ha

Now that we are nearing the week's end of enjoying the Design Team Challenge of Let it Snow, I thought that we would have a little fun! Here's a quiz to get your juices flowing....
How many different snowflakes are on the various cricut cartridges? What cricut cartridges do you own with snowflakes on them? Can you name them? Let's see if we can get this thread full with a bunch of different options! Besides Art Philosophy which is a giveaway, how many can you name?
I know there are AT LEAST 129 options! :D
What is your favorite snowflake? Can you pick just one?
Merry Christmas!
Bobbi Jo SweetSassyDiva
Did you see what they have added at blitsy today?
Be sure to check out Blitsy and you can access it by clicking here! you can let them know that I sent you just by clicking the link plus it allows you to become a member as well. Membership is free and no obligation to buy. I think you'll love the savings like I did so, I thought that I'd let you know too. I mean it's a savings big time on so many items that we know and love already! On top of it! Blitsy is offering a chance for you to win a $200 Blitsy credit for you and I each! wow! That sure would bring some Holiday Cheer!
Plus, if you enter "facebook" in the discount code of your order you will get 10% off but, I am not sure how long this special lasts. Amazing deals! I must say that you should hurry or things do get sold out or end sometimes sooner than you hope. Today they will have new items added. Talk about a great TGIF!
December 22, 2011
Snow Globe!


| and a second, sized at 3.24 and centered inside the larger one. |


- Mindy!
Subscribe to:
Posts (Atom)


