MyFreeCopyright.com Registered & Protected

April 30, 2012

Spring Gift Bag!

Hi, SweetSassyDiva here.  Lori~ from  www.scrappinmystressaway.blogspot.com created a gift bag for your pleasure.  Can you guess what cartridges that she used?  Leave me a comment and let's see who can guess which cricut cartridges that she used. 

Here is Lori's Spring Gift Bag:

I used yellow, pink, green and blue cardstock to cut out the pieces.


I used some ink, pop dots and stickles to add some dimension.

Here is my gift bag ready to stuff full of goodies!!  

Thanks for having me over today Bobbi Jo!!


--

April 29, 2012

Diamonds are a Girls Best Friend!

Hi all my crafty friends, Brenda here from Friends Craftin with Friends.  This week at Sweet Sassy Diva we were ask to make a project using a diamond or diamond shape because that is the birthstone of April and of course we all know that diamonds are a girls best friend. lol  A little birdie told me that we will be having an engagement in the near future in my family!  So I made a window card just for the occasion. I used Beyond Birthdays and Tie the Knot carts.  Sheila from She's a Sassy Lady has a wonderful tutorial on her blog on making these window cards. I started out designing my card on my Gypsy. I have figured that while I am making one card, I might as well make a second card as well. So I have two cards on my mat. You will see only one finished card that fits in with our challenge.


I chose what mat stack I wanted to get my papers from for my card bases.  For my card that I am showing your I used the La Creme mat stack by DCWV.  I also used DCWV Glittered paper as well.

I cut and assembled all of my die cuts which were only a few.  I then attached them to my card.  Here is my finished card.  Cute and perfect for a congrats cards to the new happy couple!!


I am anxious to see what my design sisters have done with this challenge!  I am sure that we won't be disappointed!!  As always we want to thank you for joining us at Sweet Sassy Diva!  I hope you go away being inspired!!

April 28, 2012

What are you wild about?

If you were following this week, you will notice that the design team challenge was something that our design team members were "wild about". 

Can you tell what each member was wild about? 

Here is Jen's project which you can see further details here!


Angie created a two page scrapbook page layout. 


Mindy created some cards.


I created a baby banner.


Tina Gale created a two page layout.


I created a scrapbook page.


Be sure to join us at http://sweetsassydiva.com/ for our design team challenge of 'diamonds' all next week.


April 27, 2012

May all your dreams come true!


I inked all the cuts with a brown ink and added i-rock jewels to the title.  This cut is layered with an orange, red, blue, green and rainbow.  I used Sweet Treats cricut cartridge for the title.


These photo mats were cut using Nursery Rhymes cricut cartridge.  And the photo mat was cut using george and basic shapes.  I added a green ribbon to both mats and this mat has a sun charm.

Here I added a bushel apple button which coordinates with the apple in the tree on the following picture.


The children dancing around the tree is cut from the cricut cartridge Nursery Rhymes.


I used the irock on the i in birthday and stickled it to give it some bling.  Also, I added some white pen dots to the 'happy'.  These were cut from Sweet Treats and I hand cut them apart.


I used cosmo Cricket paper to make this along with solid cardstock.  I also cut the orange using the Cricut Imagine with RGB codes to get the correct color.

I hope you enjoyed layout.

SweetSassyDiva


April 26, 2012

Tomorrow Land!

Tina Gale here for sweetsassydiva DT. I'm on a Disney roll so here's a couple of layouts I did for our 2006 trip. I'm really behind I know!!


I'm trying to use up a lot of my stash so the paper is just various stuff from  my scrap drawers. It feels good to be using it up.

I cut the title using the Jubilee cart. It has some great fonts on it. Check it out. I punched circles from blue paper and made a border for the bottom.


The title was again cut from Jubilee and the space shapes are from the paper doll cart. There are all kinds of shapes on this cart you can use. If you don't have it you need it! I added stickles to them for some added dimension.


And here are a few close ups.


If you love Disney I have lots more layouts and projects on my blog so hop on over and have a lookie.

Supplies
Cricut
Paper doll cart
Jubilee cart
stickles

Hugz
Tina Gale

April 25, 2012

Baby Banner!


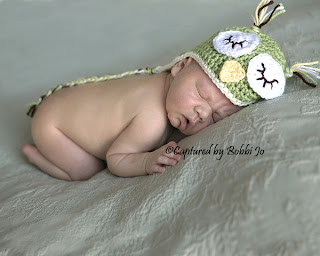
I wanted to share an image from one of my newborn sessions for ©CapturedbyBobbiJo that I created a banner using the cricut and Art Philosophy cartridge. Isn't he just so adorable?  I also used the graphic 45 papers from the baby 2 bride collection and little darlings.

My facebook page for my photography can be found by clicking here! and please "like" the page.  Be sure to leave a comment on my wall letting me know you found me from sweetsassydiva.com (here)

Of course for my crafts, you can still follow on facebook by clicking here! and "like" that page too.

If you are in the Southeastern Wisconsin area or Northeastern Illinois, I am looking for a newborn model that is due in the month of April.  Be sure to schedule now. 

April 24, 2012

Many Thanks Cards!

Wow, the 'wild card' theme for this week took me a while... couldn't pin down a specific thing I wanted to do. I always need thank you's so here we are :) So simple and easy to make that I am thinking I will make a few sets to have as quick gifts.
The flower border is from Holiday Cakes page 52 , cut at 1 inch from card stock from my stash. I added some dots and dashes with various gel pens. The Many Thanks is from Wild Card ( had to do it, LOL ) page 42 and is cut at 5 inches from black card stock. I made the card from Kraft card stock, sponged the edges with a brown ink and made a faux bow from white seam binding. I am thinking these easy cards are going to need a cute box of some sort for giving as a set. Guess that will be my next project.

Melinda

April 23, 2012

Busy Bee!

Angie here, This week at Sweetsassydiva we were given a wild card week. I chose to do a layout. I really need to work on my scrapbooking and this gives me a reason to do so. My inspiration was my 2 little girls who have been non stop all day everyday since they were born. My busy little bees.... As always I have one idea in mind, and then end up with something completely different. I started with using George and Basic shapes cutting out 3 in octogons. I cut them in a tannish and white cardstock. I really don't like such stark colors so I used my Ranger Ink (antique ivory) and distressed them just a bit. I then used Create-a-Critter to make the cutest little bumblebees and bee hive. I cut them at 2.5 in.
Again I decided to distress a bit on the beehive.
I cut out the title using Plantin schoolhouse at 1.75 in. Then it was assembly time. I think it took me longer to play with how I wanted it to come together then it did to cut out all of the pieces. The one that stayed the same is the part that says "BEE"
I cut out 4 (4.5x6.5) mats for photographs. Or can be divided for a smaller picture and a journaling box. This will be cute filled with pictures of my busy bees. It was really simple to make and turned out better than my first thoughts. I hope you enjoy.

*recipe* cardstock...black, white, tan, black, yellow, blues cricut cartridges....george, create a critter, plantin schoolbook markers, ink (a napping baby is good as well)

April 22, 2012

Blessed!

Good Morning! This is Jen from 3 Cats and a Bug. This week at Sweetsassydiva's the DT is creating something we are wild about. Today I'm also using a Boy's Rule sketch. {More info on my personal blog, 3 Cats and a Bug.}
I started out with a double sided patterned paper from K & Company. I created a layout on the other side and didn't want to waste this page.
I added a 3 x 12 strip of patterned paper with a darker shadow paper.
Next came a 8.75 x 10 blue, with a brighter blue shadow.
Next came a green patterned paper cut at 7.75 x 9 with a bright green shadow.
I added a blue grey strip at .75 x 10. I also took a strip of patterned paper and used my MS punch to create a heart border at 1.25 x 9.25 and glued them down.
Next I took 3 pictures of my Grandson and trimmed two of them to 3 x 4 and one at 3.25 x 4 and matted them all in light blue and glued them down.
Next I cut out three arrows from Gypsy Wanderings at 1.6 x 5.25, 1.5 x 3.32 and 1.10 x 2.39. I ran two of them through my big shot with a cuddlebug folder.
and glued them down.
I cut out two green star shapes at 2 x 2 from Gypsy Wanderings and glued them down.
From Cindy Lou I cut out the word Boys in blue and green at 1.3 and glued that down. I added some gems, some stickles and used my white gel pen.
Just some detail shots...
Thanks for looking!

April 21, 2012

Week in Review!

This week we had a Mojo Monday Challenge. As you will see below, even with following the same sketch, there are so many different options. 


To view this card, click Here!


To view tutorial, click here!


Here's Hello Dragon Fly! with more detail click here!


 Don't worry Bee Happy! tutorial click here!


Happy birthday! tutorial is here!


And remember Owl Always Love you!