

Hello Sweet Sassy Diva bloggers. This week the challenge for the DT was
Tis the Season. So I packed up my Halloween things and got out my Christmas goodies. I for one was ready to move on to another color
palette. For this project we could make anything a card, layout, altered
project, gift. You name it! Well I decided to make and share some of
my Gift candles. I made some of these last year and they were a big hit.
It is a great idea to make a few and then if someone stops by unexpectedly
with a gift or you need a hostess gift you have them available. They are
great for Thanksgiving, Christmas, and New Years. Oh and I guess you could
even do a Halloween one if need be. They are quick and easy to put
together and you can use scraps,Cricut cuts, or any embellishments you
have around. Here are the 4 completed candles.
The large ones were purchased at Michel's on sale 3 for $10 and the small one
was$1. So watch the sale ads.
Directions:
1. For the tops I used the Tim Holtz Rosette makers which I love as
it is so quick and the rosettes come in three sizes- 3/4 ", 1 " and 1 1/4". This is especially handy for small rosettes.
If you don't want to make rosettes you can put die cuts, embellishments,
flowers, etc. on top. 2. Pull off the labels. This is easy peasy on M's candles. If
you have a candle and it won't come off then just cover it. I like to cut the flavor of the candle off the label and stick it to the bottom.
3. Cut strips of 12 inch paper for the large candles. You can
leave it plain or punch with punches. I cut the bottom layer at 3" and the top layer at 2.75. The small one was 1 1/4 " and 1 ". I
then glued a strip of coordinating ribbon down the center. You could also
punch a strip with your punches.
4. Glue the strips together and then put ATG strips or glue on the back
and roll it around the jar. They will just meat in the center. I then put strips of invisible tape over the meeting point.
Make sure you keep it tight so it won't slide down.
5. Now you are ready to decorate. See the next group of pictures for
details.
The first one was done using embellishments of holly, pointsettias, gems and
raffia. I found a bag of raffia at M's with red, green and cream that I knew would come in handy. I added a holly to the top of the
rosette.
The Thanksgiving jar I used the acorn from Doodlecharms cut at 5" and 3".
I embossed the acorns and added some embellishment leaves and the word Fall. The Fall colored raffia is from the tie from a package of pasta my
hubs bought.
The blue one I cut out a snowflake from Art Philosophy with the ornament shadow
at 3". I added some snowflake gems and bling.The small one I added a Merry Christmas embellishment and some
raffia.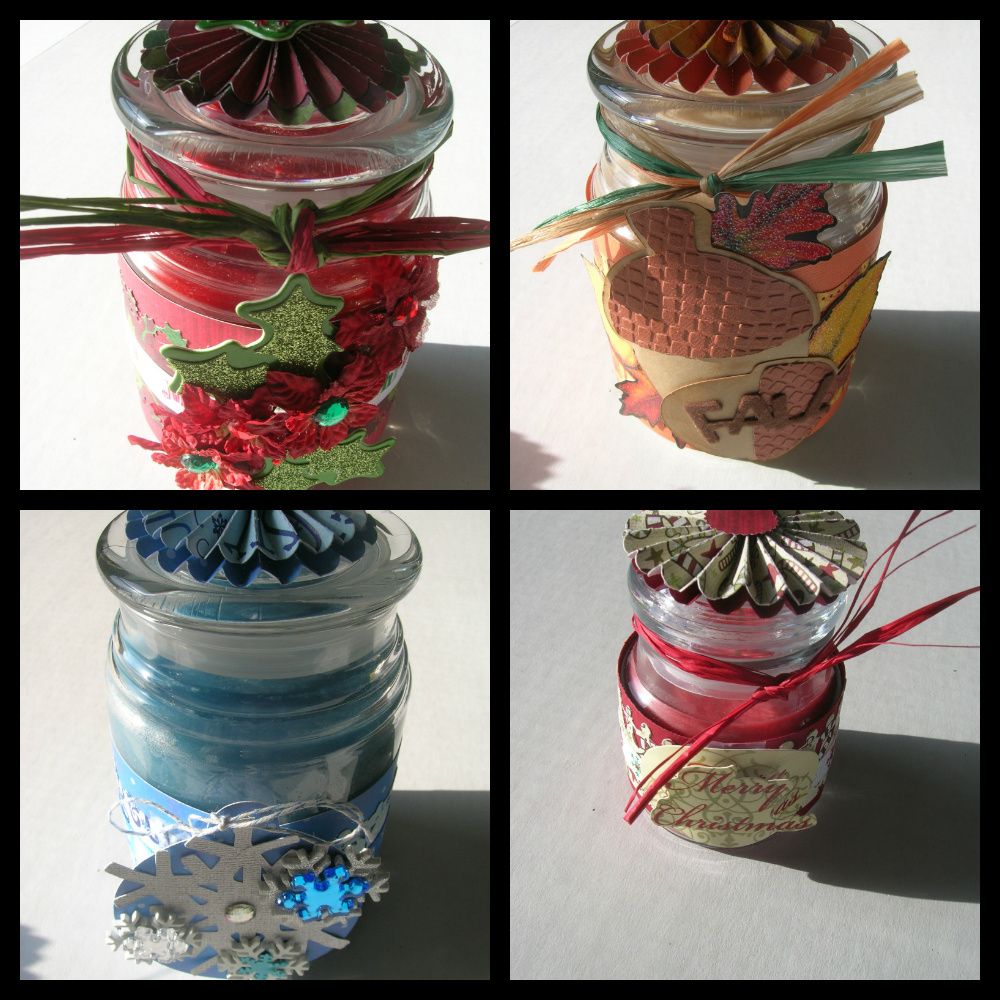
Here are a few more pictures and ideas from last years candles.

I hope you have enjoyed this idea and the directions. I would love to see
your comments. Please come back all week to see what the other DT members have created.


4 comments:
Suzanne Love them. Both of my girls and my friend love candles. These will make excellent gifts. Thanks so much for sharing
I'm scraploifting...Forgot to tell ya
I love these candles Suzanne!! They look so awesome and make such a great gifts! Thanks so much for doing a tutorial for us!!
Great projects!
Post a Comment