Hi! Lori here from ScrappinMyStressAway with a Witchy Banner! Sometimes that is just how I feel! Most of the time I just love Halloween.
I started with some paper. The purple paper is from Nikki Sivils Boo-tiful, and I think I got it at CKC in Kansas City last October. The green black and orange are cardstock from my stash.
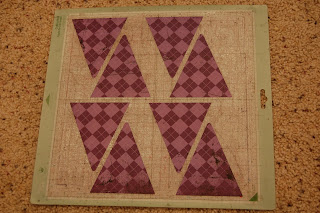
I turned to Birthday Bash for my banner base. There are several banner shapes to choose from and I wanted to layer two pieces. I started with the triangle at 3.94w x 4.25h. I copied and rotated a second triangle, then copied the two of them three times to get 8 triangles on my mat.
I cut them out with the purple plaid.
For the top layer, I chose the zig zag triangle banner sized at 3.92w x 4.25h. I copied, rotated and copied until I had eight triangles on my mat.
I cut out these in lime green cardstock.
I found the Witches Hat from Mini Monsters and sized it 2.95w x 3.50h. I used Hide Contour to hide the inside cuts on the hat. I put eight on my mat.
I cut them out in black cardstock.
On the next layer, I put eight stars from the hat layer (I hid the hat band and circle) along with the word "witchy" from Birthday Bash at 1.0w x 1.12h.
I cut out the stars with some purple scraps. I found this scrap for the letters with halloween words on it.
Next I jazzed up the hats with some stickles. I did half of the hat bands purple and the other half lime green.
I put icicle stickles on the stars.
My banner was missing one thing (and I don't have the patience for making rosettes) so I found this shape from Elegant Edges. I cut out eight of them at 2.90w x 2.76h.
I cut them out in orange card stock.
Here is the shape after I weeded out the inner cuts.
I layered the pieces together to have a look.
I inked the letters with black stamp pad ink and pop-dotted them on the hats.
I put them all together with some polka dotted ribbon. I am getting better at using patterned paper and busy ribbon together (still prefer solid colors most of the time)!
Here is my banner all together. I hung it on my daycare door (cackle, cackle)! Hope you have a wonderful witchy day!! Thanks for having me over today SweetSassyDiva!!


8 comments:
Oh my word...That is CUTE!! I like the how you put it all together. Very "festive" :) What are rosettes? I made my first banner just this past week. That is time consuming for sure!! The more I see from mini monsters and birthday bash, the more I am thinking I need these carts! TFS!
Hugs,
Michelle
http://michells-crafty-creations.blogspot.com
Very cute banner Lori. The Witches hat is too cute. I love all the different banner shapes from Birthday Bash.
I love your banner! What a great tutorial. Thanks for sharing. :)
Tami
http://scrappinrabbitdesigns.blogspot.com/
Such a cool banner. Love witches. TFS
scrapbug@live.com
Very cool!
I was wondering ... looks like you got a lot of use out of your mat.
Do you use something to restick your mat? what seems to work best for you?
Thanks for sharing your cool projects.
Monica
monica.lowrance@gmail.com
http://happyscrappn2.blogspot.com/
Cute! I love the witches hats..Very nice job!
transport7800@aol.com
http://mawmawsthoughts.blogspot.com/
follower!
Very clever! You did a great job! Thanks for your inspiration! I sure learn a lot from you!
Natalie
mtmcbroom at gmail dot com
http://timelesslegacydesigns.blogspot.com
Lovely Be-witched Banner. Smooches... Felicia - frankleecrafts [at] gmail [dot] com
Post a Comment