

Want to join the SweetSassyDiva Design team? Today is the last day, September 30th, to submit your entry to join the design team!
Please include 3 layouts, cards or projects that best reflect your design style. (Your favorites...these do not need to be new.)
Also, submit one layout, card, gift idea or project using the theme "Tis the Season" that has not been posted anywhere before. Do not post it anywhere until after the design team call has been completed and announced.
This can be all about Winter Celebration, How you celebrate the Holiday Season, or other Winter holiday celebrations! It can be an altered item, handmade card, 12x12 layout, mini album, Christmas Card...surprise gift idea to wow us!
Please provide step by step instructional pictorial or video along with the recipe for the item. Be sure to use a Cricut Cartridge based project as after all most of the projects here you will be asked to use your cricut and cartridges so, that readers can get inspiration and possibly duplicate and play along with the challenges.
Please email including the recipe, directions and any other project details such as a cut file, tutorial and/or video. Email your entry to: Click here! In the subject heading, please label as "sweetsassydiva design team entry".
• Include your name, email address, the link to your blog, links to any photo galleries, and links to any other Design Teams you are currently on. (You do not need to have a photo gallery or be on another design team to be considered.) Also, if you are from a messageboard, which one and your screen name there. Are you a member of the cricut mb or cricut circle? (This is not a requirement.) Please include a brief bio/introduction of yourself.
Please indicate what die cutting machines [cricut, imagine, e2 expression 2 anniversary edition, expression, etc.] that you own as well as if you own the gypsy and what cricut cartridges. Or any other items of note or interest. Also, how many cricut cartridges do you own? Are you able to make a few go to cartridges sing and create your own cut files from george and basic shapes? Do you jump on the first release and have to be the first one to have the latest cartridge? Tell me a bit about your creative space.
The term will be for 6 months and the frequency of posting will be every other week miniminum with projects due on the Sunday before.
• Also, put in three sentences why you think you will be an asset to the SweetSassyDiva Design Team.
Please submit your application by 11:59pm EST September 30th which is TODAY :)
Actually, you can submit older projects and only 1 is theme based and new. Do-able to whip up.
SweetSassyDiva Designers will be contacted by October 15th by email. The Design Team will be announced on the blog shortly thereafter.
Note: this is not a paid position nor do you receive any free product. Although you never know but, I do not guarantee anything other than friendship and camaraderie among the design team and myself.
Good luck!!
On a separate note, I am also looking for sponsors and affiliation submissions as well.
September 30, 2011
September 29, 2011
Disney Autograph Pillow Cases

Hi ~ Lori here from ScrappinMyStressAway with a Disney project to share. I was in the Disney Hop with Sweet Sassy Diva last weekend and you can see my layouy HERE if you like.
We are getting ready for our first ever Disney Cruise! We have been lucky enough to go to Walt Disney World several times with our boys, but I was shocked when my husband suggested a cruise. He does not really like the water so I figured a cruise would be a girls vacation or no vacation for me!
Mike is a researcher and he read on the Disney Message Boards that you can bring a pillow case on your cruise and the characters will sign it while you enjoy the cruise. I decided to make two of them and here is how I did them:

I opened a 12 x 24 mat on my Gypsy and used Disney Mickey Font for my letters to spell out APGAR FAMILY DISNEY CRUISE 2011. My original plan was to letter the top of the pillow case on both sides so I sized my letters so the words would fit a 20" length (the width of the pillow case).
Then, I flipped the letters so they would cut out in reverse.

I took Freezer paper and cut a piece to fit my mat. I cut it shiny side up.

I pulled the freezer paper "stencil" off of my mat.

At this point, I changed my mind and put all of the words on one side of the pillow case. I put APGAR FAMILY at the top and the rest at the bottom and ironed the stencil on the pillow case. I added in the center pieces for the D, R and A's and ironed them in.

I used fabric paint and a sponge brush to paint my letters. ***Don't forget to put something in between the pillow cases so the paint doesn't leak to the back side. I did not have any cardboard long enough, so I used the back of my cricut mat.

After the paint dried, I carefully peeled the stencil off the pillowcase.

Here is the pillow case all painted up! I decorated the next one with blue paint.


Don't forget to peel out the center of the letters!

Here is the blue lettered pillow case.

I added Nemo ribbon (found at Wal-Mart) to the edge of the pillow case. I don't sew very well so I am having my MIL sew the ribbon on ~ I just tacked it down for the photo.


I used this ribbon (also found at Wal-Mart) for the black lettered pillow case.

I can't wait to see it filled up with autographs!! Thanks for having me here again Bobbi Jo!!
Enter by September 30th!

September 28, 2011
Crush!
Hello everyone! Today I have a special guest, actually two guests that are helping me with todays post. Our challenge this week at sweetsassydiva was to use Disney Pixar. Well I can tell you doing Disney is not a challenge for me. My family are huge disney fanatics which brings me to my guest designer today. I've been so busy here lately and when my son came home from college last weekend with a friend he was showing him around my studio when I mentioned our next project. He grabbed my cart and started shooting all kinds of ideas at me. I jokingly asked him why he didn't just do the project for me and help me catch up. The next thing I knew he was picking papers and working on Crush here. Isn't he the cutest!?


This is his friend Braedon learning all he'll ever need to know about the cricut and scrapbooking from my son. LOL It was so much fun watching his project come to life.
Enter by September 30th!


He's a master at the chalking die cuts to make them pop don't you think?

This is his friend Braedon learning all he'll ever need to know about the cricut and scrapbooking from my son. LOL It was so much fun watching his project come to life.

I hope you enjoyed Joseph, my guest designer, today and his card. I definitely have a crush on him and his card.
To Joseph, I love you more than words could ever say. Thank you for all the joy you bring to my life and always willing to jump in and help me out when I need it.
Hugz
Tina Gale
Enter by September 30th!
September 27, 2011
OH BOY!
Hello everyone and welcome to the Sweet Sassy Diva Blogspot. This week the
design team was asked to do a project with Disney/Pixar. There are so many carts to choose from. For this project I decided to do a twisted easel
card and use Mickey and Friends and Mickey Font to decorate it.
Believe me once you try making a twisted easel card you will be hooked.
The papers are from a Disney stack I got at Joanns.
So here are the directions:
1. Cut 2 pieces of cardstock- one 6x6 and 1 6x 12.
2. Fold the 6 x 12 in 1/2
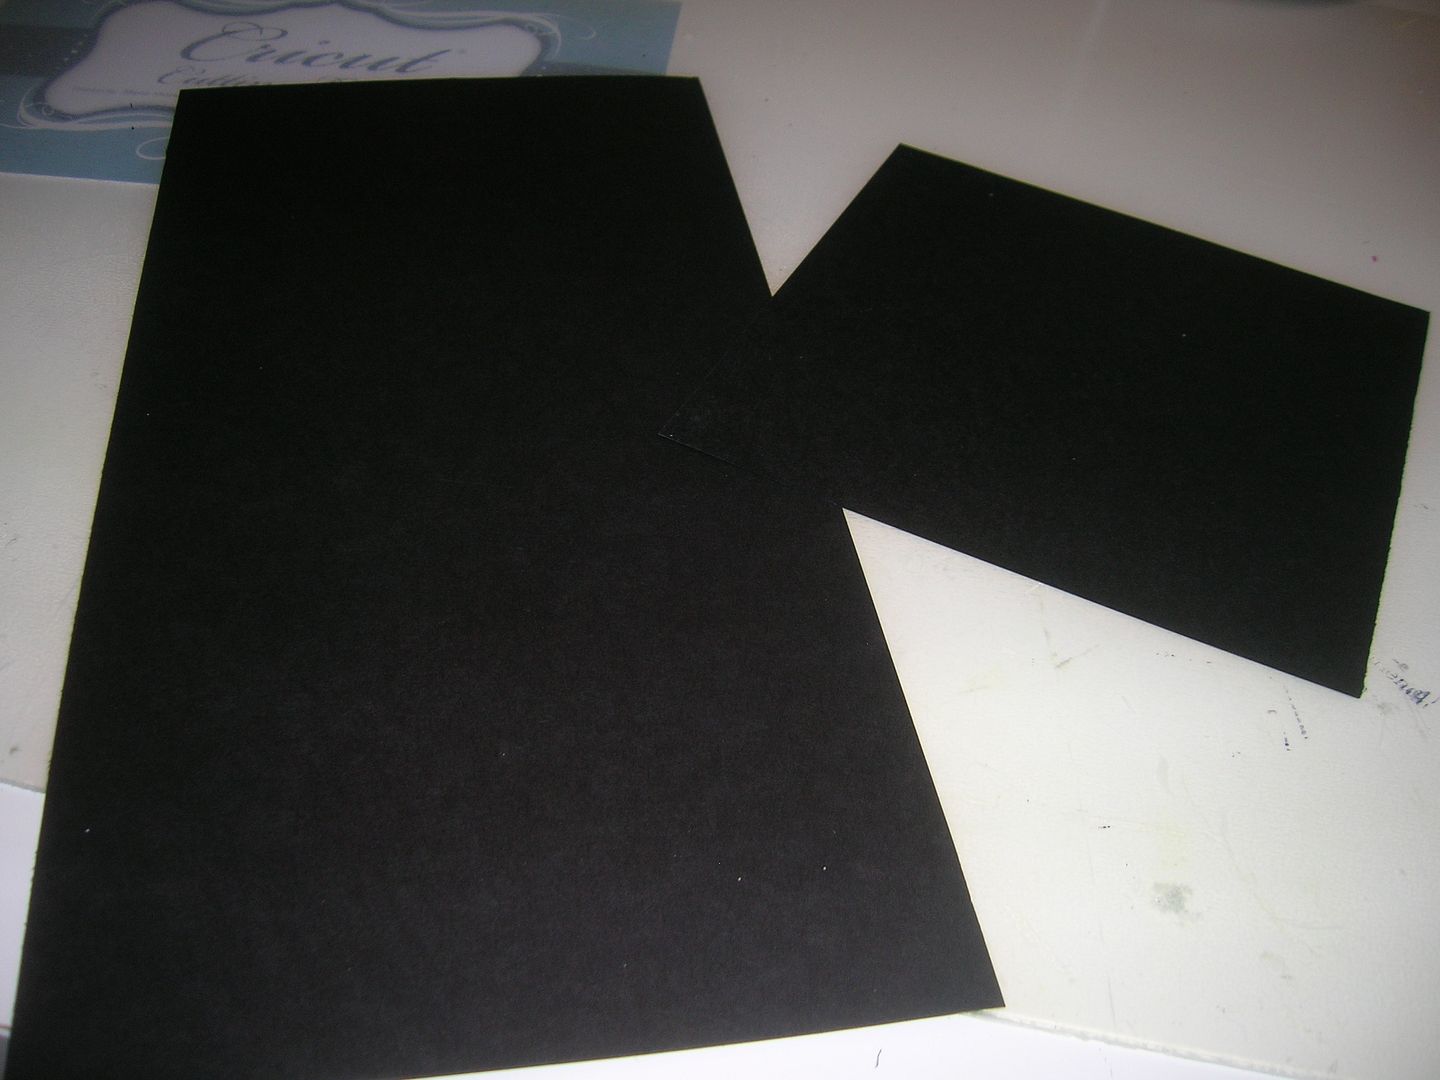
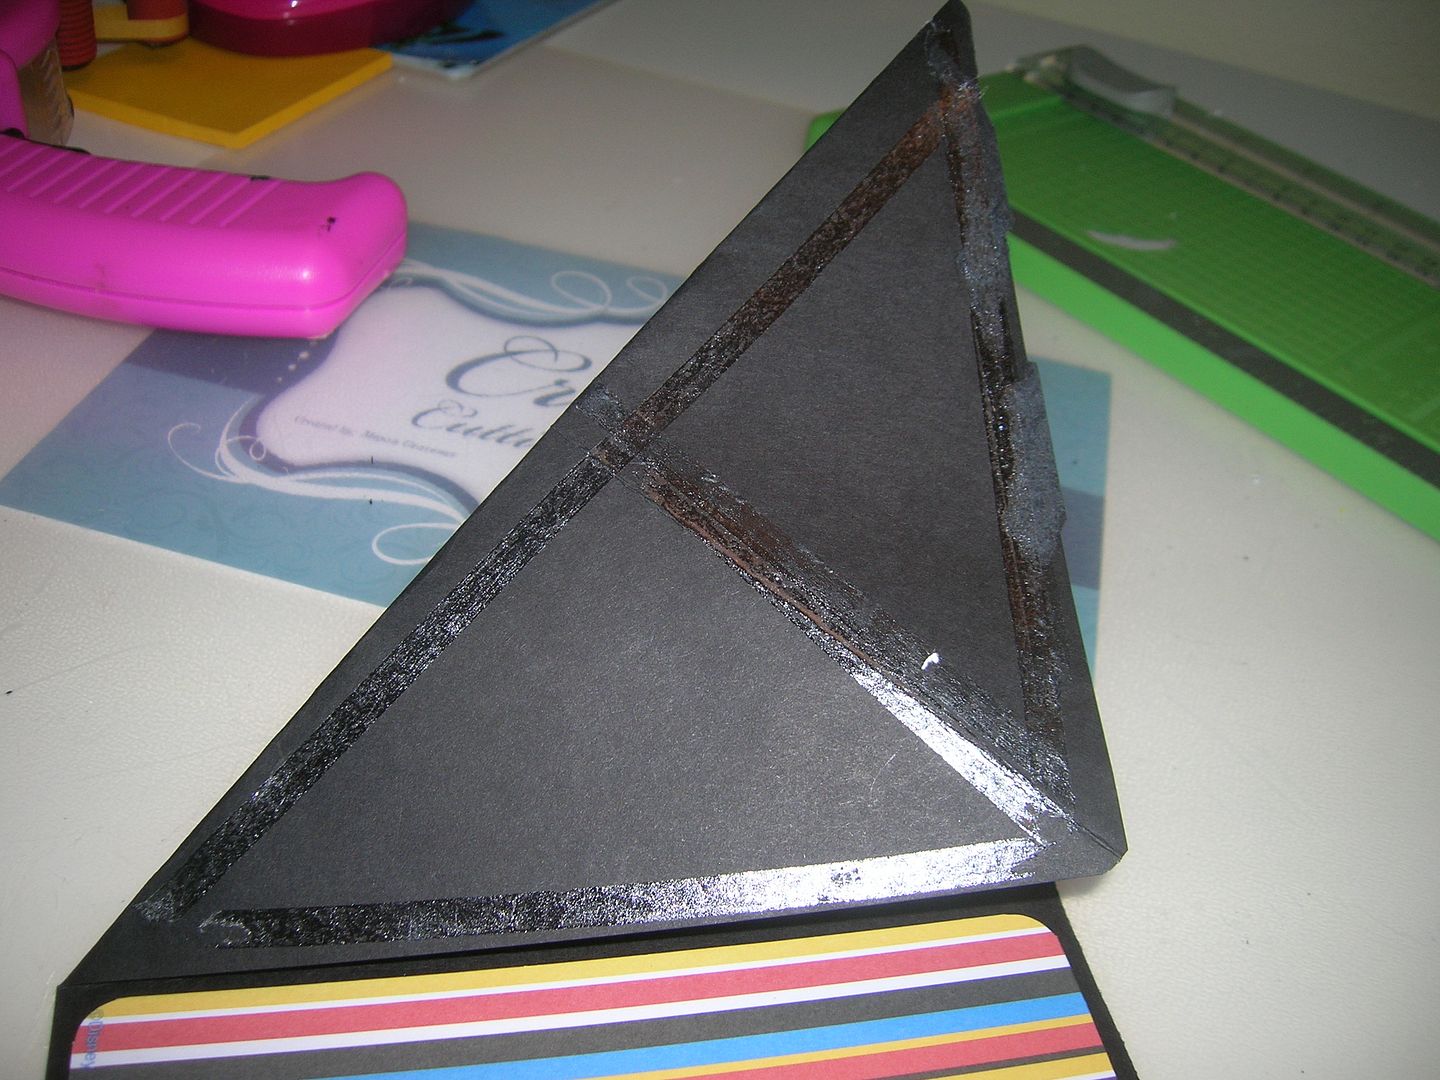
3. Fold the left side of large piece across to form a triangle. (I
goofed and folded the wrong way but that is fixable as it will be covered with the other piece). I use my ATG gun to adhere the 6 x 6 piece to the
triangle. Mke sure to line up at bottom so card will close. Test now
before you can't remove it. I guess I forgot pic of this step but see
picture 8.
4. Here is my mat with cuts from Mickey and Friends page 108 cut at 5
inches. I did not cut the shadow. 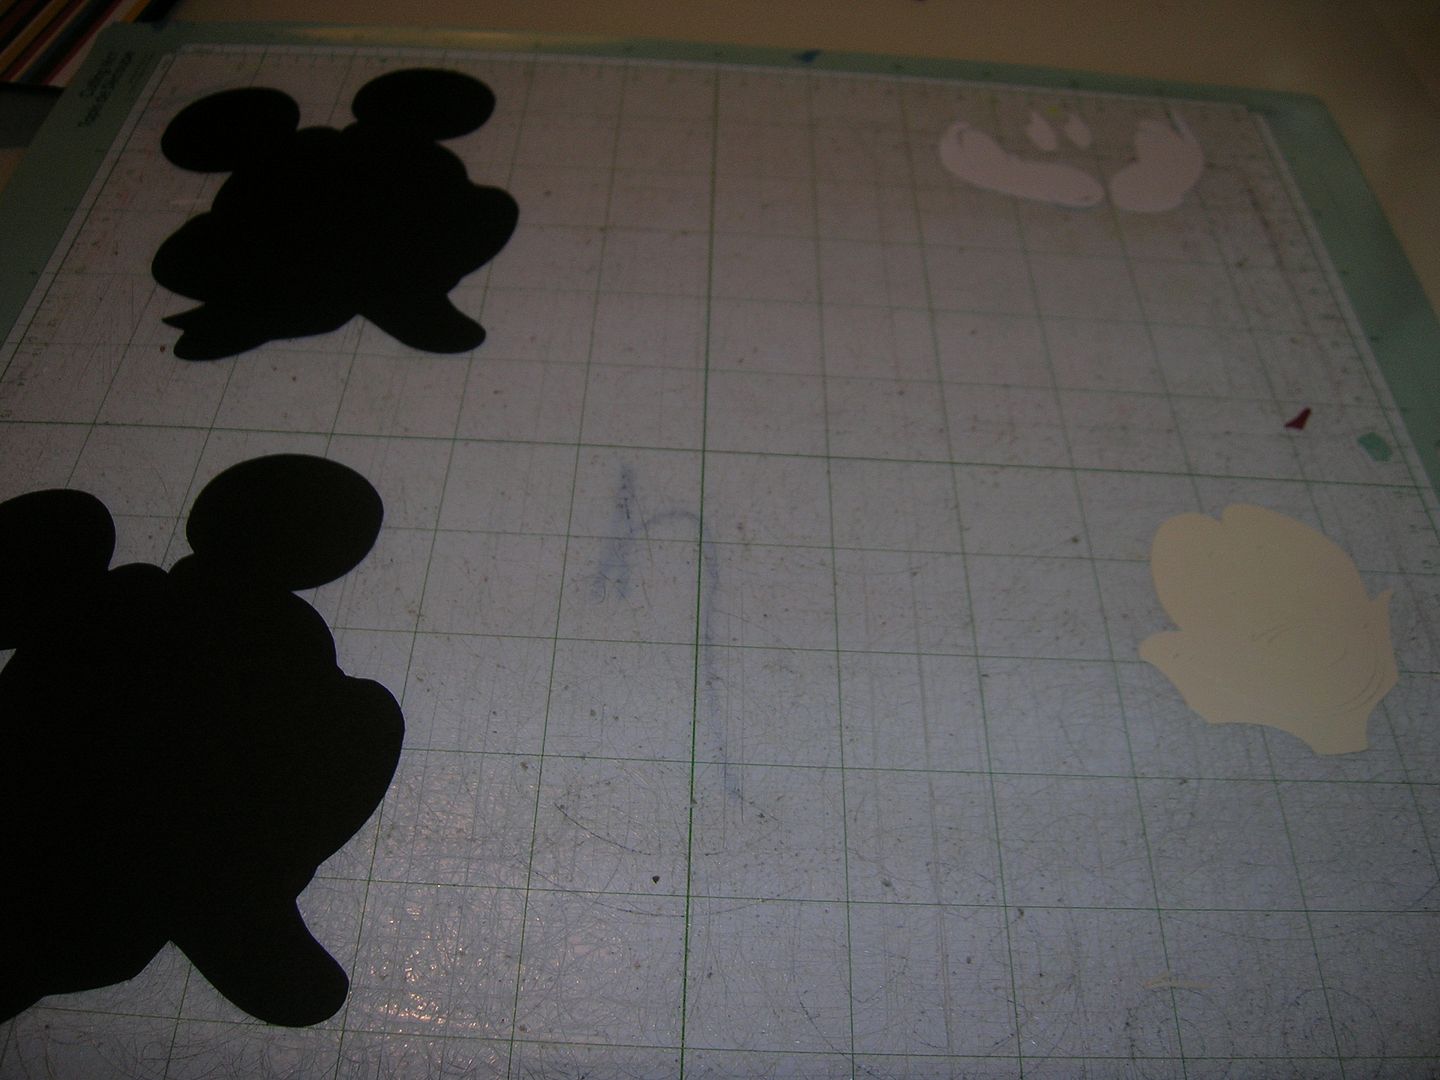
5. Here is my mat with Oh Boy cut with shadow at 1 inch from Mickey Font.
This was an already designed phrase so I did not have to make words. 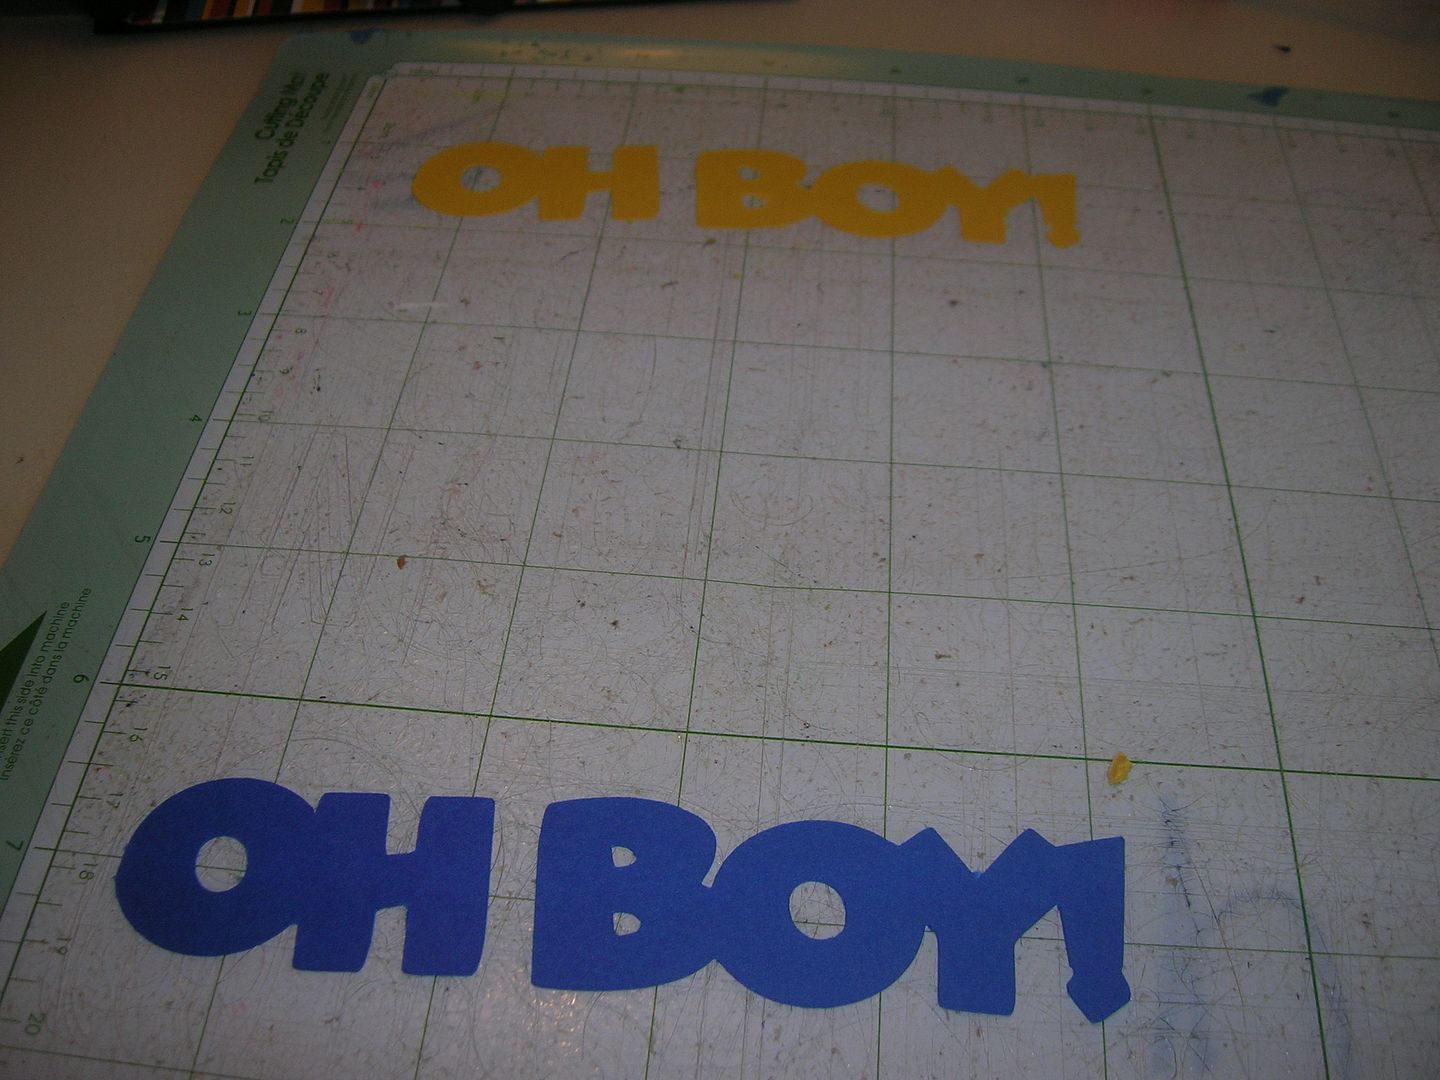
6. I glued my pieces together and added Glossy Accents to eyes and nose.
To the words I did dots and dashed with a Sharpie. 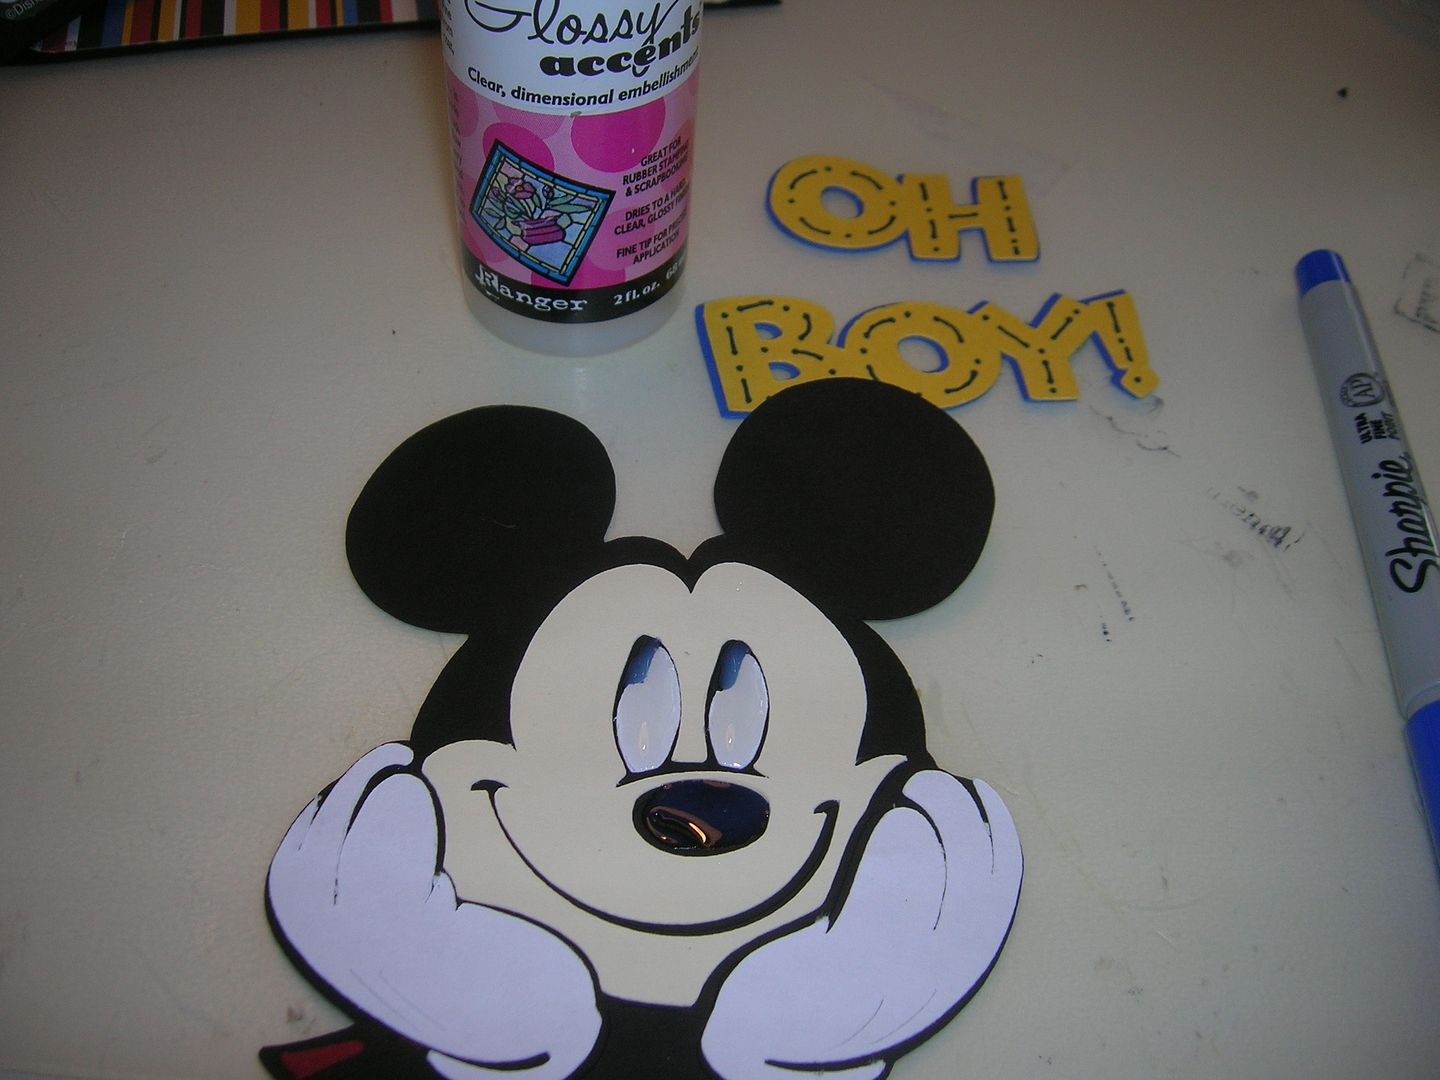
7. Next I stamped my birthday sentiment and placed it on a 3 1/2 inch
cardstock piece. Then you use pop dots so this piece will hold the easel portion up.
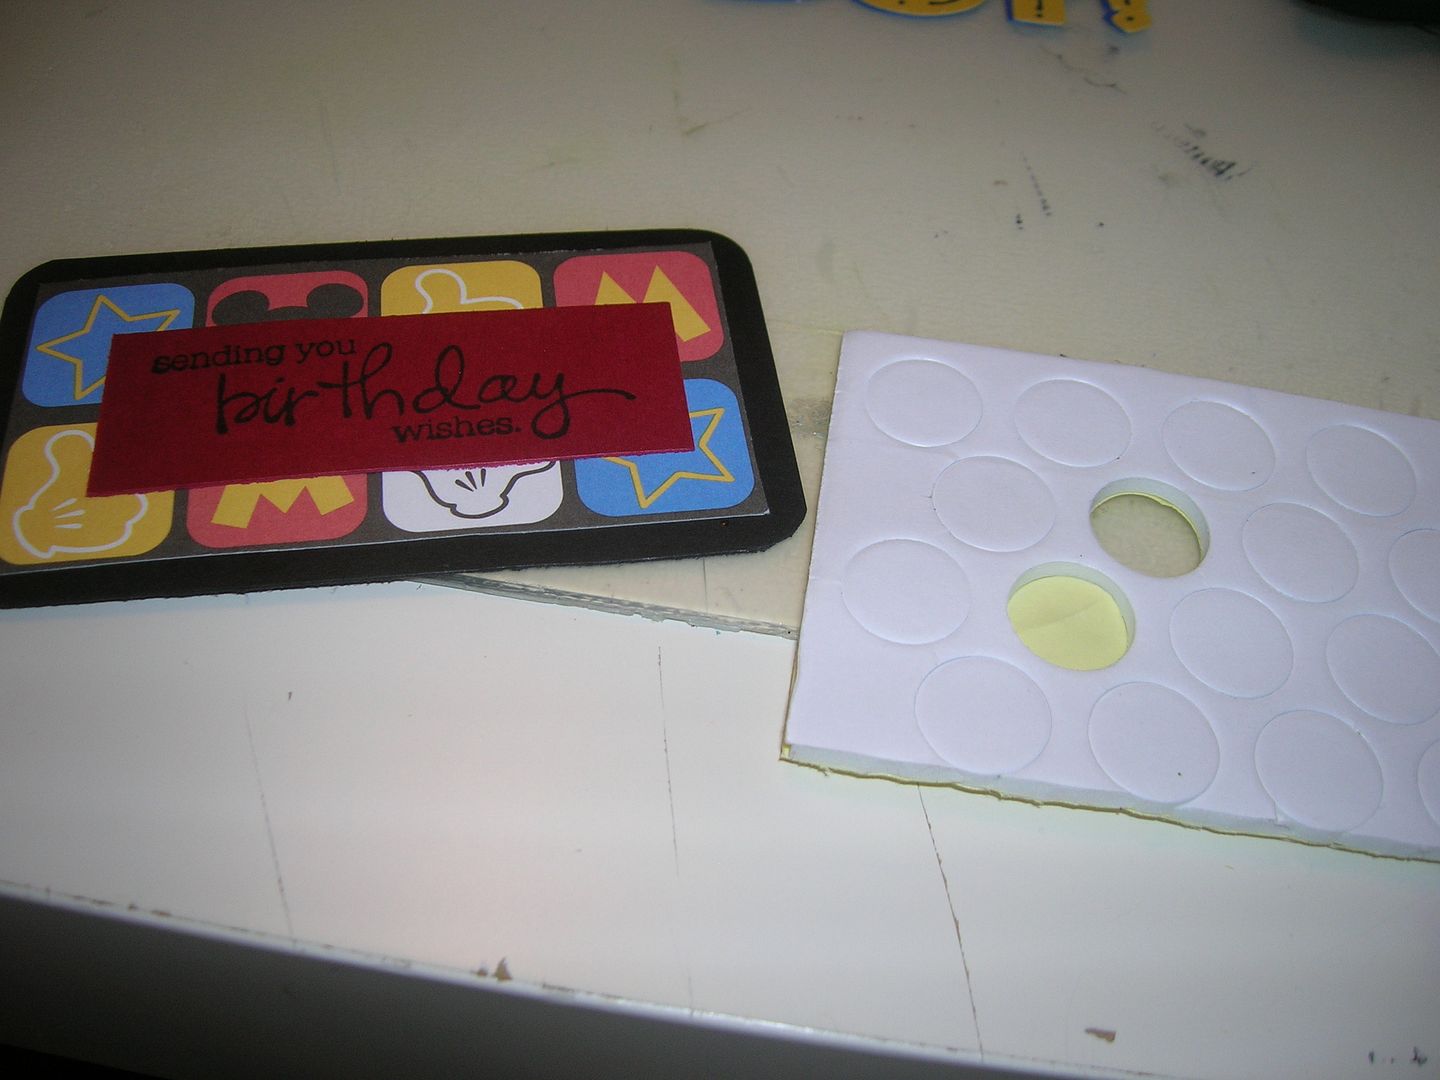
8. Place the sentiment piece on the bottom of card back so it holds easel
in place.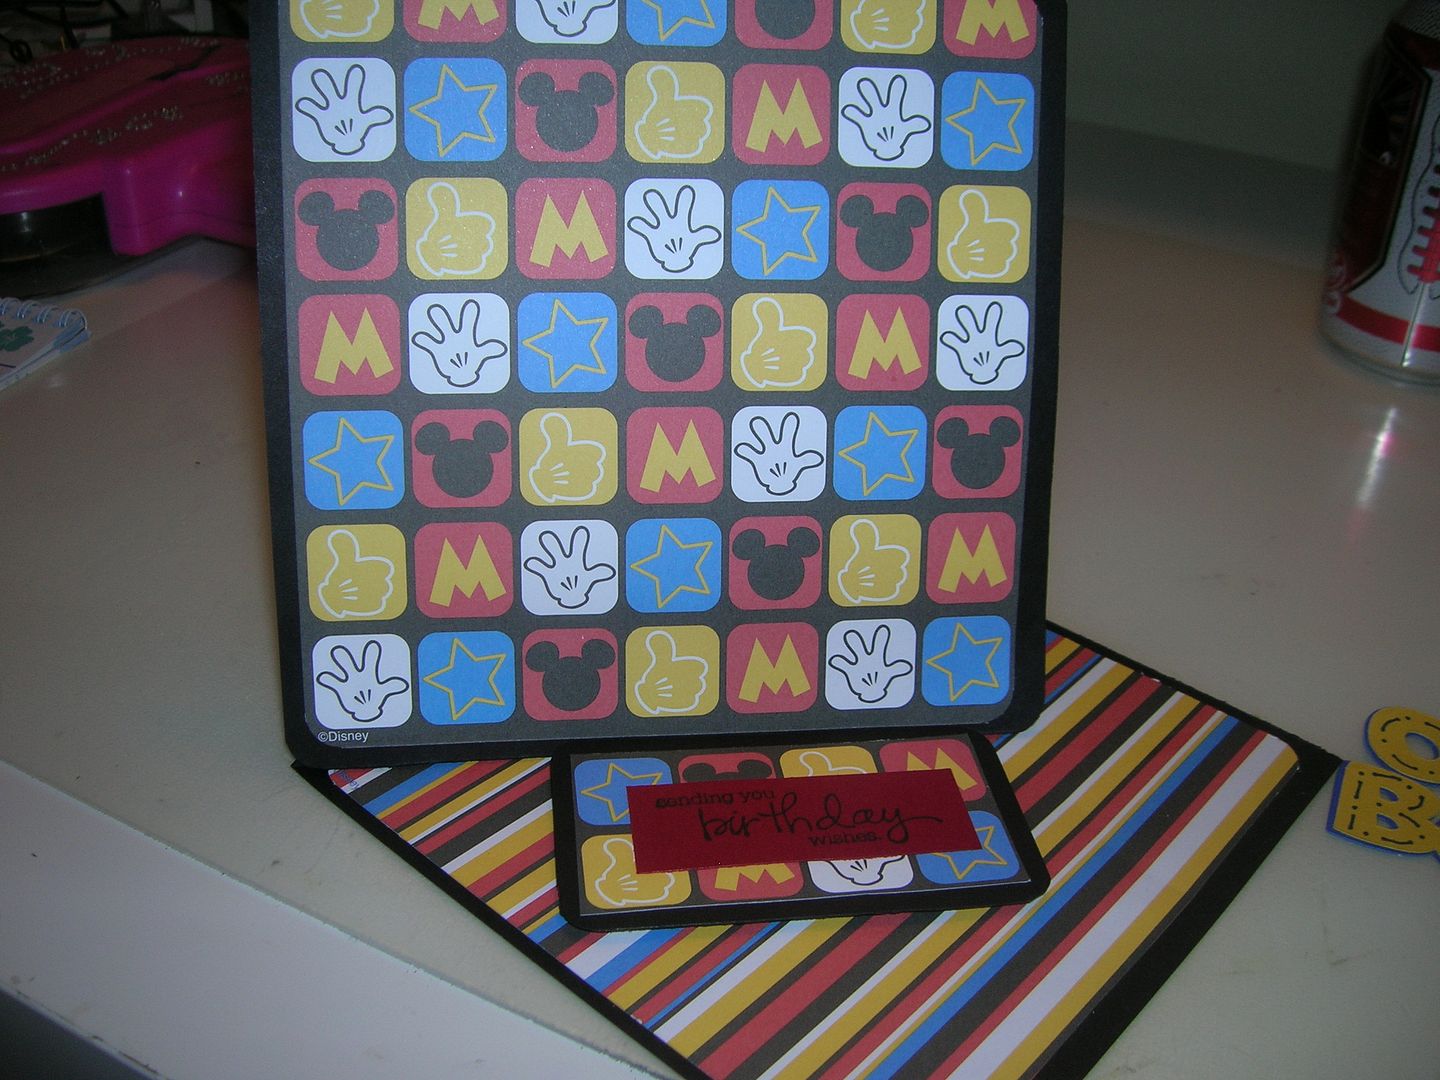
Add other cuts - Doesn't Mickey look so happy.
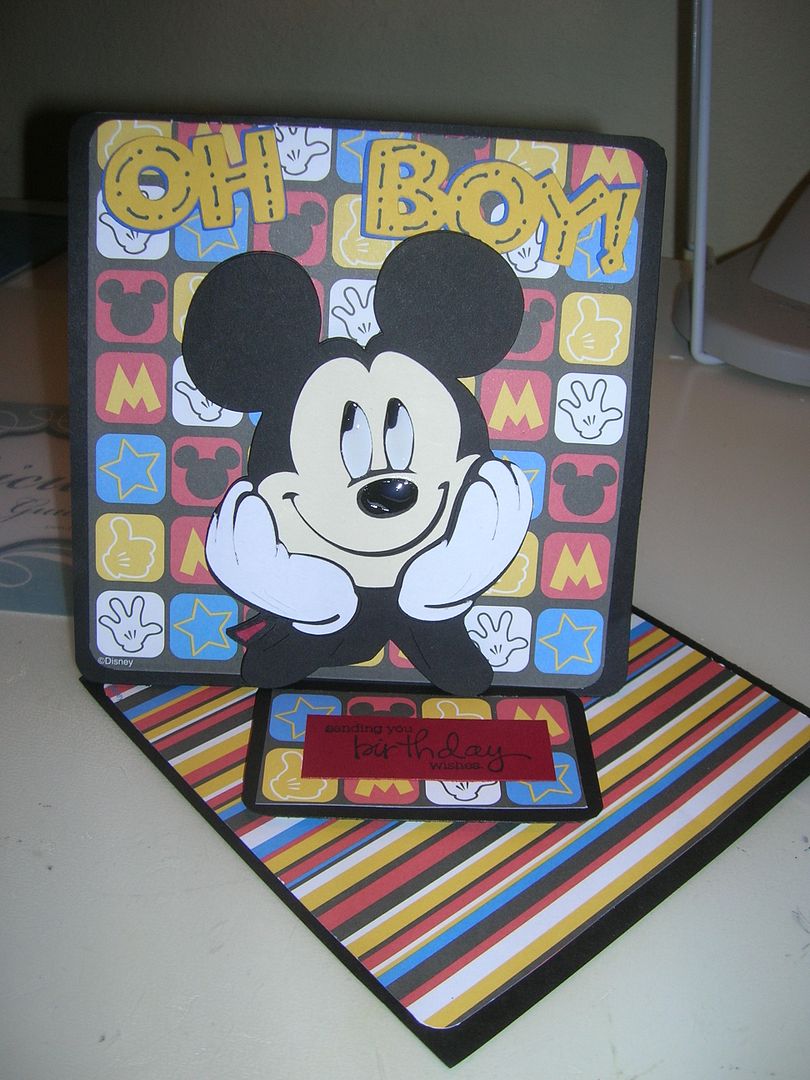
This is card closed
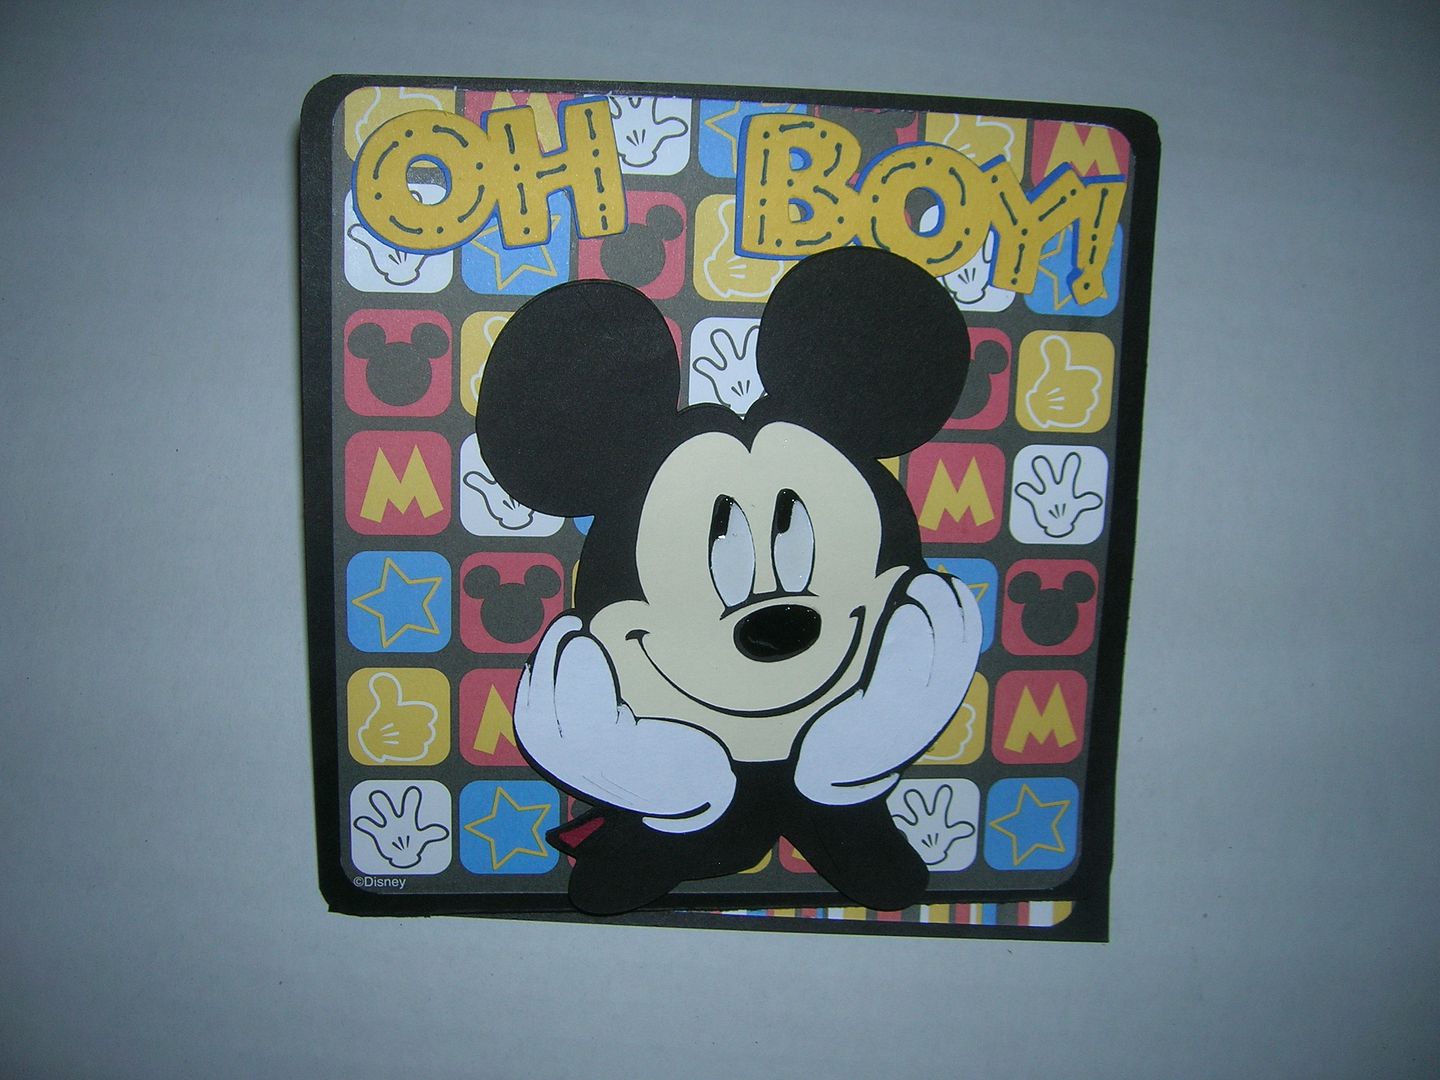
I added two Mickey buttons I had in my stash.
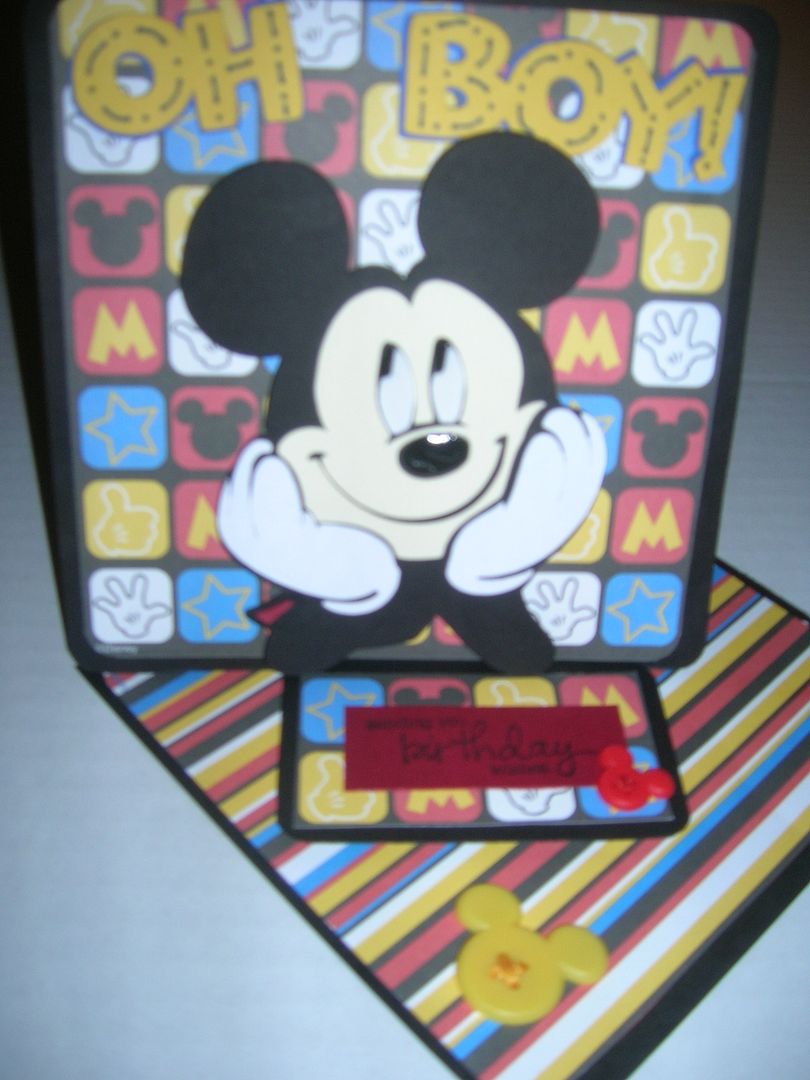
Sorry this pic is so blurry.
So now you know how to make a twisted easel card. This is the link to
where I got my directions and you will also find directions for double and triple twisted easel cards here.
I can't wait to see what the rest of the Design Team has made this week.
How about you? Make sure to come back each day to check it out and you are always welcome at my blog too
Be sure to check out the SweetSassyDiva DT call! Be sure to enter the SweetSassyDiva Design Team Call!
Enter by September 30th!
September 26, 2011
Little Mermaid!
This week at SweetSassyDiva's we're doing the Disney Theme. My kids are way past that age, but when my daughter was younger, she LOVED the Little Mermaid. The dress she's wearing in this picture (which I did save for her!) was her favorite one and trying to get her to wear something else was a challenge!
I used Disney - Princesses Dreams Come True cartridge and Cricut Craft Room! There is a great blog on how to do faces on in CCR, Cricut Craft Room blog, however with the new build it didn't work correctly for me. So instead I followed the directions but did a Print only and cut it out myself. Ariel isn't a hard shape to cut out. She was cut @ 5 and then I did an extra cut of her hair, flower and top. I added crystal stickles to her hair and yellow stickles on the flower center. I used glossy accents on her top and flower.
![]()
In CCR I also cut out Flounder @ 2.5 the same as Ariel and cut him out myself also. (I'm hoping this gets fixed quickly, I hate cutting things out by hand! LOL)
The bottom border was cut @ 7.25 and the frame was cut @ 7.5. Stickles were added where ever I could. :)
To get the picture to fit the frame, I cut the background piece out of scrap paper, but I did NOT lift it off my mat! I lined up where I wanted my picture to show through the frame by laying the picture under the scrap paper and moving it around. Once I picked out what I wanted, I smoothed the picture on the mat and removed the scrap paper and cut again. Perfect every time!! (Sorry I forgot to take pictures of the process) Stop by my blog, 3 Cats and a Bug and e-mail me to let me know if you need help with this.
I added a 4.5 X 12 light pink paper and a 1.5 X 12 dark pink strip of paper to add some contrast. With the exception of Ariel, this was one of the simplest LO's I've done in awhile.
![]()
Be sure to enter the SweetSassyDiva Design Team Call!
Thanks for looking!
I used Disney - Princesses Dreams Come True cartridge and Cricut Craft Room! There is a great blog on how to do faces on in CCR, Cricut Craft Room blog, however with the new build it didn't work correctly for me. So instead I followed the directions but did a Print only and cut it out myself. Ariel isn't a hard shape to cut out. She was cut @ 5 and then I did an extra cut of her hair, flower and top. I added crystal stickles to her hair and yellow stickles on the flower center. I used glossy accents on her top and flower.
In CCR I also cut out Flounder @ 2.5 the same as Ariel and cut him out myself also. (I'm hoping this gets fixed quickly, I hate cutting things out by hand! LOL)
The bottom border was cut @ 7.25 and the frame was cut @ 7.5. Stickles were added where ever I could. :)
To get the picture to fit the frame, I cut the background piece out of scrap paper, but I did NOT lift it off my mat! I lined up where I wanted my picture to show through the frame by laying the picture under the scrap paper and moving it around. Once I picked out what I wanted, I smoothed the picture on the mat and removed the scrap paper and cut again. Perfect every time!! (Sorry I forgot to take pictures of the process) Stop by my blog, 3 Cats and a Bug and e-mail me to let me know if you need help with this.
I added a 4.5 X 12 light pink paper and a 1.5 X 12 dark pink strip of paper to add some contrast. With the exception of Ariel, this was one of the simplest LO's I've done in awhile.
Be sure to enter the SweetSassyDiva Design Team Call!
Thanks for looking!
September 25, 2011
Disney Pixar Blog Hop!

Welcome to the Disney Pixar Blog Hop! I am honored to be a part of the hop that is co-hosted with Shawn and Melissa. If you arrived here first, be sure to stop by Shawn http://craftychicsblog.blogspot.com/ to see the whole hop. I hope that you find inspiration along the way.
If you arrived here from Kim http://uscrap2.blogspot.com/ then, you are in the right spot.
I decided to work on a two page layout to add some disney pictures later. Below is a picture of it before I glued it all down. I love to use my scrap'n easel to work on my cards and layouts before I glue it all down. It makes the process easier. In fact, she is having a sale on them now and you can see more on her site just Click here!

It all began with a mouse but, I find that I like to begin my layout on the gypsy.

I used Mickey and Friends, Mickey Font, Accent Essentials and Cursive 101.
I used the cutterpede to cut a red and yellow border.

I positioned mickey between the two pages cutting him just to the left of his eyes.

Here is the left page:

And the right page:

I cut some additional Mickey gloves to hold the photo mat.

I used the gypsy and welded the shadow layer and font for the title.

The irock added some bling to the title.

For the "Mouse" title, I used Mickey Font.

I used a few different papers on this layout including EK success Disney Mickey paper pad, Sandylion Mickey Characters and Creative Imaginations magic. Oh and of course a number of solid cardstock in coordinating colors.
What is your favorite disney title for a layout? I have a few on my list but, I would love to hear your ideas.
Please continue on your magical journey to Jenny http://jennyplace26.blogspot.com/ next. If you get lost, along the way, you can find a complete list on Shawn's site.
Be sure to enter the SweetSassyDiva Design Team Call!
Enter by September 30th!
All this week the current SweetSassyDiva Design team are creating more Disney Pixar projects to further inspire you. Be sure to check back at http://sweetsassydiva.com/ all week and I welcome you to become a follower by clicking the "follow" button in the right hand side column.
Here is the entire hop to enjoy it again and again:
http://craftychicsblog.blogspot.com/2011/09/disney-pixar-blog-hop-day-two.html
http://disneydreamerdesigns.blogspot.com/2011/09/3rd-edition-of-original-disneypixar_25.html
http://uscrap2.blogspot.com/2011/09/day-2-disney-pixar-blog-hop.html
http://sweetsassydiva-gspot.blogspot.com/2011/09/disney-pixar-blog-hop.html YOU ARE HERE!
http://jennyplace26.blogspot.com/2011/09/disney-pixar-blog-hop-day-2.html NEXT!
http://thecreativestamperspot.blogspot.com/2011/09/disneypixar-blog-hop-day-2.html
http://www.creativecutter.org/2011/09/disney-blog-hop-iii-day-two.html
http://jamielanedesigns.blogspot.com/2011/09/welcome-to-disneypixar-blog-hop.html
http://yesterdaystomorrow2011.blogspot.com/2011/09/disneypixar-blog-hop-and-giveaway-3rd.html
http://www.cricutforbeginners.com/?p=1953
http://scrappinrabbitdesigns.blogspot.com/2011/09/disney-pixar-blog-hop-day-two.html
http://www.lovetocrop.com/2011/09/disneypixar-blog-hop-day-two-ears-to.html
September 24, 2011
Changing Seasons.....
This week's challenge was a fall theme. Fall means back to school, and as a homeschool mom I am the one who gets to come up with our bulletin board ideas. However we don't have a bulletin board as such, so we make do with poster board when needed. This year I'm incorporating things for my 3 year old as part of school, and so that means more hands on. I also wanted to give the older kids a different perspective on seasons. The fact that with each passing season, time is moving forward....so there sprang my idea of a calendar/clock for the seasons. (That is what my 10 yr old has decided that it is called.) This project literally took me some time. I am so thankful for my gypsy and the weld function....and that I can load up several images from different cartridges at one time. I can't imagine having done this one without it. It's a very simple poster, but it took a lot of time welding, layering, and then some...so here we go...
 This is how I laid out one of my sheets for cutting. This is the one for all of the little symbols that I am putting around the clock. This is another reason I love my gypsy...I can lay things out according to the screen on my mat, and not waste paper. I get so much more use from scraps then I ever have. As you can see on this one I have all sizes laid out.

 Another tool I used was my heat embosser...another one of those things I love. I had cut out the title of my project on some ugly paper that just didn't do it for me. With the help of some stampendous ink and embossing powder it really stands out...which is good or it would get lost.
 After getting everything cut, and starting to lay it all out I realized that I had forgotten a circle. I grabbed my creative memories circle cutter and had one if just a few seconds. (I'm thinking this one should have been on tools.)
Finally here are all of my pieces ready to start placing.
 I started with the clock face. I cut out 2 inch strips in colors I thought would represent each month and glued them around the circle. I then added the small circle to the center of the clock to cover the edges.
 I embossed all of the months and the title, glittered the numbers, and some of the symbols. After it was all dry I laid it out on the poster board. It doesn't look fancy, but it shows the idea of what I wanted for the kids to realize, that seasons, and months as they go by are time passing by. I want them to enjoy what each one brings, and not keep wishing them away. So each month has some symbol of something to look forward to. I also used the landscape scene from camping critters to give an idea of what the world outside looks like. Here is my finished project and then I will give the whatnots on the pieces.
 Ok here we go I hope I don't miss anything:
Cricut cartridges:
Plantin schoolbook for the numbers, title, and months (welded with the gypsy)
George and Basic shapes for the large circle (clock face)
Camping Critters for the landscapes.
Gypsy wanderings for the seasons, seasons shadows, and jack-o-lantern
Create a critter for the turkey
Doodlecharms for the stocking, snowman, valentine, flower, sun, ice cream, and school bus
Sugar and Spice for the kite and umbrella
Independence day for the flag banner
Creative memories cutter for small circle
Stampendous embossing powders, and clear stamping ink
heat embossing tool
glitter glue
a brad for the clock arm.
Have a great day, thanks for looking, and remember to enjoy each month, each season, each day for that matter, because it is all passing time. You can't get it back.....Angie
Be sure to enter the SweetSassyDiva Design Team Call!


Finally here are all of my pieces ready to start placing.


Cricut cartridges:
Plantin schoolbook for the numbers, title, and months (welded with the gypsy)
George and Basic shapes for the large circle (clock face)
Camping Critters for the landscapes.
Gypsy wanderings for the seasons, seasons shadows, and jack-o-lantern
Create a critter for the turkey
Doodlecharms for the stocking, snowman, valentine, flower, sun, ice cream, and school bus
Sugar and Spice for the kite and umbrella
Independence day for the flag banner
Creative memories cutter for small circle
Stampendous embossing powders, and clear stamping ink
heat embossing tool
glitter glue
a brad for the clock arm.
Have a great day, thanks for looking, and remember to enjoy each month, each season, each day for that matter, because it is all passing time. You can't get it back.....Angie
Be sure to enter the SweetSassyDiva Design Team Call!
Subscribe to:
Posts (Atom)


