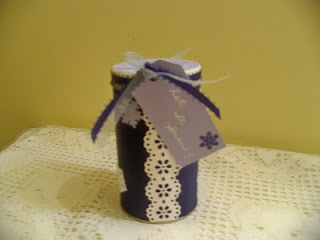
Well, here is my first attempt with the Post-It Full Adhesive Paper.
LET IT SNOW TIN CAN FOR TREATS!
This project was made with the Post-It Craft Paper Full Adhesive paper. This was easy, but also a challenge as I didn't plan for the lid not going on as easy as I would like due to the thickness of the paper. But, I got it done.
Supplies:
White, Glacier, and Cobalt Post-It Craft Paper Full Adhesive
Cuddlebug Snowflake Folder
Martha Stewart Double Lace Punch
Light Blue and Cobalt Blue Ribbon
2 1/2"X4 1/2" Christmas Tin from Michael's
Cricut Christmas Cartridges
Cricut My World Cartridge
White Craft Paint
Glitter
White Pigment Ink Pen by Signo
Hole Punch
Glue Pen
Recipe:
Paint the lid white and let it dry.
Cut a piece of the Cobalt paper the size of the Tin, peel the backing off and wrap it around the Tin. It stayed on with no problem. It was easy to remove several times to get it to go around the circle just right and then adhere back again.
Cut strip the lengh from the top to the bottom of the Tin from shiny white paper with Martha Stewart punch and adhere to Tin. (This is to cover the seam).
Cut the snowflakes using various Christmas Cartridges. Use the Post-It White paper for the snowflakes and Glacier paper for behind some of them. After cutting take off backing and adhere.
Turn some of the snowflakes over and put glitter on the sticky side. It worked well. Then adhere those to the Tin using glue pen.
Cut a circle using the Glacier Paper the size of the top of the Tin using the My World Cartridge.
Run the circle through the Cuttlebug using the Snowflake Folder. Peel the backing off of the circle and adhere it on the Tin lid.
Make a tag and write "Let It Snow" on it with the White Pen.
Punch a hole in the tag and tie both ribbons through it. Then tie a small bow with the light blue ribbon and adhere it to the top of the Tin with a glue dot.
Stuff with goodies and give as a gift.
Donna
Subscribe to:
Post Comments (Atom)


3 comments:
I love this!! How cute :O) And isn't that paper the best?!?!
I am so glad that you did this project as I have been trying and trying to find someone who could tell me how to use the Martha Stewart deep punches to make a punch on each side of a piece of paper. I can get the first one done OK, when I go to do the second side, I cannot figure out how to line them up. Can you help?
Kathi - Sorry been busy making Gingerbread Men with my 2 yr old grandson or I would have answered you sooner. I have the MS Lace Punch that punches both sides at once and of course the middle at the same time. I love it. God it at Michaels. I have the other single one too, but have never tried punching both sides. I am in MD vs KY for the Holdiay, or I would try. I'm sure if you have though, it won't work. I will try when I get home though.
Happy Thanksgiving Donna
Post a Comment