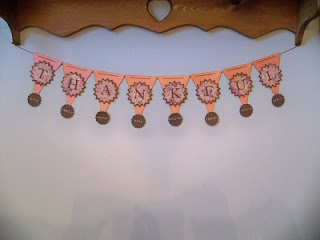
It was November 11th at 7pm (mountain) to make this beautiful banner! It uses the cricut cartridges Country Life and Sentimentals. They also provided the optional Gypsy cut file before the class.
Well a few of the SweetSassyDiva Designers decided to share their take on the banner. I hope you enjoy their take on it. Also, if you did the banner or had your own twist, please upload and link your picture below. We would love to see what you create! You do not have to use their paper package. Imagine all of the different beautiful banners!First up......Travelin' Nana!
Well, Travelin' Nana here did not register for the class while she was on the road. So she used the "It's Time for Class" email picture to get an idea of what they were going to teach and hunted up some carts that she could use to create her own. It was definitely fun.
Supplies:
Carts: Stand and Salute, Accent Essentials, and Plantin Schoolbook
Leaf Patterned Paper, Shiny Pumpkin and Truffle (Brown) Card Stock
Stampin Up 1 3/4 Scallop Paper Shaper Punch
Brown and White Ink
Brown and Cream Piercing Thread
Piercing Tool
Needle
Pot Dots and Tape Runner
Cut 8 flags just under 5.59" height from the Shiny Pumpkin card stock for the Banner, from Stand and Salute Cart. in Blackout mode.
Cut the foundation to put the "Thankful" letters on with the Accent Essentials cart. Use Leaf patterned paper and cut 8 at 2.88" height, and cut 8 Brown for the borders at 3.24" height.
Cut the letters for Thankful out of Brown card stock at 1.47" height, using the Plantin Schoolbook Cart. Adhere them to the leaf foundation.
Use brown ink around edges of flag and leaf foundation. I didn't ink the borders.
After inking the Leaf foundation adhere them onto the Borders. Adhere letters to the Leaf foundation, and then adhere that finished element to the flags using three small pop dot on the back of the boarder pieces.
Cut 16 scallop pieces from Brown card stock using the punch. Set 8 aside.
Take 8 of the Brown scalloped pieces and put the words you are thankful for onto them. I choose to paper pierce and sew mine for a homey look. I used the words, God, Family, Church, Home, Friends, Freedom, Health, and Wealth.
Pierce the words you want to use onto the scallop and then use embroidery thread to sew them on the scallop. I cheated and cut white scallops out of printer paper to write my words on and put the white piece over the actual scallop to pierce. Take the white paper away and the sew the words on the actual scallop.
After sewing the words on with cream embroidery thread (quite that challenge as you probably noticed), I glued the other Brown scallop pieces, right side out, to the back of the scallop with the words on them. (no glue at the top middle-see below).
Place and adhere the tip of the flag down into the top middle of the double scallop to hold it on so the glue won't show. Put the glue on the scallop vs the flag as the tip if flimsy.
Thread the flags together using embroidery thread whatever thickness you like. I used the thickness it comes in and choose to thread from back to front because I like that look.
- Donna
Here you have seen three examples. First, is the class version, another Thankful version and a Let it Snow version! Would love to see what banner you are inspired to make! Pst your picture on facebook.
- SweetSassyDiva


4 comments:
Those are all so pretty!
This really is a cute banner -- love the color combo and all that 'bling'!!
Vickie
I love all the banner, great job DT!
Beautiful!
Post a Comment