


Showing posts with label Gypsy Font. Show all posts
Showing posts with label Gypsy Font. Show all posts
February 20, 2012
You're Invited to a Blog Hop!
That's right, you're invited to a blog hop! March 10 & 11 SweetSassyDiva is having a blog hop to celebrate her birthday so this week the theme is to make an invitation for any event. As you can see my invite is for all of you to come to this exciting blog hop!
 The details: Cricut Birthday Bash - You're Invited - 1.5" Cricut A Child's Year - to, a .75" Cricut Gypsy Font - Blog Hop - 1" The when, where and rsvp were done on the computer. The ribbon is from my stash. I hope you will put the date for the hop in your calendar and come and join the fun ! As always, thanks for stopping by :)
September 10, 2011
Grandma's Photo Frame!
Hugs to everyone this glorious day! This is Jearise who lives in Lorby's World; a world of creation and crafting. I am honored to be guest designer here today on SweetSassyDiva and hope you enjoy my picture frame made from fond memories of my grandmother.
Grandparents day is celebrated September 11 of 2011 and I created something special for this special holiday.
I love mini-picture frames and making the fancy mats that go in them so I decided to work with this. I thought back to my grandmother and how she meant so much to me and was such a colorful person and that's when everything fell into place.
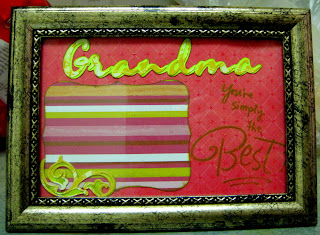

 I used a 4 x 6 inch frame and cardstock from two different pads: DCWV Cotton Bloom Stack and s.e.i's Mimosa's stack. The neon green that I used for the shadowing of the flourish and the word "Grandma" is plain cardstock from Recollections.


 I've found that using a tweezers and quick dry glue are the way to go when putting the letters on the shadow.

The inches are wrong for the mat in the picture. I had to unlink them and set the width at 3.50 inches and the height at 2.50 inches.
 The flourish and it's shadow were done at 1.50 inches for height and I kept the measurements linked.
The stamp "You're simply the Best!" comes from Inkadinkado's Kathy Davis designs #97608 and I used the olive green ink from ColorBox Petal Point Classic Pigment inkpad #08013 - Provence. I inked the mat, and shadows for Grandma and the flourish. I finally used a la mode clear embossing powder on my words.
Be sure to enter the SweetSassyDiva Design Team Call!
Grandparents day is celebrated September 11 of 2011 and I created something special for this special holiday.
I love mini-picture frames and making the fancy mats that go in them so I decided to work with this. I thought back to my grandmother and how she meant so much to me and was such a colorful person and that's when everything fell into place.


 I used a 4 x 6 inch frame and cardstock from two different pads: DCWV Cotton Bloom Stack and s.e.i's Mimosa's stack. The neon green that I used for the shadowing of the flourish and the word "Grandma" is plain cardstock from Recollections.
I used my wonderful Gypsy for all my pieces. The word "Grandma" and it's shadow come from Gypsy Font. I did the shadow first and KE'd it at -12 and then went back and took the shadow effect off and didn't KE it.


 I've found that using a tweezers and quick dry glue are the way to go when putting the letters on the shadow.
I used Accent Essentials for my flourish and mat. The mat will hold a 2 x 3 inch photo leaving a nice little frame.

The inches are wrong for the mat in the picture. I had to unlink them and set the width at 3.50 inches and the height at 2.50 inches.

The stamp "You're simply the Best!" comes from Inkadinkado's Kathy Davis designs #97608 and I used the olive green ink from ColorBox Petal Point Classic Pigment inkpad #08013 - Provence. I inked the mat, and shadows for Grandma and the flourish. I finally used a la mode clear embossing powder on my words.
Be sure to enter the SweetSassyDiva Design Team Call!
August 21, 2011
Gold Fever!

Hello everyone! I have been so busy this last month! It was nice to finally get back home and get a project going. In the past month we...went gold mining at Cache Creek, fishing in Kenai, bought a 2nd 4 wheeler, went on a porker run on the 4 wheelers, drove to Valdez, picked salmonberries, picked blueberries, stayed in Valdez for 16 days, fished in Valdez, attended Valdez Gold Rush Days, went on a historic homes of Valdez walking tour, drove home, got the kids ready for school made salmonberry jelly and finally sent the kids back to school! Ahhhhhhhhhhhhh and I am sure there are things in there I forgot lol. So when asked to make a project with the theme of 'What I did on my summer vacation' I had lots of things to chose from. But I picked one and ran with it.
Picked out the paper. All this peper is from my K&Co super stack
Picked out the paper. All this peper is from my K&Co super stack

Created my own paper gold pan

Printed out 3 fun pictures from gold mining and added 'gold' to my pan
 Cut out some blue and gold glittery words, stars and circles from a piece of DCWV cardstock
Added in a few strips of polka dotty paper and called it good as gold ;)
~*Recipe*~
~*K&Co carstock
~*Cricut cartridge George and Basic, Stand and Salue, Gypsy Font
~*Glittery gold card stock from DCWV
~*Black ink
~*Jen*~ http://mymentalinstability.blogspot.com/
Be sure to check back all week for more projects for the 'What I did on my summer vacation' travel challenge at http://sweetsassydiva.com/
April 15, 2011
Lover's Knot Quilt!
This is made using Eleanor Burns Lover's knot technique which form an elegant pattern that intertwines to form a knot. This quilt uses four colors for the main blocks. I took poetic liberties adding a coordinating solid fabric for the appliquéd hearts using the gypsy and gypsy font that is pre-installed on the unit. I cut out hearts on the cricut expression to place an appliquéd heart on the darkest ‘knot’. Adding to the romance of the lover’s meeting, it is quilted in a meandering pattern just as we go together through life. The heart at the knot symbolizes for me the love that is shared and holds the lovers together as they meander through the struggles and joys of life.


 Cartridges: Gypsy Font
Supplies: 4 colors 100% cotton fabric to make up the lover’s knot block. 1 solid 100% cotton fabric to cut out the appliqué hearts, multi-colored thread for the quilting and invisible thread for stitching around the appliqué if desired. Steam-A-Seam 2, iron, ironing board, scissors, exacto knife and cutting matt. Quilting square to square up the blocks. Your choice of quilt batting to go between the pieced top and the solid back. Sewing machine, quilting machine and thread., brayer, new cricut cutting blades., painters tape, appliqué needles Cricut Expression, Cricut gypsy and Cartridges: Gypsy font
Instructions:
Using the Eleanor Burns Lover’s knot pattern which incorporates 2 – ½ inch strips, complete the blocks according to her publication instructions using machine sewing technique. The strips form an elegant pattern that intertwines to form a knot. This quilt uses four colors for the main blocks. I took poetic liberties adding a coordinating solid fabric for the appliquéd hearts using the gypsy and gypsy font that is pre-installed on the unit. I cut out hearts on the cricut expression to place an appliquéd heart on the darkest ‘knot’. Adding to the romance of the lover’s meeting, it is quilted in a meandering pattern just as we go together through life. The heart at the knot symbolizes for me the love that is shared and holds the lovers together as they meander through the struggles and joys of life. After assembling the quilt and quilting the layers together, I picked a coordinating solid fabric that is in the paisley fabric for the appliquéd heart. Using my gypsy I opened a 12x12 matt and selected a heart with a scroll in it that complimented the fabric design. It is in the Gypsy Font under the Monogram Shadow on the bottom row second to last key. I added it to the mat at 3.5” x 3.5” for width and height using the real size button. I copied it and had 6 on the page. Next, I took the sheet of Steam-A-Seam 2 removing one of the paper backing off and placing it on the wrong side of the solid fabric for the appliquéd hearts. I ironed this onto the fabric making sure to remove any bubbles. I took a new 12x12 matt and using my brayer rolled it securely to the cutting matt. I used blue painters tape and taped the edges of the fabric to the cutting matt. I set the cricut machine to blade setting 6, speed- medium and pressure – max. I loaded my mat using the gypsy and cut out 6 hearts. I repeated this process until all of my dark blue knots had an appliqué heart for the center. After cutting, I removed the hearts and ironed them to the quilt using the paper backing of the steam-a-seam 2 paper that was removed. I used scissors, exacto knife and cutting matt as needed. Then, you can use invisible thread and quilting needles and hand stitch around the appliqués if desired. This is not a required step but, finishes the project and is recommended before washing your quilt after normal use. This makes a great bedspread, quilt for cuddling on the couch or even picnics. You are only limited by your imagination. It is also great for curling up under while designing more projects with your gypsy whether at home or on the go. I hope you are inspired by my project.
April 5, 2011
Tri-fold Black Currant Card!
 This weeks projects was a good one! I have never made a tri-fold shutter card before and I count not wait to try! I am always looking for and new ways to fold a card. It really adds a little extra :) I really love how it turned out and have added it into my 'list of ideas of ways to fold my Christmas cards for next year'....yah I know I am crazy! I start planning my Christmas cards almost a year ahead. It taked me a little while to make 50 cards by hand so the more planning I can do the better! Ok so onto the card! ~*Jen*~
 ~*Recipe*~ ~*DCWV Black Currant cardstock ~*Cricut cartridge Gypsy Wanderings, George Basic Shapes, Gypsy Font ~*Black ribbon ~*Pearl accents
Picked out my paper (I actually broke into my all time love Black Currant stack for this card*gasp* yes I know its a shock)


Put my paper onto my cutting mat

Cut and folded the base of my card

Cut all my layered pices

Started to adhear the layers

Its starting to look like a card!

Added my embellishments

All done!!

March 18, 2011
Thank you!

I made this Thank You card by welding images from Gypsy Wanderings, Gypsy Font and Tags, Bags, Boxes and more. I outlined the front of the card by replacing the blade housing with the cricut markers. It gives more emphasis on the butterfly, flower and Thank you. In addition, I used Graphic 45 paper, Dew Drops, ribbon and a beautiful antique button pre-WWII. There is so much detail in the button that just is not captured in the picture. It has 4 delicate pressed flowers in the center which you cannot begin to even see in this photo.
I used the Color Box Paintbox Ocean breeze in a chalk ink to help the card pop.
Inside the card is a beautiful coordinating print. You can leave it or add a coordinating solid cardstock to write your personalized message. The pictures do not do this justice! It looks beautiful in hand!


I did need to use the little dental pick to get the small little pieces out. Some of them wanted to stay for the delivery of the message. I do not blame them because it makes it hard with all its beauty to send this thank you to another home.
I hope that this inspires you to create something unique and all you! And as always, please send me a message and let me know how this inspires you.
March 6, 2011
Can You Hear The Ocean?
Lets keep it rolling!! Straight from tropical colors and beaches to shells! I was feeling a little lost with not making a card the last 2 projects so I had to make one! I dug into my cardstock and pulled out the colors I think best represented shells and ocean to me. I was thinking (again) bleached wood and sea glass. So I just cut some random shaped pieces and then arranged them on a 6x6 inch sea blue card. I really like using the unusual size of 6x6 inch. I topped it off with a pre-made shell sticker.


~*Recipe*~
~*Recipe*~
~*Cardstock in green, blue, wood and tan
~*Velum
~*Jolee's Boutique shell sticker from the 'Beach' set
~*Flourishes from Gypsy Font Cricut Cartridge
Can you hear the waves? Smell the ocean? I can!
~*Jen*~
~*Velum
~*Jolee's Boutique shell sticker from the 'Beach' set
~*Flourishes from Gypsy Font Cricut Cartridge
Can you hear the waves? Smell the ocean? I can!
~*Jen*~
February 10, 2011
Photo Inspiration Challenge: Wintery Fun!

Have I ever told you how much I love snowflakes?! Ever? So you know I couldnt pass up an opportunity to use some in this weeks project. We were show a sweet picture of a sweet little one sitting in the snow wearing a great blue snowsuit and asked to create and be inspired by this pic. I went right into my paper and started looking for the 'just right' blue to use with my white. I got my Gypsy out (I love my Gypsy! How did I ever create before I had it?!) With it being Feb I really didnt want it to look too Christmas-y. So I tried to stick to the winter look being as tho we still have a few feet of snow here and this morning it was -4 outside :) I still look at this project and think it needs a little more...something...but when you have a deadline you dont get too much time to find out what that 'someting' is. We were super busy this week. I managed to get 3 birthday cards and 40 Valentines Day cards done! Like always we got a chance to get out doors and enjoy our beautiful state. This weekend was the Willow Winter Carnival and we were able to participate in the snowmachine Radar Runs. It is alot of fun to see how fast your machine can go in 1000 feet. They also had the dog pulls. Last we had seen there was a St. Bernard who had pulled over 1800 lbs. DANG! I wonder how much my little corgis could pull :D :D Well off to get my taxes done and work on my project for this week. ~*Jen*~
~*recipe*~
~*blue and white carstock from DCWV
~*Cricut Cartridges Winter Lace and Gypsy Font
~*a few misc gems and sequins
~*velum

February 5, 2011
Movie Challenge..Valentine's Day!
Hi everyone,
This week for Sweet Sassy Diva's DT challenge we were to watch a movie and make a project about the movie. Well I haven't been renting any movies lately but I watched Valentine's Day on HBO this weekend. This is really a cute movie. It follows different people and their love stories. Really cute.
So for my project I decided to make an altered compisite notebook. This is a pocket size notebook and would fit perfectly in your purse.

So the first thing I did was took the pink patterned paper and traced it around the notebook and cut it out.
Then I glued it on the top of the notebook. I then sanded the edges. Repeat same process for the back side of the notebook. Then I added the chocolate with poka dots paper and sanded the edges.

Next, I used Gypsy font to cut out love at 1.20" and glued onto the front, and added the sticker.

Recipe
Compisite notebook
CM paper from Love paper kit
Pink Cardstock
CM stickers
Gyspy Font
Thanks Rebecca
January 17, 2011
You'll Flip!
 I am lucky enough to have both my kids birthdays with in a 2 week period. They both actually had the same due date when I was pregnant with them but Eli was born the 28th of Jan and Alli the 13th of Feb. So we usually do a joint party which sounds like it would not be too fair but my kids love having their partys together. Its like they get twice the amount of friends that show up. I was excited to make their invites this year and loved how they turned out. I used my Gypsy and was able to plot them out.

~*Recipe*
~*DCWV Cardstock from their Ultimate stack (the green with skulls and the zebra)
~*Red and pink cardstock
~*Post-It craft paper in white
~*George and Basic Shapes Cartridge (flowers)
~*Gypsy Wanderings and Gypsy Font (skull and 'A')
~*Black ink (to distress the edges)
~*Black fabric paint (to make the dots on the edge of the skull invite)
~*Pink button and rhinestone to place in the middle of the flower
I made them just a single panel and then I will flip them over and write their party info on the back. My kids cant wait to share them with their friends!!
~*Jen*~
December 3, 2010
Christmas Ornaments!
Hello all! This is Carissa!! I was super excited when a certain package arrived the other day!! Oh my goodness!! Post-it Craft Paper!! This paper is really awesome and I love it!!! It is so easy to use and looks great! It really is cut, peel and stick!! Thank you so much for letting me try out this wonderful product!!
My project this week was to use the Post-it Craft Paper! So, I used it to personalize ornaments purchased from my Celebrating Homes consultant. I flipped the letters from the Gypsy Font Shadow so I could use the adhesive side for glitter! I am beginning to really love glitter!! It was really easy and quick to do once I figured out which color I could part with... Just take off the backing and pour your glitter on!!
 /
/
After glittering, I used clear adhesive dots to attach to plastic paper. Probably would have been okay without the plastic paper but I thought that it needed to be a little thicker. The ornament had a raised circle where I wanted to attach the initial. The finished product looks perfect!!

Another fun project using the Post-it Craft Paper... Labels! I love to organize so this was actually the first thing I did after opening the package!! I used an image from the Imagine More cartridge with patterned paper from the Better Together cartridge. Love to cache patterns! The original image is the green label. I also made smaller labels for the pockets on the inside. Might be able to see that in a video soon!!!

Carissa
My project this week was to use the Post-it Craft Paper! So, I used it to personalize ornaments purchased from my Celebrating Homes consultant. I flipped the letters from the Gypsy Font Shadow so I could use the adhesive side for glitter! I am beginning to really love glitter!! It was really easy and quick to do once I figured out which color I could part with... Just take off the backing and pour your glitter on!!

After glittering, I used clear adhesive dots to attach to plastic paper. Probably would have been okay without the plastic paper but I thought that it needed to be a little thicker. The ornament had a raised circle where I wanted to attach the initial. The finished product looks perfect!!

Recipe:
Gypsy - Gypsy Font Shadow (flip the letters)
Post-it Craft Paper
Plastic/Acrylic paper
Glitter
Clear adhesive dots
Another fun project using the Post-it Craft Paper... Labels! I love to organize so this was actually the first thing I did after opening the package!! I used an image from the Imagine More cartridge with patterned paper from the Better Together cartridge. Love to cache patterns! The original image is the green label. I also made smaller labels for the pockets on the inside. Might be able to see that in a video soon!!!

Carissa
November 19, 2010
Joy...Hope...Peace....Home Sweet Home!
Hello all!! This is Carissa from Loksi & Co.!! I am super excited about this project!!! I went to a Christmas Home Tour last year and got this idea from something I saw there!! I just knew this was perfect for a home decor item for this weeks challenge!!! Also, we were to use the color green, the Cuttlebug and felt. The Cuttlebug is on my Christmas wish list!! I was able to use the Cuttlebug at my local scrapbook store!! Yay!! This project was pretty fast and easy to assemble once you have all of your pieces together!! I love to make projects like this!! I also love to use 3D foam squares!!

Recipe:
3 - 6x6 Chipboard Square
Paper - BoBunny Winter Joy Collection
Ribbon
Felt flowers - BBD Supplies
Scrabble tiles
Glossy Accents
Chestnut Roan Colorbok ink chalk
Cuttlebug folder - Snowflake
Gypsy - Gypsy Font for the words
Christmas Cards cartridge - Corner scrolls
Words using the Gypsy...
 The words were cut using Gypsy Font after they were welded together using a tutorial from Sheila at She's a Sassy Lady. I'm new to the Gypsy and I'm always looking for tutorials on how to use it!! Also, I used the shadow and blackout feature welded together to add dimension.

Challenge materials...
Green - The color green is on the corner scrolls and in the background of the paper.
Cuttlebug - I used the Cuttlebug folder on the lighter paper.
Felt - The purple and turquoise flowers are felt... I purchased these a couple of months ago to make headbands for my daughters... Worked perfectly for this project also!!!

Scrabble tiles...

The scrabble tiles were made ahead of time to allow time for drying... I used Glossy Accents to glue the paper onto the scrabble tile, cut the excess paper around and inked the edges. Then use a thin layer of Glossy Accents on top to make a pretty embellishment!!! Allow time to dry!!
- Carissa
If you go to the right hand side of the blog, you can see a list with links to the design team and their personal blogs. I hope you are enjoying all the wonderful projects that everyone is sharing! wow!!!
The winner of the

blog candy is.....
pattyk said...
love the card great colors. thanks for the chance to win
Congratulations Patty!!!
- SweetSassyDiva

Recipe:
3 - 6x6 Chipboard Square
Paper - BoBunny Winter Joy Collection
Ribbon
Felt flowers - BBD Supplies
Scrabble tiles
Glossy Accents
Chestnut Roan Colorbok ink chalk
Cuttlebug folder - Snowflake
Gypsy - Gypsy Font for the words
Christmas Cards cartridge - Corner scrolls
Words using the Gypsy...


Challenge materials...
Green - The color green is on the corner scrolls and in the background of the paper.
Cuttlebug - I used the Cuttlebug folder on the lighter paper.
Felt - The purple and turquoise flowers are felt... I purchased these a couple of months ago to make headbands for my daughters... Worked perfectly for this project also!!!

Scrabble tiles...

The scrabble tiles were made ahead of time to allow time for drying... I used Glossy Accents to glue the paper onto the scrabble tile, cut the excess paper around and inked the edges. Then use a thin layer of Glossy Accents on top to make a pretty embellishment!!! Allow time to dry!!
- Carissa
If you go to the right hand side of the blog, you can see a list with links to the design team and their personal blogs. I hope you are enjoying all the wonderful projects that everyone is sharing! wow!!!
The winner of the

blog candy is.....
pattyk said...
love the card great colors. thanks for the chance to win
Congratulations Patty!!!
- SweetSassyDiva
Subscribe to:
Posts (Atom)


