MyFreeCopyright.com Registered & Protected
Showing posts with label Laura. Show all posts

December 26, 2010

Happy New Year!

New Years Card
using 3M Post-it Adhesive Craft Paper


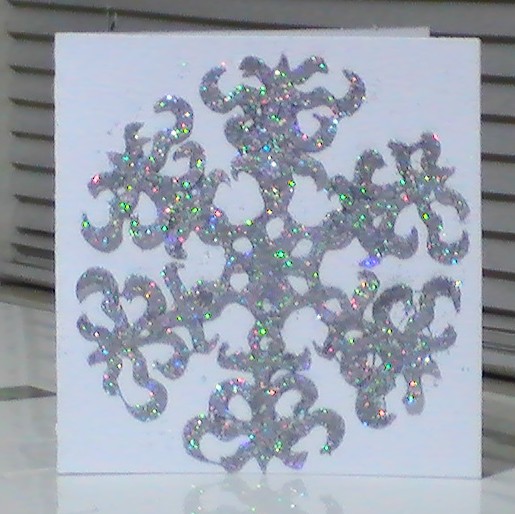
In person this card is soooooooooooo sparkly!


RECIPE

6x12 white cardstock
6x6 blue 3M Post-It Adhesive Craft Paper
4x4 light blue 3M Post-It Adhesive Craft Paper
small piece of pink cardstock for sentiment
muliple colors of shake on glitter
graphics of your choice
dimensionals
Martha Stewart snowflake border punch
scraps of white 3M Post-It Adhesive Craft Paper

DIRECTIONS

Score and fold your 6x12 white cardstock to create base

peel backing off blue 3M Post-It Adhesive Card stock
take glitter of your choice and sprinkle on to to cardstock...I chose dark blue, gold, and red...trying to make it look like fireworks with my random pattern

attach glittered piece to main base with glue runner or atg gun

Next I took the light blue 3M Post-It Adhesive Cardstock and combined my ribbon and confetti graphic then added my drinks images in Corel and printed...then inked the edges

Center in the middle of your glittered card and attach with glue of your choice

Now print out or stamp your sentiment on the pink card stock and center and I used dimensionals to adhere to card I also inked the edges

Now take some scrap white 3M Post-It Adhesive Cardstock and use border snowflake punch...peel off adhesive and adhere to both sides of the card

In person it is so much prettier......sparkles like crazy!

Laura


Imagine What You Can Do - Clipart, Custom Cards, and Embroidered Gifts
Imagine What You Can Do Blog - Become a follower and get updates and changes to win free stuff!

December 19, 2010

Snowman Post-It Note Holder!

Snowman Post-It Note Holder

these make wonderful stocking stuffers!
RECIPE
Peachy Keen Snowman Stamp
Colored Markers
Martha Steward White Glitter glue
1 piect 3.5 x 5.75 white card stock
1 pack of 3x3 post-it notes
DIRECTIONS
Score your white cardstock at 2 1/8", 2 5/8", 3 1/-8"
Cut 2 slits on fold of front 3 1/8 fold and 2 5/-8 fold about 3/-4" apart to make area for pen
fold area where pen goes out and the rest of the folds go in
put sticky strip on back just where it is going to touch and not where pen area is...press firmly
use sticky strip to adhere post-it pad to inside
insert mini pen in pen holder
Now take your Peachy Keen snowman stamp and stamp in the center of the front
I then colored in the snowmans nose, limbs, buttons with markers
color in band of hat with gold Martha Stewarts glitter pen
and snow effects under snowman using white Martha Stewarts glitter pen or glitter of your choice
Voila!  You have  a nice stocking stuffer that cost you pennies to make!

December 12, 2010

Mini Gitz and Glam! Last day for Hop and 20% off!

FOR THE YOUR STORY BLOG HOP CLICK HERE!!!

Sweet Sassy Diva's Design Team was given a challenge to create a mini-book

Here is my version......hope you like it!


RECIPE

BEIGE SHEET OF 3M POST-IT BEIGE CRAFT ADHESIVE PAPER
6X12 SHEET OF BLUE CARD STOCK
10 6X12 SHEETS WHITE CARD STOCK
RED MARTHA STEWARTS GLITTER GLUE PEN
GOLD MARTHA STEWARTS GLITTER GLUE PEN
SMALL OFF WHITE PRIMA ROSE
CINCH-IT MACHINE
CINCH-IT BINDING WIRES

DIRECTIONS

FIRST I CREATED MY SHOE IN MAKE THE CUT SOFTWARE...I ACTUALLY DOWNLOADED THE SHOE SVG BUT DON'T REMEMBER WHERE...I RESIZED IT TO 5.0 INCHES AND CREATED A SHADOW LAYER...SO THE BLACK IS THE SHADOW...THE RED IS THE ACTUAL CUT....I PRINTED AND CUT BOTH ON THE BEIGE 3M POST-IT CRAFT PAPER

I THEN USED A CURVED SQUARE SHAPE FROM MAKE THE CUT SOFTWARE SIZED AT 5.5 INCH AND CUT OUT 2 BLUE AND 20 WHITE

NOW PEEL OFF BACKING FROM THE SHOE PARTS AND LAYER ON THE BLUE

I THEN USED RED GLITTER ON THE RED PART OF THE SHOE TO GLAMOUR IT UP
(YOU KNOW HOW I LOVE SPARKLE!!!!!!!!)

THEN I TOOK THE GOLD GLITTER AND GLAMMED UP THE ROSE ADDED A LITTLE AT THE BOTTOM OF THE HEEL AND ADDED DEFINITION TO THE INSIDE OF THE SHOE WITH IT

I GLUED ON THE ROSE.....AND ADDED AN L WITH RHINESTONES

NOW I GOT READY TO PUT MY BOOK TOGETHER SO OUT CAME MY CINCH-IT

PULL PEG 1 AND ALL AFTER PEG 10

AFTER ALL SHEETS HAVE THEIR HOLES I ADDED TO MY CINCH WIRE THEN CUT EXCESS WIRE OFF...NOW TO THE BACK OF THE CINCH-IT TO CINCH THE WIRES TOGETHER

VOILA!

Laura

Imagine What You Can Do - Clipart, Custom Cards, and Embroidered GiftsImagine What You Can Do Blog - Become a follower and get updates and changes to win free stuff!


Marlo is having a special this weekend only!  OMG!!!! Scrap'n Tote Sale for only one more day.... Sunday ONLY! Use Coupon Code: ChristmasTime for 20% off Mist Green & Pink Suede Scrap'n Tote!!!!" Click the picture below for Discount code to use on your order of a Scrap'n Tote! note: if you are seeing this after Sunday, try it maybe she forgets to take it down.


She is also having a new drawing for some wonderful Provocraft prizes.  Click here for more details!

December 7, 2010

Christmas Snowflake Cards

This card is sort of a twofer ggggggggg

You have 2 options....create a Snowflake Card or add the Western Santa for a Santa Card


RECIPE:

6X12 WHITE LINEN CARDSTOCK BASE
6X6 PIECE OF WHITE 3M POST-IT ADHESIVE CRAFT PAPER
GLITTER
SMALL PIECES OF COLORED 3M POST-IT ADHESIVE CRAFT PAPER - FOR SANTA
MARTHA STEWARD WHITE GLITTER GLUE - FOR SANTAS BEARD AND MUSTACHE
MARTHA STEWARD BLUE GLITTER GLUE - FOR SANTAS EYES

OPTIONAL:  INK AND INK PAD TO STAMP SENTIMENT INSIDE CARD

DIRECTIONS

START WITH YOUR 6X12 BASE CARDSTOCK AND FOLD IN HALF

NEXT I CUT THE SNOWFLAKE THAT WAS DOWNLOADED FROM PENNY DUNCAN (THANKS PENNY!) AT SIZE 5 INCHES ON WHITE 6X6 PIECE OF 3M POST-IT CRAFT PAPER

ONCE CUT I REMOVED THE BACKING AND SPRINKLED ON MY ULTRA FINE GLITTER...3M POST-IT CRAFT PAPER MAKES THIS PROCESS SO EASY!

I THEN RUN THE SNOWFLAKE THROUGH MY XYRON TO PUT ADHESIVE ON THE BACK TO STICK TO MY CARD BASE

FOR THE SNOWFLAKE CARD THAT COMPLETES IT EXCEPT FOR PUTTING YOUR SENTIMENT INSIDE


OK NOW FOR THE SANTA PART...I TOOK JUST SMALL PIECES JUST LARGE ENOUGH TO DO EACH OF THE INDIVIDUAL CUTS FROM COLORED 3M POST-IT CRAFT PAPER...PEELED THE BACKING OFF AND LAYERED ON

FOR HIS BEARD, MUSTACHE AND EYEBROWS I USED THICK AMOUNT OF MARTHA STEWARDS WHITE GLITTER GLUE TO GIVE A TEXTURED EFFECT

I USED SMALL AMOUNT OF BLUE MARTHA STEWARDS GLITTER GLUE FOR HIS EYES

HERE IS A CLOSE UP OF HOW HE LOOKS.....THINKING MY BASE COLOR INSTEAD OF BLACK I SHOULD HAVE USED A DARD BEIGE......OH WELL THE KIDS WILL LIKE IT ANYWAY :o)


HOPE YOU LIKED THEM!

Laura

Imagine What You Can Do - Clipart, Custom Cards, and Embroidered Gifts
Imagine What You Can Do Blog - Become a follower and get updates and changes to win free stuff!

November 29, 2010

Joyful Christmas Card!

Joyful Christmas Card
This card was such a joy to make with the new 3M Post-It Craft Paper
RECIPE
12X12 WHITE CARD STOCK - CUT TO 8.5X5.5
RED 3M POST-IT CRAFT PAPER CUT AT 4.25X5.25
WHITE 3M POST-IT CRAFT PAPER CUT AT 4.0X5.0
3 STRIPS PATTERNED CHRISTMAS PAPER CUT AT 5.0X1.0
SMALL PIECE OF GREEN CARD STOCK
Ok first I created on Sure Cuts A Lot my basic card cutting file which is included here...just click on picture to download
I then folded the largest cut which was my white card stock in half this is your card base
the second cut which in this picture is showing green was my red 3M Post-It Craft Paper
I peeled the back off the post-it paper and applied to the white...easy peazy!
then your next cut in the picture is showing as light blue...I cut white 3M Post-it Craft Paper
Again easy peasy...peel the backing off and attach to the red
You next cut is showing as light green strips...you may use ribbon or I used the cuts on some really nice Christmas Patterned Paper I had and used my snail glue to adhere to the project.
Now instead of the big square cuts to go on top of everything I chose to cut my scalloped green cardstock on my Imagine using one of the included shapes...it was then stamped with the greeting and some glitter glue applied in a few areas and inked around the edges and dimensions added to pop up on the card for dimension
Next, I cut the small green and white labels from 3M Post-It Paper and affixed to the card and then wrote 2010 with my Martha Stewart Gold Glitter Pen
Then, for extra dazzle the tree was just something I already had that I thought would be cute...then I created the snowflake by cutting on my Imagine from my Winter Lace Cricut Cartridge set at 2.5 inches out of white 3M Post-It Paper...then peeled the backing off and applied ultra fine glitter to the tacky side (which I might add is so much easier than trying to glue and glitter on something so detailed) ... I then pop dotted it on to the card
Hope you like my project
Laura
My Embroidery Store  - Embroidery Designs
Imagine What You Can Do - Clipart, Custom Cards, and Embroidered Gifts

November 22, 2010

Lori's Garden Home Sweet Home!

In this Project, I used the new 3M Post-It Craft Paper that the Design Team of SweetSassyDiva Blog will use this week in their projects. 

Let me tell you this paper is fantastic...especially when making delicate cuts that you wouldn't ordinarily want to have to glue on!

Oh I am definitely going to love using this paper when cutting out intricate snowflakes and attaching to my projects. Thank you Bobbi Jo and 3M for allowing me to try it out! This wonderful paper is for sale at JoAnn's, Michael's and Amazon.com ...I wouldn't be surprised if it shows up at Walmart eventually.


RECIPE:

Cricut Imagine

Cricut Imagine Art Cartridge - Lori's Garden

3M Post-It Adhesive Craft Paper - White

2 sheets White 12x12 Card Stock

Prima Roses

Martha Stewart Glue Glitter Pens

Jolee's Flowering Branches


DIRECTIONS:


With your Cricut Imagine and the Lori's Garden cartridge print out the wording wallpaper for your background on a 12x12 piece of white cardstock (just a note- the wording is The Constitution of the United States)

Now, go into the images part of the cartridge and on your other piece of 12x12 white cardstock print and cut the lacy green border with the florals in the corner

This will cut out the center white part but I added it back as I didn't want the wording showing back through where my birds and cages were going to be. So just affix both pieces to your background

Now, I took a 8.5x12 piece of white 3M Post-It Adhesive Cardstock and print and cut the Birds, Birdcage and flowering limb and removed the backing and adhered to my project...that paper is just amazing!

I then went to altering my project....I took the Martha Stewart silver glitter glue pen and drew in the chains and metal work on the cage and bird swing...it really makes it look quite 3D in person

and you KNOW how I love glitter!

Then to really make everything pop, I added my glittered large Prima roses...and then the smaller ones...and then added the flowering branches by Jolee that I just simply adore as well.

There is green felt on the leaves of the large Prima Roses...there was just nothing in this project that I could use the cuddle bug on as all the pieces were too large to put in it. Plan on having a custom frame created for this but for now has ribbon attached to the back to hang on the wall.

Hope you liked my creation...watch for more projects made with the 3M Post-It Adhesive Craft Paper and also from the Lori's Garden Cricut Imagine Cartridge!

Laura

November 10, 2010

Smiley IOU Card!


Although this card may look a little simple, I used a technique that sometimes gets looked over...needed a cute iou card for a friend that helped me out so this one fits the bill!


Also, created it right after the Gypsy update and something had went wrong and machine started going crazy and making all kinds of noises....I am happy to report that I re-did the update on both my Imagine Machine and Gypsy and they seem to be working in harmony now! lol


RECIPE FOR SMILEY IOU CARD


SUPPLIES:


gypsy and smiley card files

cricut imagine or any cricut machine

xyron 5 inch label maker

Martha Stewart Glitter Glue

Martha Stewart Ultra Fine Glitter

12x12 pattern cardstock

4x5 solid (I used a tan) cardstock

6x6 yellow cardstock

Prima Rose

dimensionals


Set up your machine with the gypsy and choose for your first layer to cut out the card the rectangle card shape at 6 inches by 10.5 inches


I cut the solid paper cardstock at 5x5 inches


I then set the gypsy and imagine to cut the circle and IOU message from the smiley card cart


I folded the rectangle sheet in half after scoring it with a bone folder.....then the 5x5 cardstock I ran through my xyron sticker creater and attached to the top of the folded rectangle paper.


I then ran the smiley circle through the xyron and attached it to the top left part of the card


Now...run the topside of the IOU cardstock through the xyron that will make it sticky...shake your fine glitter on top and shake excess off (I like doing this as it is not as messy as using glue!)


Attach the glittered IOU to bottom center of the card using dimensionals


I used Markers to draw in hair, eyelashes, nose, and chin


Use Martha Stewart GlitterGlue pens to create the eyes and lips...boy does that glitter glue sparkle!


Add Prima Small Rose to hair like a hair bow


At the end I added 2 yellow rhinestones for earrings...and for added bling I added 3 blue rhinestones to right hand side of the card


On the inside of the card, I created a money envelope to slide the money in!


~Blessings

Laura

November 3, 2010

It's Fall Ya'll Card!

It's Fall Ya'll Card


Had to put my thinking cap up for this one. Since My embroidery design set of Fall Sunbonnets are real popular thought maybe the graphic from one of them would make a nice Fall Card...let me know what you think ok?


I am including the graphic for you in case you would like to make one and also I always make a sketch card to plan out my card before creating it here is my sketch.....below you will find a blank one you can download and print out to use for your creations if you like


Recipe for Its Fall Ya'll Card


Supply list is on the Sketch Card


First I took a 12x12 sheet of white card stock and cut it to 6x12 on my Cricut Imagine. Then I cut the Orange Cardstock on my Imagine to 6x6


I added the wording and border to my fall sunbonnet image and then printed it out as a 3 3/4x4 1/4 and then trimmed around the border....it is was placed where shown on my sketch with pop dots after inking around the edges with brown inkpad


You all know how I love my Prima Roses and I found this pretty fall colored one so it went in the top left corner


Then finally I added scattered leaves to fill in the card and put one coming right down from the image to look like it had been kicked out of the pile she is skipping through gggggggg


Here are the files you may download by clicking on the images


Bye for now


~Laura

October 28, 2010

Introducing...

Now a Card and Introducing....

Laura!  Hi just wanted to give you just a little bio about me, and to let you know how excited and pleased I am to be part of SweetSassyDiva's Design Team!

I started crafts at the ripe age of 7 my grandmother started teaching me to Crochet and Knit, then age 8 she taught me Ceramics, and at the age of 9 she taught me Flower Arranging.  I later on learned how to create Porcelain Dolls and also Macrame'.  I went to College for Computer Programming and Business Administration.  Then, the world of Machine Embroidery fell into my lap and I have been creating and selling my Machine Embroidery Designs on my website since 1998.  I only recently found my way to making cards and scrapbooking and I just love it!

You will find with my projects I love bling.....the more the better!


Recipe for Laura's Breast Cancer Card


1 12x12 sheet of Pink Cardstock
1 12x12 sheet of Soft Green Cardstock
1 12x12 sheet of White Cardstock
1 sentiments stamp
1 printout of graphic - I used 2 graphics from embroidery designs
from our website and combined them together. If you would
like the same graphics the original artwork can be purchased
from JRhettgraphics.com
Inkpad to stamp you sentiment and also to ink your edges on cut
white cardstock
Pink Ribbon
Rhinestone dots
Prima Glitter Rose
Double-sided tape
Popup dots
Aleenes Glue or Hot Glue
Glue Runner

1 Fold pink cardstock in half and then half again to create a 6x6 card. Or you can cut half off
to save on cardstock.

2 Use your Cricut or paper trimmer to cut green cardstock to a 5x5 piece.

3 print your graphic on white card stock measurements should be where the graphic is 4 inches wide...then trim close to graphic on all sides.

4 Use your Cricut or paper trimmer to cut another piece of your white cardstock to 3 inches by 2 1/2 Inches

5 Now place your pink ribbon diagonally on your card where it looks pleasing to you...cut enough excess to wrap around to the back of the card. Run glue runner on back of ribbon and attach to front of card on diagonal and ends attached to the back.

6 Put double-sided tape on back of green cardstock and center on your pink card and press down

7 Ink your edges on both pieces of white card stock both printed and not printed. Now is also when you should use the same ink pad and your sentiments stamp and stamp your sentiment on the non-printed white cardstock piece.

8 Put pop dots on both pieces of white cardstock...printed one I centered in the top middle of green cardstock..stamped white cardstock I off centered to the right to make room for my rose.

9 Glue Prima Glitter Rose to bottom left on green cardstock.

Final step...some bling...oh yes! I added 2 pink rhinestones to the right of the printed area of white cardstock on the green cardstock.

Hope you like the card and if you make some I hope your recipient loves it and it brings them encouragement and hope!

Laura Clayton
http://laura-imaginewhatyoucando.blogspot.com/
http://imaginewhatyoucando.com
http://myembroiderystore.com