MyFreeCopyright.com Registered & Protected
Showing posts with label Mickey and Friends. Show all posts

June 26, 2012

Lollipops!

Hey again....how's your summer going? Ours is just starting here in Alaska. This week at sweetsassydiva we are celebrating National Candy Month....for me that's 12 months out of the year. (Must be why I'm so sweet ;)) I have the perfect idea in mind for this week as soon as it came out. It took me a while to make it...and for it to come together in my brain...too much sugar I guess... but I finished it. My Mama sends her grandbabies these huge lollipops...that we were never allowed to have as kids...must be a grandma thing.
My girls love it when they get a box in the mail from her because they know that they have all flavors of lollipops. So I decided a layout would be good to do with this one. I even had help putting this one together....starting them early ;)


So here is the layout we came up with....
The paper is from DCWV pastel stack and sweet stack...and Colorblok textured cardstock. I used the plantin schoolbook cartridge for the letters. I welded thhe "I'm a SUCKER 4 a" on my gypsy. I found a lollipop cut on my Mickey and Friends however I wanted something a bit more so I decided to make my lollipops.

I used dmc thread, 2 or 3 colors and twisted them together...and then wound them onto just a scrap sheet of paper. I used my glue runner to make a sticky surface...and then cut out around the edges. I cut a toothpick in half, colored it with a white marker....cut out a small square of saran wrap and there you have it...my own handmade lollipop. I cut out 3 (4.25x6.25) rectangles for pictures and a 4.25x4.25 square for either a 4x4 picture or a journal box. I added ribbon corners on each to add a little more color. Now all I need is to add the pictures of my sticky little girls. I hope that you are all enjoying summer!!!!

Angie

September 27, 2011

OH BOY!

Hello everyone and welcome to the Sweet Sassy Diva Blogspot.  This week the
design team was asked to do a project with Disney/Pixar.  There are so many
carts to choose from.  For this project I decided to do a twisted easel
card and use Mickey and Friends and Mickey Font to decorate it.
Believe me once you try making a twisted easel card you will be hooked.

The papers are from a Disney stack I got at Joanns.  
So here are the directions:
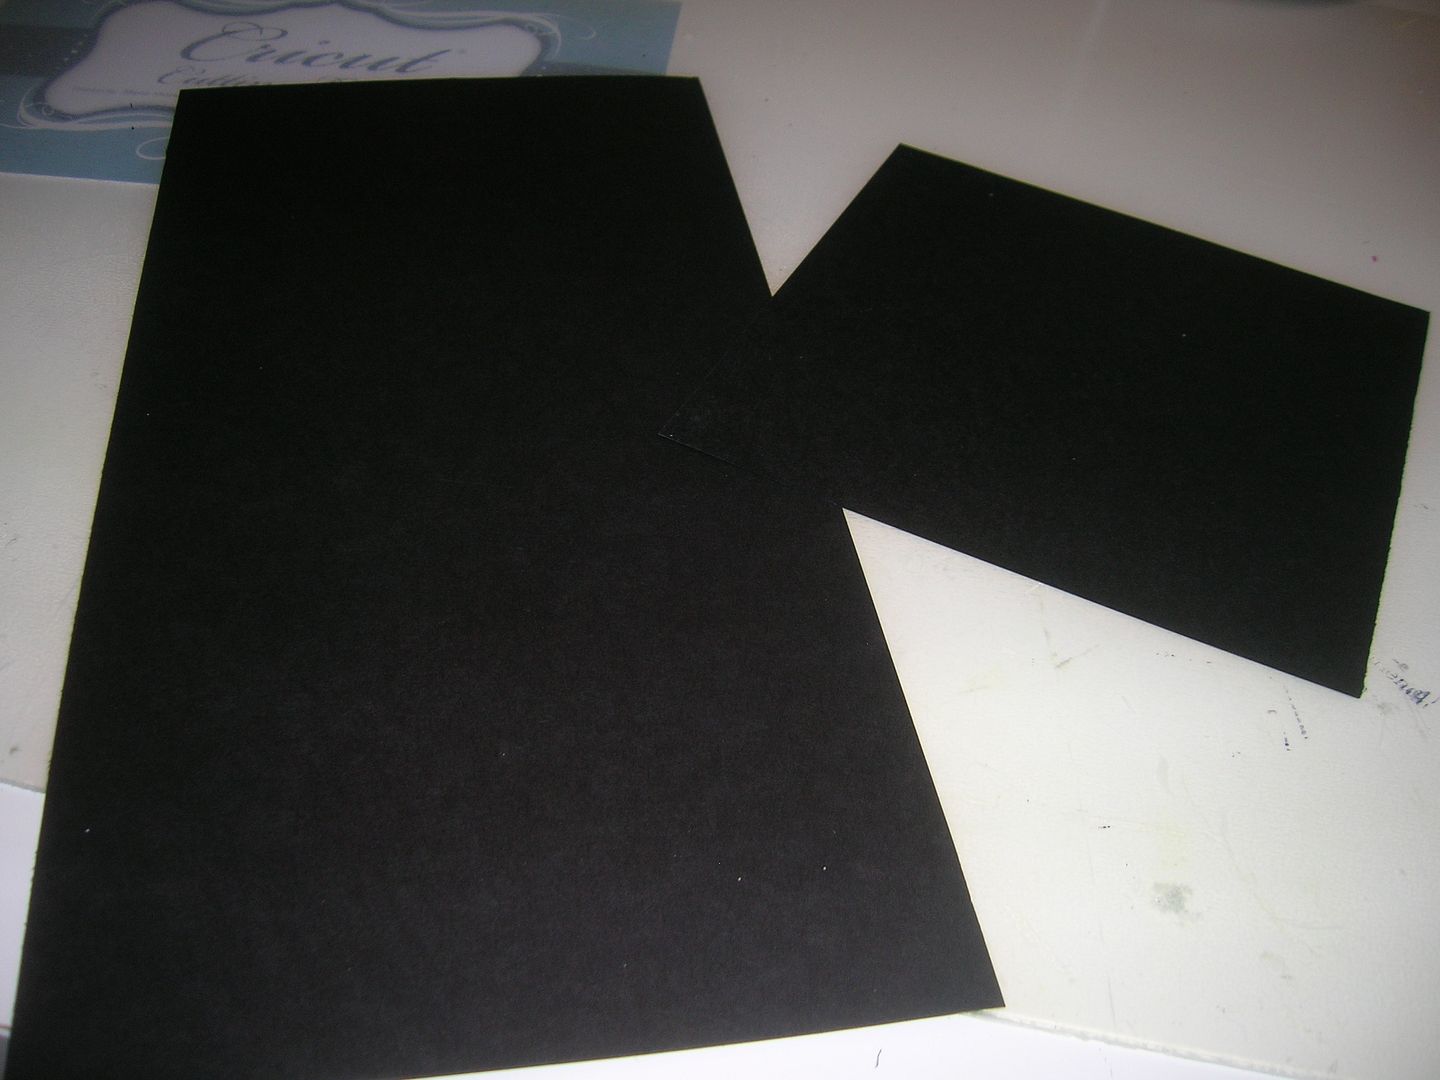
1.  Cut 2 pieces of cardstock- one 6x6 and 1 6x 12.  
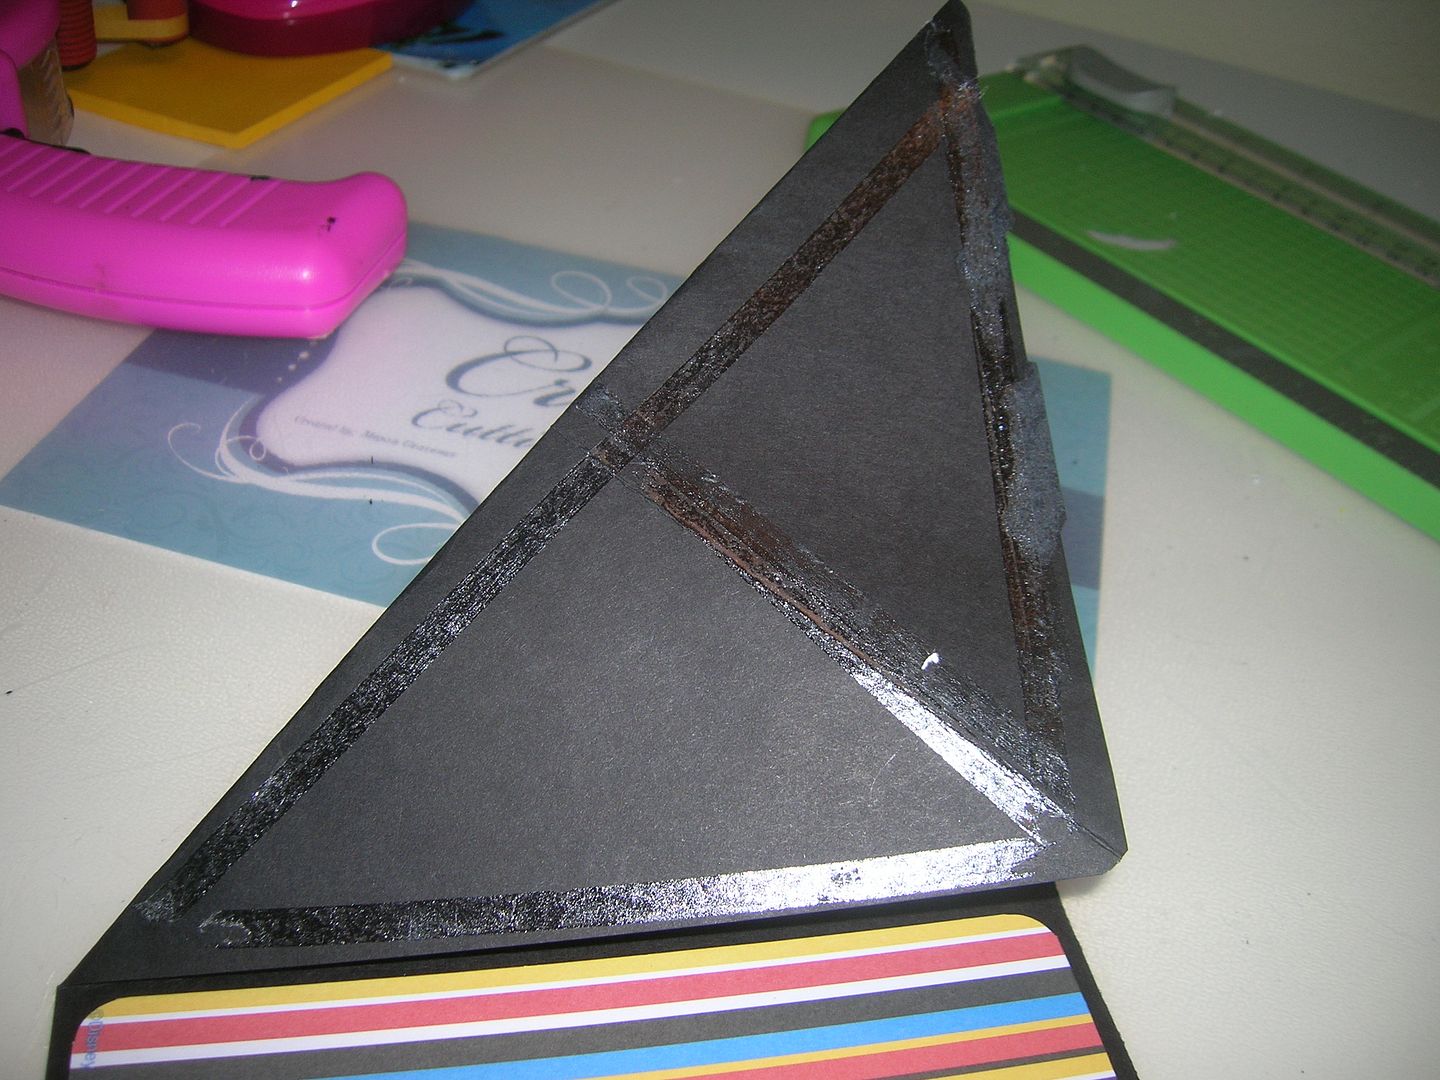
2.  Fold the 6 x 12 in 1/2  

3.   Fold the left side of large piece across to form a triangle.  (I
goofed and folded the wrong way but that is fixable as it will be covered with
the other piece).  I use my ATG gun to adhere the  6 x 6 piece to the
triangle.  Mke sure to line up at bottom so card will close.  Test now
before you can't remove it.  I guess I forgot pic of this step but see
picture 8.  
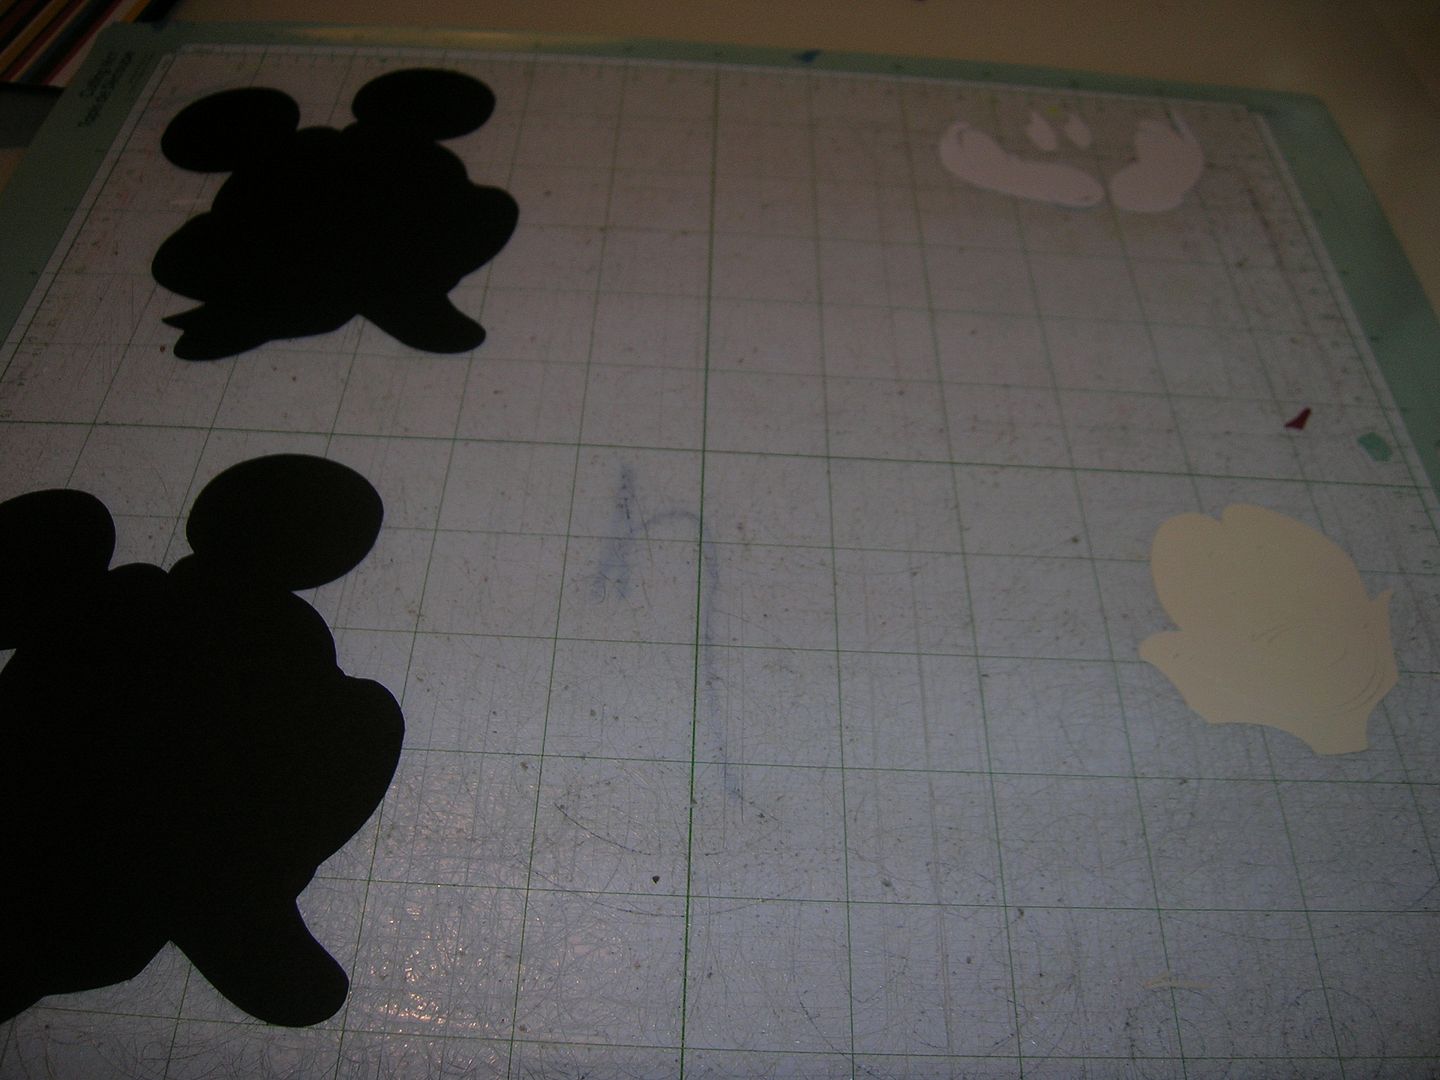
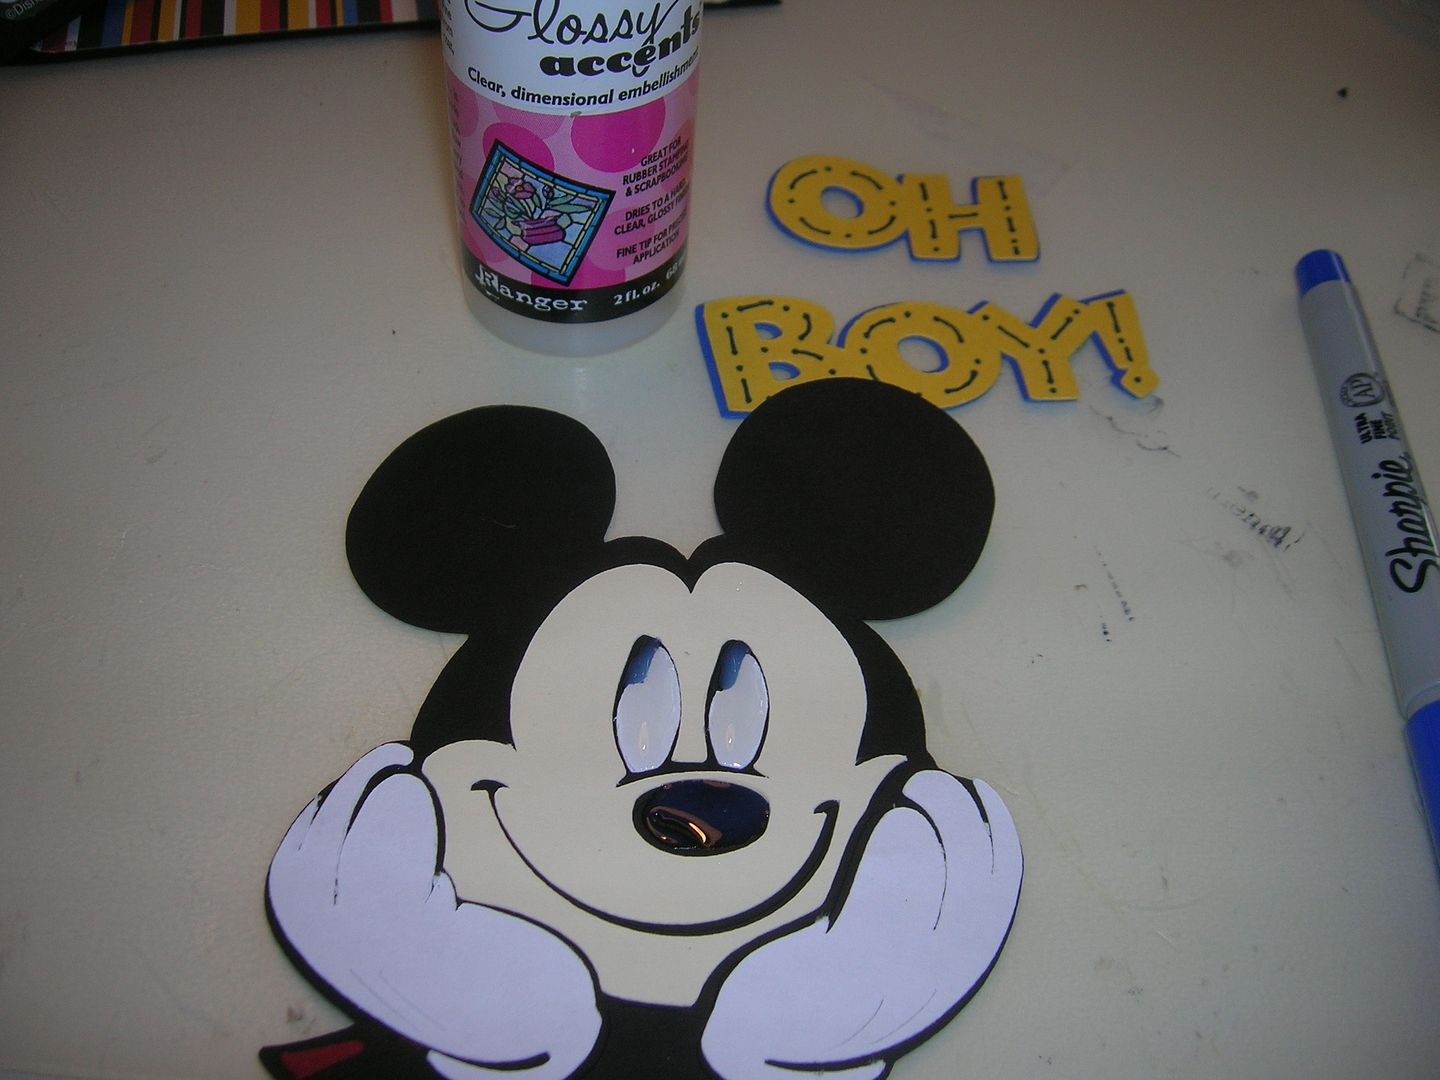
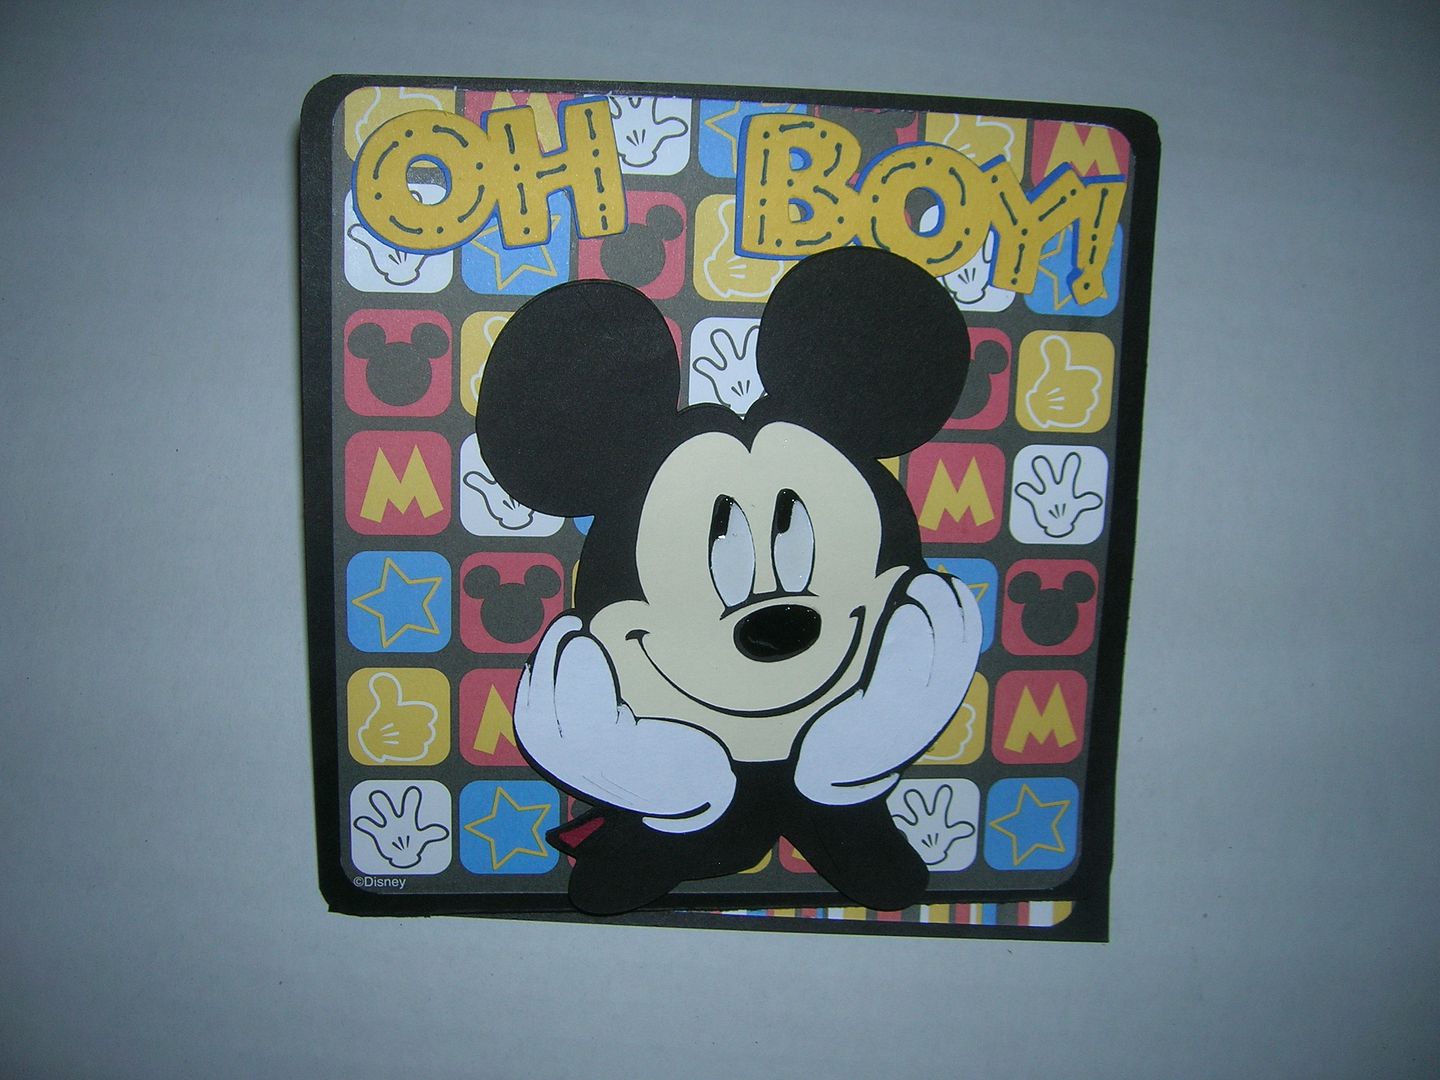
4.  Here is my mat with cuts from Mickey and Friends page 108 cut at 5
inches.  I did not cut the shadow.
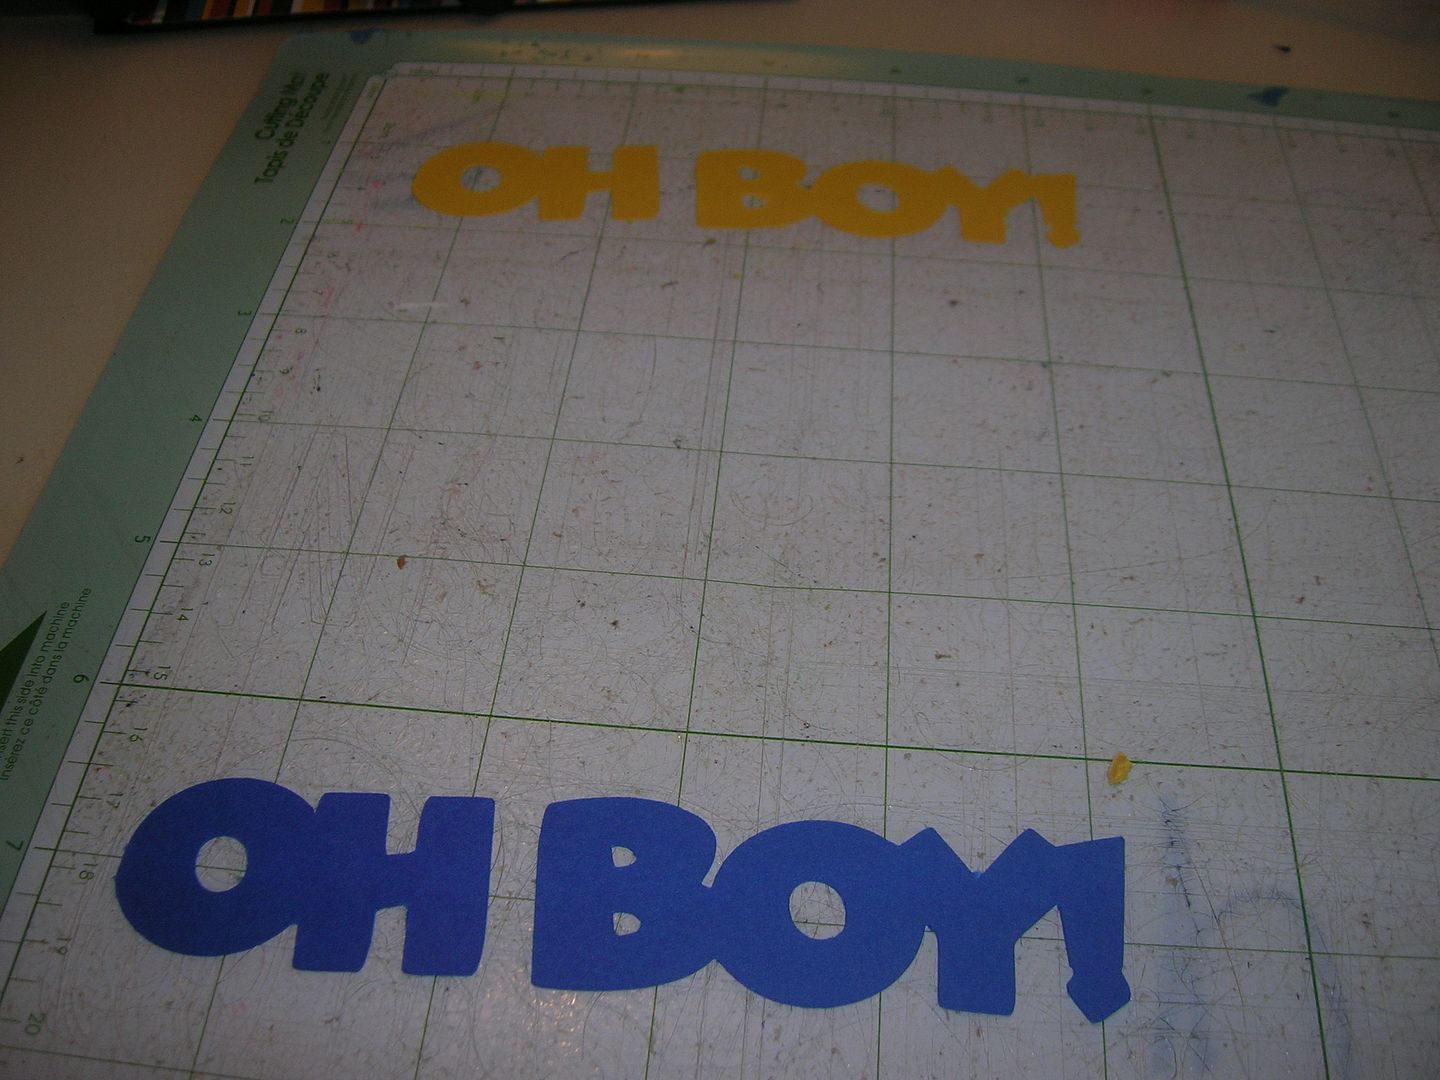
5.  Here is my mat with Oh Boy cut with shadow at 1 inch from Mickey Font.
 This was an already designed phrase so I did not have to make words.

6.  I glued my pieces together and added Glossy Accents to eyes and nose.
 To the words I did dots and dashed with a Sharpie.
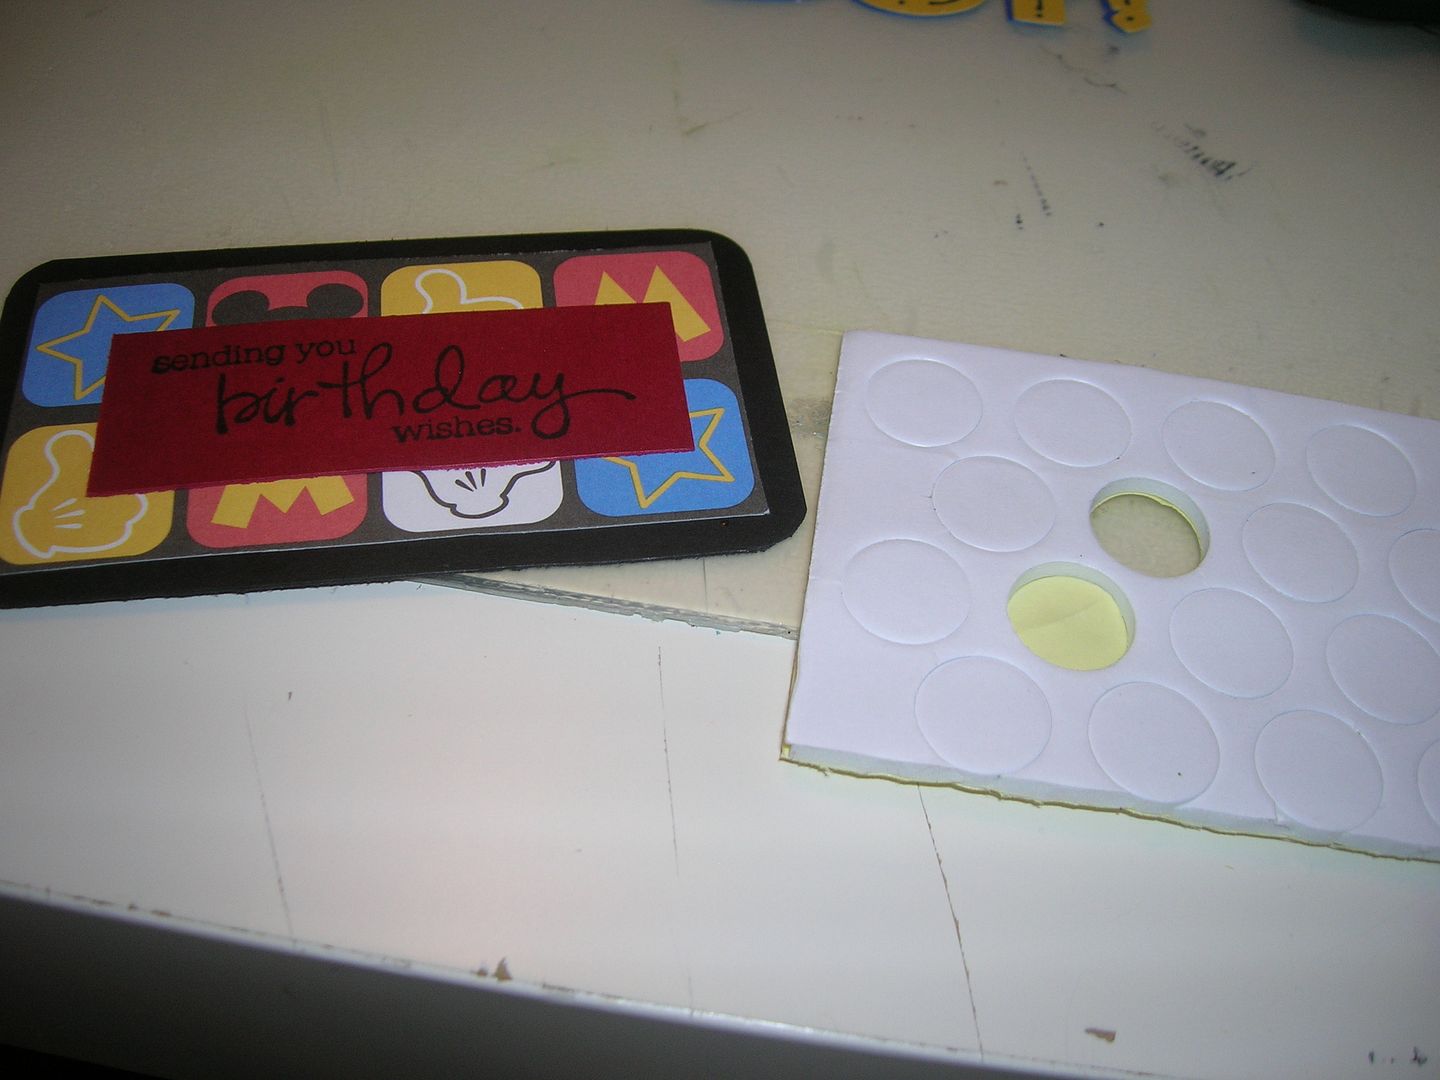
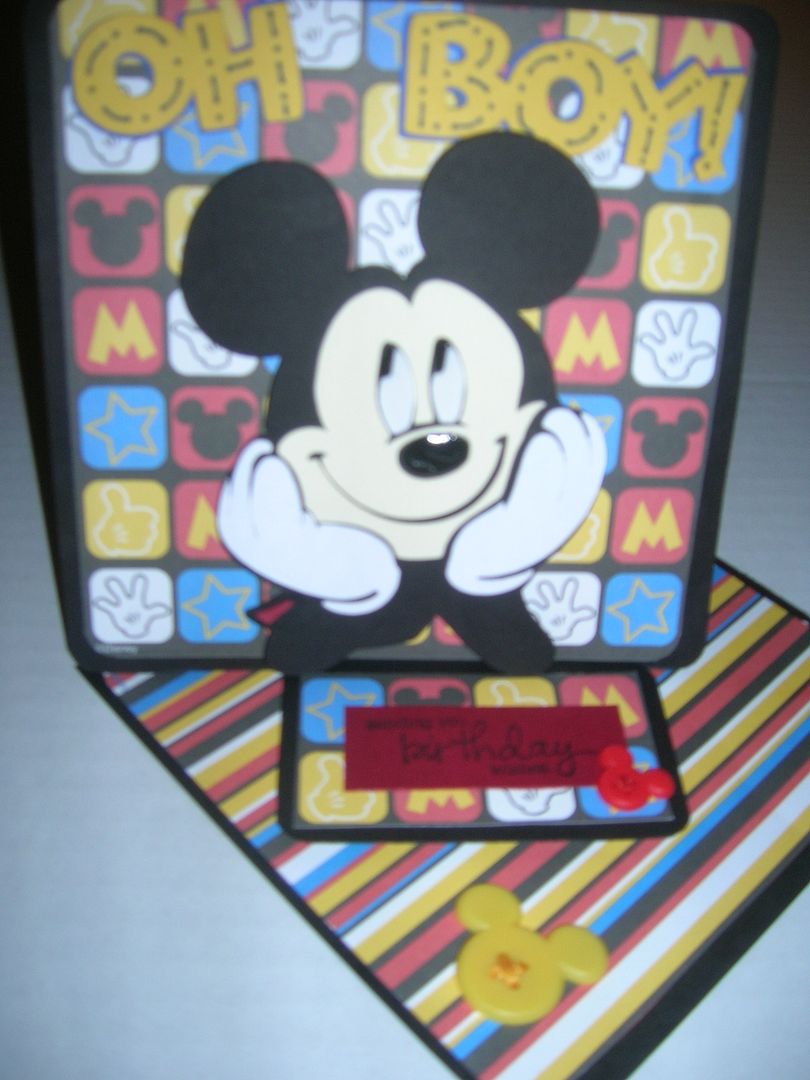
7.  Next I stamped my birthday sentiment and placed it on a 3 1/2 inch
cardstock piece.
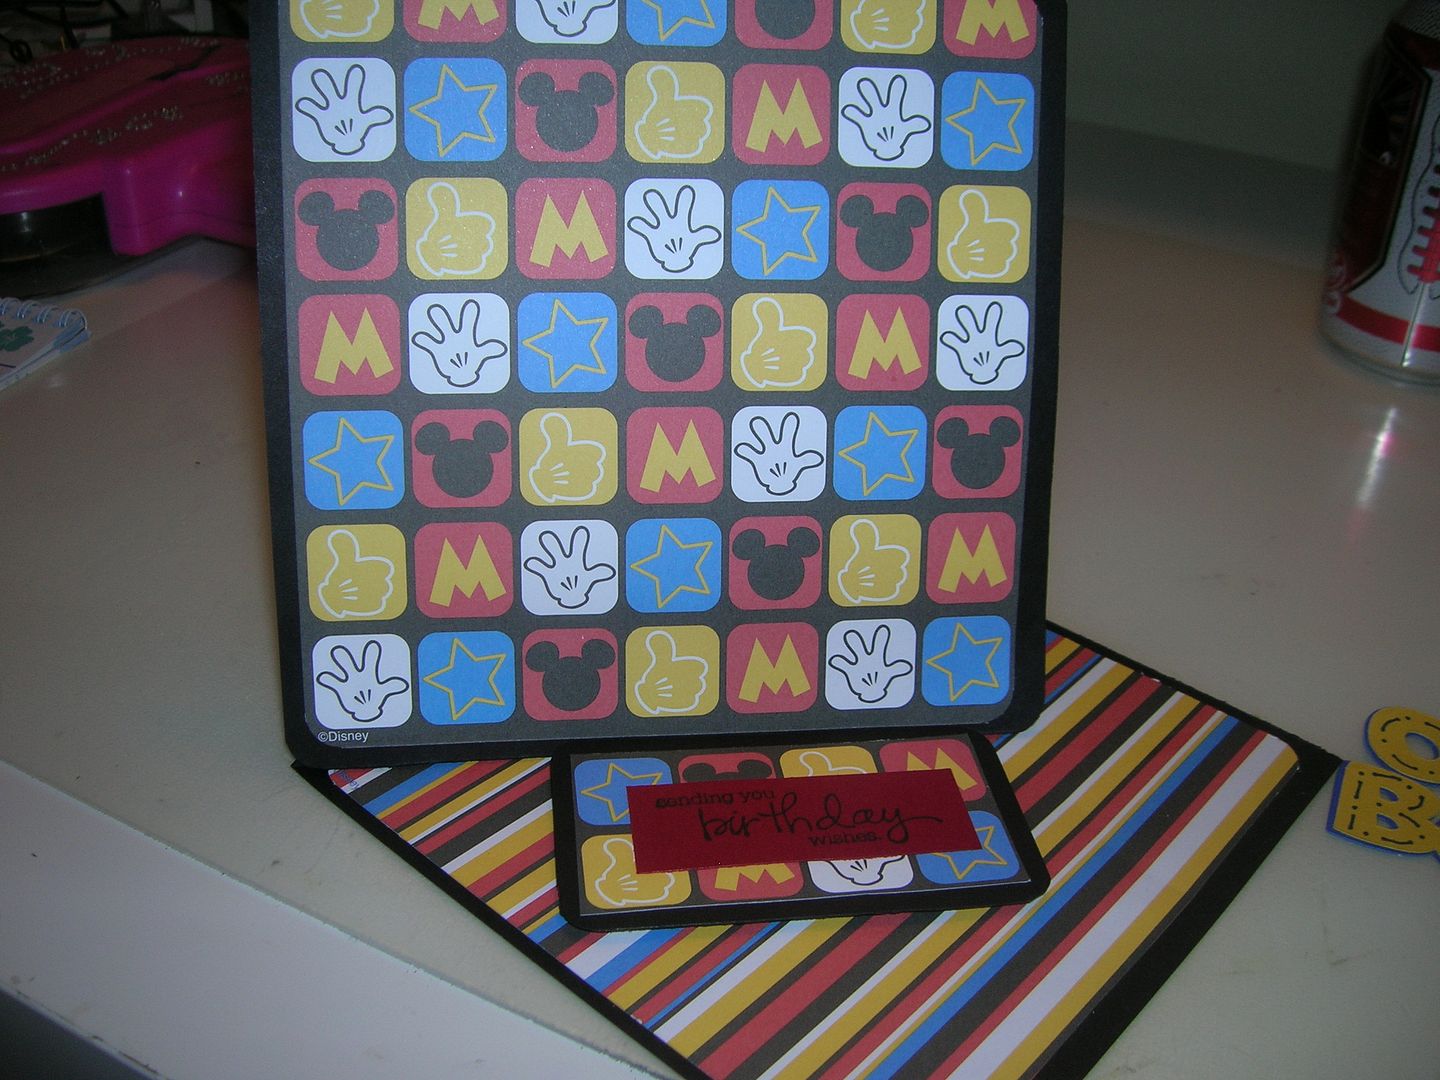
Then you use pop dots so this piece will hold the easel portion up.  
8.  Place the sentiment piece on the bottom of card back so it holds easel
in place.
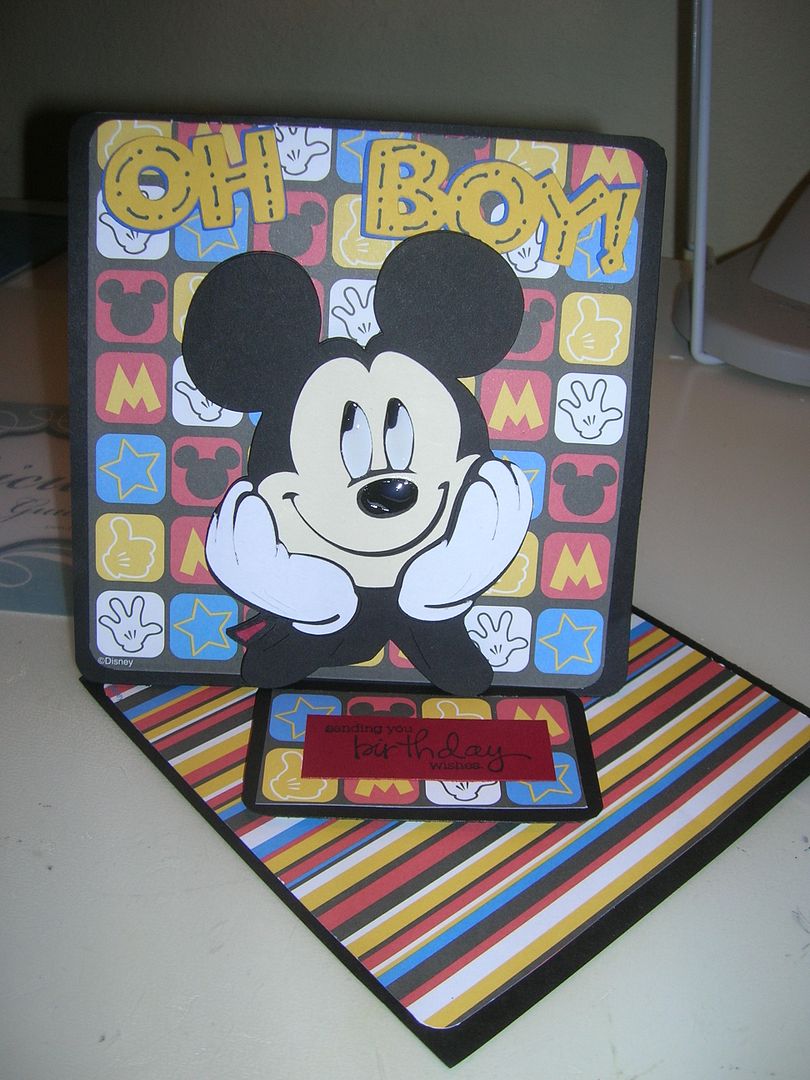
Add other cuts - Doesn't Mickey look so happy.  
This is card closed 
I added two Mickey buttons I had in my stash.  
 
Sorry this pic is so blurry.  
So now you know how to make a twisted easel card.  This is the link to
where I got my directions and you will also find directions for double and
triple twisted easel cards here.
I can't wait to see what the rest of the Design Team has made this week.
 How about you?  Make sure to come back each day to check it out and
you are always welcome at my blog too

Be sure to check out the SweetSassyDiva DT call! Be sure to enter the SweetSassyDiva Design Team Call!

Enter by September 30th!

Photobucket

September 25, 2011

Disney Pixar Blog Hop!


Welcome to the Disney Pixar Blog Hop!  I am honored to be a part of the hop that is co-hosted with Shawn and Melissa.  If you arrived here first, be sure to stop by Shawn http://craftychicsblog.blogspot.com/ to see the whole hop.  I hope that you find inspiration along the way. 

If you arrived here from Kim http://uscrap2.blogspot.com/ then, you are in the right spot. 

I decided to work on a two page layout to add some disney pictures later.  Below is a picture of it before I glued it all down.  I love to use my scrap'n easel to work on my cards and layouts before I glue it all down.  It makes the process easier.  In fact, she is having a sale on them now and you can see more on her site just Click here!


It all began with a mouse but, I find that I like to begin my layout on the gypsy.


I used Mickey and Friends, Mickey Font, Accent Essentials and Cursive 101.

I used the cutterpede to cut a red and yellow border.


I positioned mickey between the two pages cutting him just to the left of his eyes.


Here is the left page:


And the right page:


I cut some additional Mickey gloves to hold the photo mat.


I used the gypsy and welded the shadow layer and font for the title.


The irock added some bling to the title.


For the "Mouse" title, I used Mickey Font.


I used a few different papers on this layout including EK success Disney Mickey paper pad, Sandylion Mickey Characters and Creative Imaginations magic.  Oh and of course a number of solid cardstock in coordinating colors.
What is your favorite disney title for a layout?  I have a few on my list but, I would love to hear your ideas. 

Please continue on your magical journey to Jenny http://jennyplace26.blogspot.com/ next.  If you get lost, along the way, you can find a complete list on Shawn's site.

Be sure to enter the SweetSassyDiva Design Team Call! 

Enter by September 30th!

Photobucket

All this week the current SweetSassyDiva Design team are creating more Disney Pixar projects to further inspire you.  Be sure to check back at http://sweetsassydiva.com/ all week and I welcome you to become a follower by clicking the "follow" button in the right hand side column.

Here is the entire hop to enjoy it again and again:

http://craftychicsblog.blogspot.com/2011/09/disney-pixar-blog-hop-day-two.html


http://disneydreamerdesigns.blogspot.com/2011/09/3rd-edition-of-original-disneypixar_25.html

http://uscrap2.blogspot.com/2011/09/day-2-disney-pixar-blog-hop.html

http://sweetsassydiva-gspot.blogspot.com/2011/09/disney-pixar-blog-hop.html YOU ARE HERE!

http://jennyplace26.blogspot.com/2011/09/disney-pixar-blog-hop-day-2.html NEXT!

http://thecreativestamperspot.blogspot.com/2011/09/disneypixar-blog-hop-day-2.html

http://www.creativecutter.org/2011/09/disney-blog-hop-iii-day-two.html

http://jamielanedesigns.blogspot.com/2011/09/welcome-to-disneypixar-blog-hop.html

http://yesterdaystomorrow2011.blogspot.com/2011/09/disneypixar-blog-hop-and-giveaway-3rd.html

http://www.cricutforbeginners.com/?p=1953

http://scrappinrabbitdesigns.blogspot.com/2011/09/disney-pixar-blog-hop-day-two.html

http://www.lovetocrop.com/2011/09/disneypixar-blog-hop-day-two-ears-to.html

May 1, 2011

Got Ears? Disney Pixar Blog Hop

Enter the SweetSassyDiva Design Team Call!  Click here for details!


Welcome to the Disney Pixar Blog Hop! If you arrived here first, the beginning is at Crafty Chics Blog.


If you arrived from Creative Cutter, you are at the right place! 

Here is a precious sweet girl to greet you and welcome you to SweetSassyDiva blog! 


I would love to thank Shawn for inviting me to participate in the Disney Pixar Blog Hop!  I am so excited that there is a chance for a lucky follower to win one of some amazing prizes! 

There will be a GRAND PRIZE of a Gypsy being given away. Just find the two "Hidden Mickey" blogs in the hop, one from each day, to enter to win a Gypsy donated by Marlo of Scrap N Tote! I hear she is also donating a scrap'n tote!

She is also a maker of the Scrap'n Easel! You can see the video that I made with the scrap'n easel on the right hand side of my blog.   She has made some amazing products.

For more information and current sales offers on the scrap'n tote and scrap'n easel, click on the picture of them below. They are having a sale and you can get the details and special codes by clicking the picture below. Be sure to check it out today because she has some special Blog Hop pricing.


Which color of the scrap'n tote or scrap'n easel do you like best?  Did you click the picture above to see the wonderful colors as well as the newest added? 

Haven't the projects just been amazing so far?  There are a lot of great surprises and more to come.

Now, on to my project!  I made a 2 page scrapbook layout of course Disney!  I used the Disney Cricut Cartridges Mickey Font and Mickey and Friends!

Page 1


Page 2


I used the Sizzix Build a bear die.  To cut out this cute bear, I snipped the bear to make it moveable.  I also cut an additional bear head to pop it up adding dimension. 


His shoes are tied with some DMC Embroidery Floss.  And he has special reinstones to create a Mickey head logo for his shirt.  I think the added dimension of popping up his legs and head add to his character. His ears were cut from the cricut cartridges.

I welded the words on the gypsy and cut it out in 3 layers.


I used a zig two way pen to glue the pieces together.  It helps to use the thin pen and not to add too much or it will ooze out the sides. Did you see the welded mat above with the ears?  I welded all of that in the gypsy an it cuts as one piece.


I added dimension by using pop dots on the "Ears?" to make it stand out.


Is there any question as to how much dimension and interest it adds?  I also inked the edges to add some pop!


The cute Mickey ears were cut on the gypsy and sized to fit.  Did you catch the bow on the first bear?


Here you can see the entire layout.


Be sure to check out Jamie Lane Designs! next as well as leave some comments on all the blogs for your chance to win some fabulous prizes.  Also, please become a follower of my blog by clicking the follow button on the right side bar.  In addition, you can sign up for emails too but, please do both so, you don't miss anything.
 
Here is the blog line up in case you get lost or need to come back to the line up later.


Shawn  Beginning!

Diane http://www.capadiadesign.com/

Susan http://www.cricutforbeginners.com/

Tami http://www.scrappinrabbitdesigns.blogspot.com/

Kristal http://www.gettingcricky.com/

Jessica http://thecreativestamperspot.blogspot.com/

Kaye http://www.yesterdaystomorrow2011.blogspot.com/

Cathie

Bobbi Jo http://sweetsassydiva-gspot.blogspot.com/  YOU ARE HERE!

Jamie  NEXT

Kim http://uscrap2.blogspot.com/  

Melissa http://www.disneydreamerdesigns.blogspot.com/

I hope you enjoyed my scrapbook layout and please now on to Jamie NEXT

And be sure to check the hop from yesterday when you finish today's hop to find the other wonderful blog candy.  You also need to find the two micky icons for a chance to win a Gypsy!


Posted from my iPhone