

Showing posts with label Lacy Label. Show all posts
Showing posts with label Lacy Label. Show all posts
May 7, 2012
Happy Mother's Day!
Good Morning! This is Jen from 3 Cats and a Bug. This week at SweetSassyDiva's; the theme is All about Mom's. I decided to make a two page layout for my Grandson's Mom for her first Mother's Day. I used several different cartridges for this layout. I wanted to use the floral circle from Mother's Day 2010 cartridge, so I started with that cut @ 11.5. I cut it in 3 different layers using my gypsy. The bottom layer was in green and I used the hide contour to hide the small flowers around the edge. The second layer was blue, which I left alone. The top layer I hid all the lines except for the flowers, which I cut from yellow, green and blue patterned paper. I wanted the circle on both pages, so once I figured out where, I cut it in two.
![]() I saved the leftover from those cuts.
I saved the leftover from those cuts.
![]() I used my Viva Decor Pearl Pen and added purple dots around the edge. I added some flower gems to the larger flower cut outs and smaller pearl dots to the small flowers.
I used my Viva Decor Pearl Pen and added purple dots around the edge. I added some flower gems to the larger flower cut outs and smaller pearl dots to the small flowers.
![]() The next thing I needed was a frame for the picture. I used a frame from Mother's Day 2010, cut @ 6.8 and hid the inside cut. From lacy labels I took the butterfly oval, cut @ 4 and welded it into the MD frame. I also cut the same oval to layer on the frame in a darker blue.
The next thing I needed was a frame for the picture. I used a frame from Mother's Day 2010, cut @ 6.8 and hid the inside cut. From lacy labels I took the butterfly oval, cut @ 4 and welded it into the MD frame. I also cut the same oval to layer on the frame in a darker blue.
![]() I added the picture to the frame, adjusting it how I wanted it to sit, and then flipped it over and taped the picture down. (The picture is of the three of them when Bentlee was about 1 hour old. Such an awesome day!!)
I added the picture to the frame, adjusting it how I wanted it to sit, and then flipped it over and taped the picture down. (The picture is of the three of them when Bentlee was about 1 hour old. Such an awesome day!!)
![]() I love decorating my cuts. To the layer on the frame I added "stitching" with a white gel pen. I used some Stickles to the butterfly and when that dried I added glossy accents, although it really doesn't show up well in the picture. I used 4 of the bigger flowers from the circle leftovers and added green brads to it. I inked the edges of the frame in blue chaulk.
I love decorating my cuts. To the layer on the frame I added "stitching" with a white gel pen. I used some Stickles to the butterfly and when that dried I added glossy accents, although it really doesn't show up well in the picture. I used 4 of the bigger flowers from the circle leftovers and added green brads to it. I inked the edges of the frame in blue chaulk.
![]() I cut out "Happy Mother's Day" from Mother's Day 2010 @ 5.
I cut out "Happy Mother's Day" from Mother's Day 2010 @ 5.
![]() I used my white gel pen to decorate it.
I used my white gel pen to decorate it.
![]() I cut out an image of Mom and child from A Child's Year @ 6. I will admit I messed them up when laying everything out to cut. I had meant for the dark blue to be the shadow. When I realized what I did, I put them together anyways and actually liked how they looked, so I didn't fix it. :)
I cut out an image of Mom and child from A Child's Year @ 6. I will admit I messed them up when laying everything out to cut. I had meant for the dark blue to be the shadow. When I realized what I did, I put them together anyways and actually liked how they looked, so I didn't fix it. :)
![]() I cut out the purple swirls from Lovely Floral @ 3. I added pink liquid pearls to the flowers.
I cut out the purple swirls from Lovely Floral @ 3. I added pink liquid pearls to the flowers.
![]() This is the first page,
This is the first page,
![]() and the second page,
and the second page,
![]() and the two of them together.
and the two of them together.
![]() Thanks for looking!
Thanks for looking!
February 17, 2012
XOXO Door Hanger!

Hello ~ Lori here from ScrappinMyStressAway. This week at SweetSassyDiva's the theme is "Not a Card or Layout" so I decided to finish a project I started earlier. I saw something similar several months back and created a file in my Gypsy right away (so I did not forget) and never even did a test cut! I was thinking this would be cute for Valentine's Day.

I started with this box from Tags, Bags, Boxes and More and welded this layer of an ornament from Christmas. The box is sized at 10.90w x 6.88h and the layer of an ornament is sized at 4.81w x 29.12h.
On a side note, the layer of the ornament can be used as a wine bottle tag!

I cut out my box in red card stock.

I scored and creased on the fold marks and used my ATG to adhere it together.

I found an image from my Holiday Vignettes program and printed it out on white cardstock. I cut it out.

I had to guess at the size of the image and it turned out pretty well!

I wanted to put a doily behind the image, so I opened up Lacy Labels and found an oval shaped doily. I rotated it 90 degrees and sized it to fit the front of the box (4.91w x 3.47h).
I grabbed the "XOXO" from Sentimentals and sized it to 2.74w x 1.12h.
I cut both out of cream colored card stock.

I inked them both with Antique Linen ink to age them.

I wrapped some wide brown ribbon around the middle of the box and adhered the doily to the box. I pop-dotted the image to the doily. Now I just have to wait for my Valentines to be delivered!!!
-- Lori~ www.scrappinmystressaway.blogspot.com
February 9, 2012
Cherub Love!

Lori here from ScrappinMyStressAway with a little Valentine. This week the theme at SweetSassyDiva's is Vintage Valentine.

I won this clip art program from a blog contest and finally took some time to play with it. I am not the best at this digital thing but I keep trying!! I really love the vintage images for all of the Holidays!
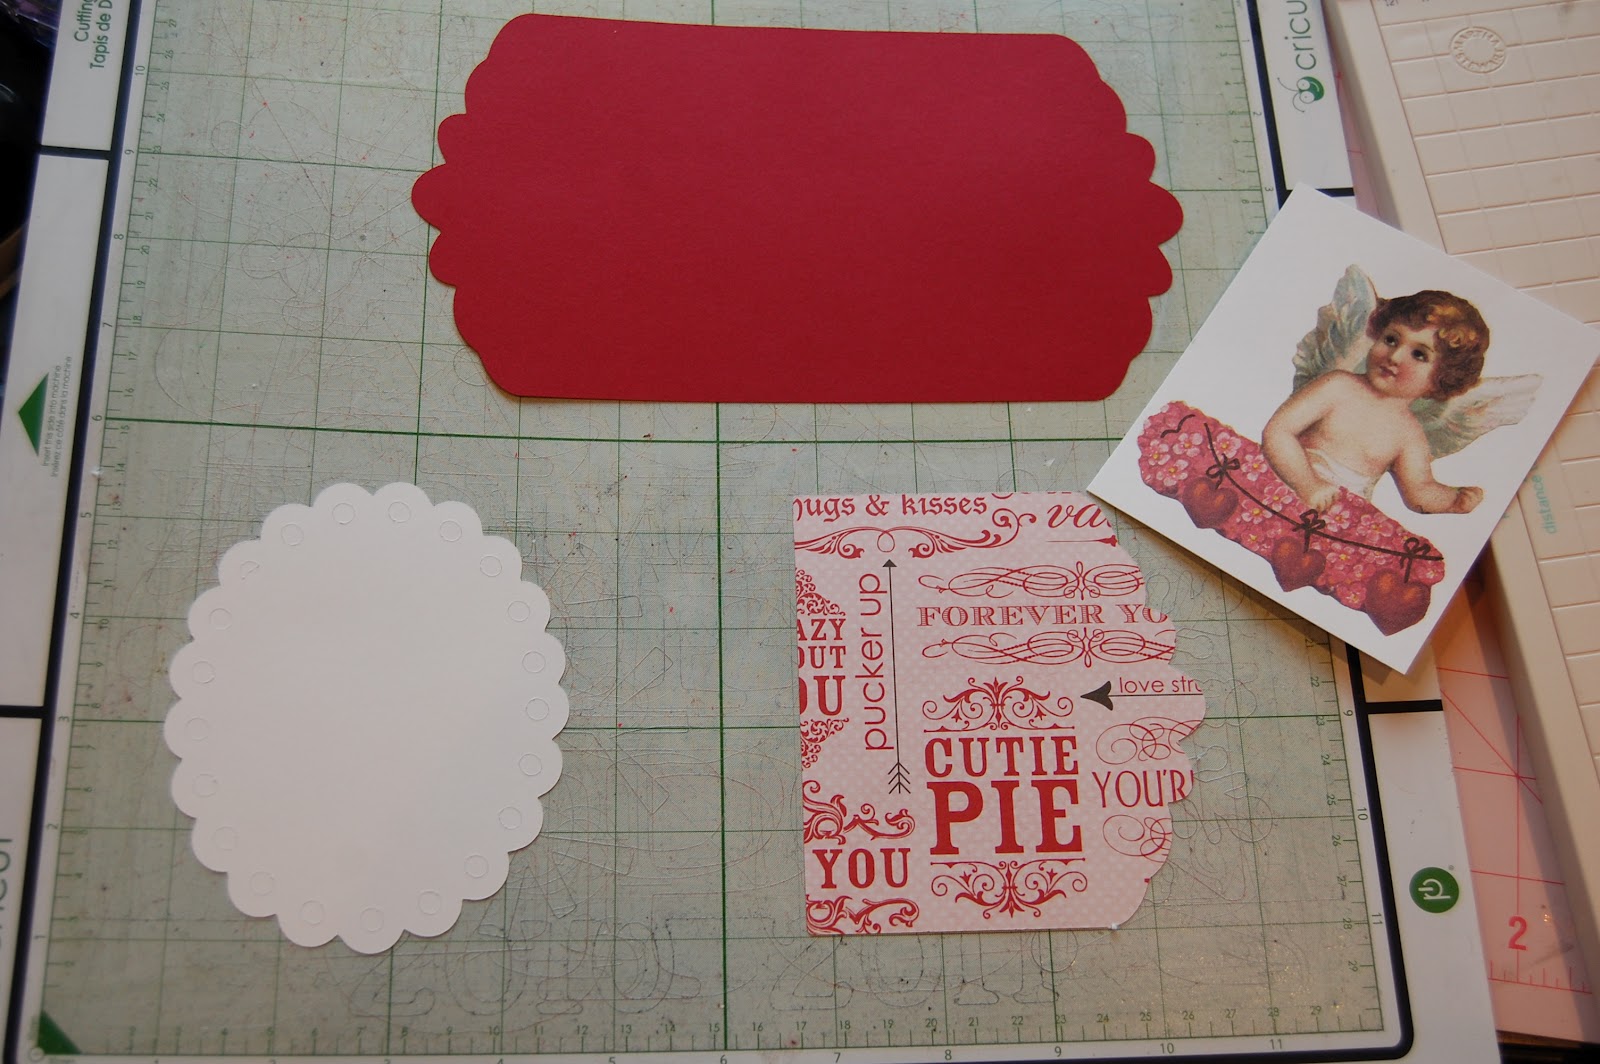
I cut out this valentine image on white cardstock.

I selected a label from Lacy Labels and welded two of them together. They are 4.77w x 4.16h rotated 90 degrees. I copied the second label and flipped it.
I copied a third label and sized it to 4.50w x 3.92h (also rotated 90 degrees). I selected a scalloped oval and sized it to 4.69w x 3.74h (also rotated to 90 degrees). I cut out the card in burgundy cardstock. I cut out the scalloped oval in white cardstock. I cut out the mat for the front of the card in Valentine paper from my stash.

I tied a bit of twine around the oval and pop dotted the cherub on top.

Here is my sweet vintage valentine card for my son's teacher.
January 18, 2012
Valentines Cards!
Hi all your crafty friends! Brenda here from Friends Craftin with Friends. I want to thank Bobbi Jo of Sweet Sassy Diva for having me today! For our challenge we were given a sketch to use. We could make anything we wanted, a layout, a card-whatever we wanted. So I decided to do a card-well 4 cards!
 First I started out by deciding what size I wanted my cards to be and I thought that a 4x9 card would work great with the sketch. So I got my bases together. Then I gathered some papers from my stash. I believe all the pattern paper came from K&Co paper stacks I had in my stash. I also decided that Cricut cart I wanted to use for my die cuts. As you can see I chose Creat-A-Critter.
 I started layering my first two layers on my card base. Colored card stock and pattern paper.


 I assembled all my layers and popped my critters up on pop dots. I did my stamping that I wanted to do and added some stickles next. And there you have it, 4 Valentine cards ready to go to the grandchildren. The sketch made these cards so easy to do. I kept my die cuts simple as well so that made for quick cards as well. I hope that you will give sketches a try, they sure can take all the guess work out and make for quick cards and layouts!
If you haven't checked out the Blitsy site, you are missing some great crafting deals! It's free to take a peek and never a fee! :D Click here! New items added three times a week.


Then I started building my layers from the sketch.

Next I sized my critters and the base for my critters in my Gypsy. I used Lacy Labels for the base that my critters are sitting on. I stretched it to suit my needs on my card. Cut them all out and then cut out my critters and layers.


December 13, 2011
String 'em Up!
 I love to make, send and receive Christmas cards! Usually I just hang a red yarn string on my wall and hang them on that. I saw an idea a few months ago that I kept stashed in my attic(mind) for a great project to make! Its not just like the one I saw but its my own version. I was so excited to start it! I know exactally how I wanted it to look and I think it turned out better. I sifted though my paper to find the perfect vintage looking Christmas sheets and then got on with the show!
I cut out my tags

Cut out my layers

Cut out my 'Merry Christmas'

Inked my edges and started layering

Added my letters and snowflakes

Decided I wanted shadows for my letters

Inked my edges and added bling!

Added big bling to my snowflakes

Used my new Tim Holtz alcohol inks to color my paper clips

Pigment inked my clothes pins

Glued it all together and strung up my new stringer :D


You can see where I added the paper clips so that I can hang more cards from strings if need be.

And now for the moment you all have(n't) been waiting for! A pictures of my super not so secret anymore 2011 Christmas card, card, card, card.....(I added the echo for dramatic effect)

TA DAH! :D
~*Recipe for Christmas Card holder*~
~*DCWV paper from last years Christmas super stack
~*Core'dinations card stock in white, red and green
~*Cricut Cartridges Winter Lace, Lacey Labels and Old West
~*Red Tim Holtz alcohol ink
~*Paper clips and clothes pins
~*Red pigment ink
Subscribe to:
Posts (Atom)


