MyFreeCopyright.com Registered & Protected
Showing posts with label Summer. Show all posts

April 18, 2011

Enjoy the Seasons!

Hello- This is Summer from www.cricutdiaries.com and this week over at SSD we were all asked to make you an Easter card, so this is what I did for you all! Recipe: 12x12 white card stock Imagine cartridge "Enjoy The Season's". Pop Dots Pink Ribbon White and Pink Gel Pens Stickles


I really love this cart and have been wanting to use it more so when I saw the super cute bunny I knew it would be perfect for this Easter card.


The scalloped ovals were cut at 5 and 4.5 using the imagine colors and patterns to fill them in.


The bunny and chick image was cut at 4.5 I used pop dots for all the layers, gel pens to go around the ovals and the edge of the card. I then added stickles for some sparkle.


April 14, 2011

Birthday Bash!

Hey Everyone- This is summer from www.cricutdiaries.com and this week over at Sweet Sassy Diva all the DT ladies were asked to make a card using pink,blue, green and a cricut tag.

For my card I used the cartridge Birthday Bash and some colors from Imagine More Cards.

Recipe: Birthday Bash Imagine More Cards White card stock Flower Cuttlebug folder Blue Glitter Corner punch Small blue gems Sentiment "just for you" Brown ink


All the images were cut at 4.5

I used a corner rounder punch to make my card base match my imagine cut rounded corner square.


I put the pink "purse" or "gift bag" image through the cuttle bug with this sweet flower folder.


I added blue glitter to my bow. I ran the cut through the xyron sticker maker, but you can do it any way you prefer.


All the layers were added with pop dots. I stamped my sentiment with distress ink and add 3 small blue sticky gems to the corner . Hope you enjoy be sure to check what all the other DT ladies have made this week.


SweetSassyDiva will be participating in the blog hop! Be sure to mark your calendar and check it out!


There will be a GRAND PRIZE of a Gypsy being given away. Just find the two "Hidden Mickey" blogs in the hop, one from each day, to enter to win a Gypsy donated by Marlo of Scrap N Tote! I hear she is also donating a scrap'n tote and scrap'n easel! 

You can see the video that I made with the scrap'n easel below or if you are on email subscription, click here and view on my blog on the right hand side.


For more information and current sales offers on the scrap'n tote and scrap'n easel, click on the picture of them below.  They are having a 30% off sale and you can get the details and special codes by clicking the picture below.


I am so excited that my subscribers will have an opportunity to enter for a chance to win one of these fabulous prizes! I absolutely love mine!

Did you see the new color offered in the scrap'n tote! wow!!! love it!

April 6, 2011

You Mean The World To Me!

Hello Everyone- This is Summer from Cricut Diaries again. This week all the Dt Ladies were asked to make a Tri Shutter card. I want to apologize for my super short post today, for some reason each time I added new photos they would be going the wrong directions! So frustrating. Also this tri-shutter card is kinda hard to describe in words, I would the most help my searching YouTube! I found some great videos that made this so fun and super easy.
You Will Need :
*White, Pink and Blue card stock
*1 sheet double sided card stock (mine was "Fun in the Sun" by Kaiser scrapbook.
*Imagine Cartridge Better Together
*White Gel Pen
*Stickles
*Pop Dots
*I used the MS score board
Like I said the best way to understand this type of fold is to check out a video. I can say that my pink card stock was cut to 5.5X12, the blue and pattern card stock were all layered 1/16th of an inch at a time.
I used my Imagine to cut out the phrase and scalloped circles for the front of my card (it was cut at 2 inches with layers) and the 3 flowers that I used to decorate some of the small boxes (all 3 were cut at 1.5). I used a white gel pen to "dot" all along the blue card stock layer. And added stickles to the rickrack and to some of the flowers. Hope you enjoy my Tri-Shutter and next time I will have more pics for you all!

March 31, 2011

Stretching into Spring!


Hey Ladies- Welcome back to Sweet Sassy Diva's weekly challenge for us DT ladies! This week we were all asked to make a Spring card using the "Stretch Your Imagination" cartridge.
Recipe:
Imagine More Cards (for colors and patterns)
Stretch Your Imagination
2-Way Glue Pen
Stickles (Lime Green and Star Dust)
Glossy Accents
Liquid Pearls (Petal Pink)
White Card stock

I must admit that I have been going a little crazy with the Glossy Accents, but I LOVE it!
I started by cutting the entire card at 6 inches while using this soft pink pattern from the Imagine cartridge. I then cut the layers for the "spring", "flower pedals" and "leaves" at 4 inches. It all fit perfectly over the initial card shape, except the "S" for what ever reason the "S" was the only letter not to fit! But that is what I love about my Cricut, I am always trying to figure out something new!
Then came all the fun stuff! I added the "star dust" stickles to the word "spring", the "lime green" for the leaves, Glossy Accents for the tulip petals and finally I "made" a pearl boarder with the "Liquid Pearls". I just recently found a new trick for this If you flick the bottom of your paper it will help you lose the point that "Liquid Pearls" sometimes gives, it makes so much sense I felt kinda funny when the lady told me about it!


Today is the last day to enter! Be sure to enter because you can't have a chance to win any other way! :) Plus, if we can get her to 2500 today, she will give away an E2 and a Cricut Imagine!

Please go to Pink by Design site Click here! and "tell them I sent you please"...they are giving away a brand new Cricut EXPRESSION 2 ☺ and check out the stamps while your there!
Be sure to enter for your chance to win an imagine and/or expression 2! 
Click Here! and sign up for a free account.

Also, sign up for the Pink by Design free newsletter: Click here! and enter that 'sweetsassydiva' referred you for another chance to win.

If that was not enough chances, you can get yet another FREE chance to win:Click here! and click on the like button on her facebook page and leave her a message telling her "sweetsassydiva" sent you.

No costs or bother but, you are entered in for chances to win one of these great machines!

March 20, 2011

April Showers!

Hello Everyone- This is Summer from Cricutdiaries.com and this week over at SSD I was asked to choose this weeks theme.... And I chose Easel Cards! This is one of my favorite folds and after you do one, it is very easy to remember.

I wanted to use my new April Showers cart so I made my card a "Spring" card.
Recipe:
Imagine More Card
April Showers
White card stock
Clear Stickles
Lavender Ink (I used stampin Up!)
Purple and white gel pens

For this card I printed and cut 2 squares with a pattern from IMC , those squares were cut at 4.7. The banner (both layers) were cut at 1.5, the tree at 3, the house at 3.5 and the flower was cut at 1.5.

For the base of the Easel card I cut a strip of white card stock at 5x10 and another at 5x5. I folded the larger strip in half to form a 5x5 card, then the top portion of the card (that would have been the front) and folded that in half again (2.5). I inked all the edges in a lavender ink.

Then I adhered my patterned squares to the full, no folded inside of the card and on the 5x5 square. That 5x5 square will be glued to the 2.5 inch folded strip on the top of the card.

For this view you can see how the 5x5 square attaches.


I used pop dots, Stickles and the purple gel pen to add detail to the entire card as well as the images I cut out. I hope you enjoy my "Spring" card and I hope that you enjoy all the Easel's you see this week!

Click Here for Blog Hop!

March 17, 2011

Happy St. Patrick's Day!

Hey Ladies- This is Summer from http://www.cricutdiaries.com/http://www.cricutdiaries.com/ and this week Bobbi Jo from Sweet Sassy Diva has asked her DT to make a St.Patrick's Day project using newspaper/newsprint. I chose to make 2 6x6 LO for my girls mini paper bag books.

Recipe:
Imagine More Cartridge
Simply Charmed
White card stock
Black card stock
2 Green eyelets
Black ribbon
Black Memento Ink
Happy St. Patrick Stamp

All of the images were cut at 2 inches from Simply Charmed, they colors were from the Imagine More cartridge.

The black card stock was cut at 6x6 the newsprint (oops my bad, I thought that I had newsprint but it was music paper) was cut at 5 3/4 inches x 5 3/4. The green print was also printed and cut from Imagine more at 4.5 inches.

I recently bought this memento ink and I love it, it is TRUE black. I stamp I used is from the $ store.

I recently bought a Big Bite for another project and used it to add 2 small green eyelets to the corner. I also ran some thin black ribbon through them and tied a simple bow.

Once I layered all the tiny layers I used pop dots to put them on my mini LO and and used a white gel pen for detail on the images and along the black boarder! Happy St. Patrick's Day!

Redbox is the best - you can rent DVDs for $1 a night with no membership fees! You should try it out. If you click on my link and it's your first time renting online, they'll give you a free one-night online rental credit. And I'll get a free rental each time you rent via my link through 3/17/11.  Also, you can sign up for email notifications and through the text sign up option, I get a free rental each month!  Click here to get started!

Did you enter for your chances to win some great machines such as the cricut imagine, expression 2, gypsy and other great giveaways? If you didn't hear or see it, Click here for more details!


Enter for your chance to win....an IMAGINE! PLUS other prizes!!! Just click on the picture of the Scrap'n Tote below for details to enter for a chance to win!

Just click on the picture of the Scrap'n Tote below for details on a special St. Patrick's DAY SALE!!! 20% off scrap'n tote, scrap'n easel and creative options project tote! Hurry before this offer ends!


Happy St. Patty's Day!

hurry before it ends!


March 11, 2011

Snail Mail!

Hello Everyone this is Summer from http://www.cricutdiaries.com/http://www.cricutdiaries.com/ and this week all the Dt ladies were asked to make a card or frame using a cricut cut "shell". I went through http://www.cricutsearch.com/http://www.cricutsearch.com/ and the only "sea shell" that I had was a very small one from Everyday Paper Dolls and while looking at this cart for another card I saw this "snail shell" and figured a shell is a shell...right??
Recipe:
Imagine More Cards Imagine Art Cartridge
12x12 white sheet card stock
Pink card stock
Distress Ink "Walnut Stain" with small finger dobber
Stickles (I used green and brown)
Collage podge with small paint brush

This was so easy since I was able to just hit my layers button and pretty much be done, The front images and all it's layers were cut @5 inches. The blue and white square were cut for the inside at 4.7 and 4.4, for the small snail I just copied the large snail and changed the size to 2 inches.

The backing to this card was cut from a 8 1/2 x 4 1/4 peice of pink card stock. All edges were inked with Distress Ink. If you all havent noticed yet it's my fave!

I then tried the collage podge for the first time on something cut and printed from the imagine and my colors seemed to start to bleed. I was looking for a shiny shell and I just ont think that this was the correct product to use.

Inside veiw.


Did you enter for your chances to win some great machines such as the cricut imagine, expression 2, gypsy and other great giveaways? If you didn't hear or see it, Click here for more details!

March 3, 2011

Overspray!

Enjoying another day at Sea on the Cricut Cruise.  Today Robyn and Tammy are doing classes with the Cricut Expression and the Gypsy.  We are on our way to the Bahamas! woo hooo!! Hey, maybe I need a Bahama Mama Drink!   This day is pretty full with a lot of Cricut Crafting.  I sure do need to catch some rays between their classes and maybe some surf n turf.  I will have to see what is on the menu today. 

Also, the cricut will be joining us tomorrow for a beach party!  I wonder if there will be a Luau or just making sand castles and burying the cricut until s/he chirps!  :) 

So, we will be getting our bathing suits on to strut our stuff at the beach Party tomorrow.  Check out Summer's layout! Overspray is good on a hot day as long as you don't fall overboard!  See how she uses the overspray feature on the Imagine!  Her layout really would look great with some beach party themed pictures! 

- SweetSassyDiva

Hey Everyone- this is Summer from Cricut Diaries and this week Bobbi Jo From Sweet Sassy Diva has asked all of her DT ladies to make a 2 page mini-book LO. I normally am not a huge LO person but I was able to use a new cartridge and created this simple LO for you all!
Recipe:
Imagine Art Cartridge - Enjoy The Seasons
2- 12x12 white sheet card stock
Distress Ink "Spiced Marmalade"
Ribbon
Pop Dots

I started by using the "Print Paper" button on my Imagine,this is only the 2nd time that I have printed whole 12x12 and I LOVE it! Since I have only done this twice and both time I used the Medium over spray, I cannot really give you any tip on which setting is better. Even with the Medium setting I still had to run a baby wipe on the mat once I pulled the paper up. I then cut 2 pages (5 3/4 and 8 3/4).


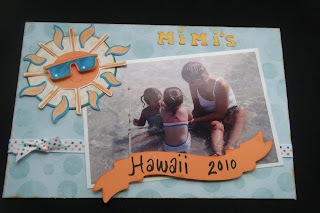
Most of the images are cut from the "Enjoy The Season's" cartridge. The Letters were from Birthday Bash cut at .5 and filled with a pattern from "ETS" to spell out "Mimi's Beach bum's" as the 4x6 photo is of my girls and their Mimi last year out on the sandbar. The sun and all the layers were cut @ 3 inches, the girl was cut at 5.5 inches, the banner was also cut at 5.5 taken from another image and flood-filled with orange to match my LO. All the edges were inked with Distress Ink and I used some pop dots to make my sun's glasses pop. Added some ribbon and used the white scraps left from the Imagine to make the 2 small photo boxes. 

Here is the schedule at sea for the Cricut Cruise:

9:30 - 11:30 am Cricut Expression class with Robyn
12:30 - 2:30 pm catch some rays at the pool and perhaps some yummy food.
3:00 - 5 pm Tammy's class with the Gypsy and vinyl
5:30 - 8 pm enjoy the ship's entertainment
8:00 pm dinner with the cricut
9:00 - 11 pm Open crop and Make 'n take
11:00 - ? Enjoy the night life!

What crafty project are you making today?  I can't wait to show you all the wonderful things that we have made! 

- SweetSassyDiva


February 22, 2011

Celebrate Today!

Hey Everyone, Summer again from Cricut Diaries! This week over at SSD we were all asked to create a card/project using these colors as inspiration!

Recipe:
Imagine Patterns and Colors Cartridge (Hopscotch)
Birthday Bash cartridge
12x12 sheet white card stock
5x5 white square card base
Distress Ink "Spiced Marmalade" and "Walnut Stain"
Birthday Sentiment (mine is by Paper Trey Ink)
Ribbon
Stickles (I used, lime green, yellow, and hot pink)

For this card I found these stack of gifts on the original cartridge Birthday Bash and used the Hopscotch colors to fill in all the layers (cut @4 inches). For my 1st patterned background I filled in a stock image that comes standard on the Imagine with a pattern from hopscotch it was cut @ 5.5 inches, the second and smaller square was cut @ 5 inches.
I inked all the edges with "spiced marmalade" and before I glued on the top layer I added my ribbon. As you can see from this original photo, once the card was put together I went back in and changed the ribbon.
Then I used "Walnut stain" to stamp my sentiment (from a set all Mega Mixed Messages).
I added stickles to make the detail pop....
Hope you like my little birthday card! Happy crafting!


Did you see the New Scrap'n Easel?  Here's a chance to see the designer talking about her new product!  After viewing the video, Click here! for more information on pre-ordering and pricing. 


If you are on email subscription, you can go to the youtube channel and view it there.  Or Click here to view the video!

Just click on the picture of the Scrap'n Tote below for details on a special 10% off on the Scrap'n easel Monday and Tuesday! Enter code EASELME

 Enter code EASELME to Save 20% on scrap'n tote using code: GOUSA