

There are a lot of questions about Advanced calibration on the cricut imagine. Here is a video I shot with Chris at the Provocraft booth at Cha Summer 2011 Trade Show. You will want to bookmark this page!
A special shout out to Chris and Provocraft for all that they do!
Posted from my iPhone
July 21, 2011
Will you enter?
It just calls to draw you in!!!

And if you don't have a badge, this taunts you.

Yes!! DCWV!!
Will I see you today???
On the other side of the hall is the consumer show. Do you have your ticket? I do have an extra for you if you need one.
Posted from my iPhone
And if you don't have a badge, this taunts you.
Yes!! DCWV!!
Will I see you today???
On the other side of the hall is the consumer show. Do you have your ticket? I do have an extra for you if you need one.
Posted from my iPhone
Press event!
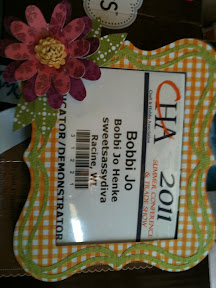
Badge frame I made at the Provocraft press event! Guess which cartridges that we used to make this...
Posted from my iPhone
Tis the Season!
Hello Everyone! This is Liza from Hoo's
Crafty! Happy to be back here for another great SSD DT
project. This week our assignment was to make a Christmas in July
project. We could use any Cricut cuts with a twist of summer added
in. Again, thinking this would be easy. Well, putting it
together wasn't the hard part, it was looking at the snowmen while sweating that
was hard.

I made an A2 size card.
I used Winter Wonderland to cut the snowman and it's layers {4.5"}
While looking around at my papers, I found this bright snowflake paper by Echo
Park that I knew would have the perfect summer twist. So I may have gotten
off course into winter rather than Christmas.
I also used cardstock from Core'dinations and AC
Instead of cutting the buttons for the snowman, I decided to add some jeweled
buttons with some zots to brighten it up a little. I hand drew in the eyes
with a brown archival pen.
White satin ribbon tied at the bottom of the card to add some dimension and even
out the card.

I did cut out the shadow layer in brown and add some 3D foam between for even
more dimension.
Sentiment was from a Studio G clear set found in JoAnn's $1 bin last year.
Thanks for stopping by to see what's new this week at SweetSassyDiva!
I hope you enjoy all of the great projects this Design Team has to
offer. Please visit me at Hoo's
Crafty! anytime.
July 20, 2011
Provocraft New Cricut Mini!

Hot off the press! (for email subscribers, please go to http://sweetsassydiva.com to view the video.
INTRODUCING
Cricut Mini™
INTRODUCING
Cricut Mini™
Cricut Mini is a small, lightweight, ultra-portable way to make almost anything you want – out of many different types of materials, including thick and thin paper, fabric, vinyl, magnetic material, craft foil, and lots more. With Cricut Mini, it’s easier than ever to make projects and be more creative!
- Small, portable, and lightweight for ultra space savings.
- Works with any computer PC or MAC with a standard wireless or wired Internet connection.
- Simply plug it in, turn it on, connect to Cricut Craft Room – the online design tool where you can see and design with every Cricut cartridge – and start making projects..
- Cuts up to 8.5” x 12” paper and other materials. Cut small shapes and fonts from ¼” to larger cuts up to 11½”!

Viewable at the Cha Show in Chicago!
You can also follow on facebook by just "like"ing SweetSassyDiva!
Candy!!!!
Hi everyone, it's Christmas in July. I love Christmas and everything that goes with it. I think a lot of us agree that we wish that there was Christmas spirit all year round....some of us like it for the candy ;) So when we were asked to design for this special time of year my sweet tooth really started working.
 This card was so easy to make, and I loved the smile on the gingerbread as I was assembling the rest.
 I gathered all of my supplies, and this time I used what I gathered. I didn't go looking for more stuff. Which is unusual for me.
I cut the card so that it is a 5x6 of DCWV Homemade Christmas Stack, red gingham (love homemade). I cut my gingerbread man at 3in...and the tag at 1 1/2 in. (they were from scrap paper).
 I added some black self stick gems for eyes, drew on the mouth, used a white pen for the frilled arms and legs, and buttons for well buttons. I cut out a present again from the DCWV homemade Christmas stack and glued it to his hand.
I stamped the sentiment onto the tag added just a few drops of red glitter glue. I tied it with the twine, and a pop dot to keep it in place. I didn't have the little bells so I used buttons and a wooden star button for my center bow to add just a bit more color. Everything was inked on the edges to add just a little dimension to the pieces.
 There it is a simply sweet card for anyone who has a sweet tooth. (like me)
*recipe*
DCWV Homemade Christmas cardstack
brown cardstock
ink (dew drop brown)
black self stick gems
red glitter glue
wooden star button
red/green buttons
twine
cricut cartridges...Gingerbread and George


I cut the card so that it is a 5x6 of DCWV Homemade Christmas Stack, red gingham (love homemade). I cut my gingerbread man at 3in...and the tag at 1 1/2 in. (they were from scrap paper).

I stamped the sentiment onto the tag added just a few drops of red glitter glue. I tied it with the twine, and a pop dot to keep it in place. I didn't have the little bells so I used buttons and a wooden star button for my center bow to add just a bit more color. Everything was inked on the edges to add just a little dimension to the pieces.

*recipe*
DCWV Homemade Christmas cardstack
brown cardstock
ink (dew drop brown)
black self stick gems
red glitter glue
wooden star button
red/green buttons
twine
cricut cartridges...Gingerbread and George
Ek success
Here is some more from cha Chicago 2011...

What a wonderful Charlie Brown card! I'd love to receive one it these in the mail.

New 3 punches in one:
I hope you enjoyed the video. You can view at http://sweetsassydiva.com if you are on email subscription.

It sure looks and feels like Christmas!

Posted from my iPhone
What a wonderful Charlie Brown card! I'd love to receive one it these in the mail.
New 3 punches in one:
I hope you enjoyed the video. You can view at http://sweetsassydiva.com if you are on email subscription.
It sure looks and feels like Christmas!
Posted from my iPhone
Subscribe to:
Posts (Atom)


