


February 20, 2012
You're Invited to a Blog Hop!
That's right, you're invited to a blog hop! March 10 & 11 SweetSassyDiva is having a blog hop to celebrate her birthday so this week the theme is to make an invitation for any event. As you can see my invite is for all of you to come to this exciting blog hop!
 The details: Cricut Birthday Bash - You're Invited - 1.5" Cricut A Child's Year - to, a .75" Cricut Gypsy Font - Blog Hop - 1" The when, where and rsvp were done on the computer. The ribbon is from my stash. I hope you will put the date for the hop in your calendar and come and join the fun ! As always, thanks for stopping by :)
February 19, 2012
Pool Party!
Hi Crafty friends, this week the DT was asked to make an invitation of any kind. I thought about this for a while and while searching my Gypsy I saw that I started to make an invitation one time for a pool party for my son, but then he decided he didn't want to have one. So I went with that idea. I took the sunglasses from Forever Young and welded two shadow shapes together to make a shaped card.
 I used white card stock for the shadow base of my card and then cut out the top layer out of black card stock. I would have chosen a red, pink or turquoise blue for myself-but if I ever use this for DS he won't go for any of those colors!! lol So black it is!
 I was going to do the next layer with the cut outs at the corner, but decided that it looked too girly so I just cut out the lens layer next. I cut that layer out in pool water paper so it looked like the water was reflecting in the glass lenses. I cut out "pool party" out of the cart Street Signs and stamped "your invited" using a Paper Trey Ink stamp. Before gluing down "pool party" I put glossy accents all over both lenses so they looked shiny like lenses should. After it dried, I glued on "pool party" added some bling because it just needed something a little girly-ok now I won't be able to use for DS unless we use plain for the guys and blinged out for the girls. I also doodled on my font sentiment. Yeah, not a great doodler. lol


 I made the invitation so it would fit into a #10 (business size) envie. Now it is ready for DS to hand deliver. If you are going to mail I wouldn't use the bling as it would coast extra to mail it. Isn't this a cute invite?!! We love to have people over to BBQ and swim in the pool during the summer so what better way to send out an invite for the pool!


Sizes: shadow base: 8.90 wide x 5.58 height
base layer: 8.73 wide x 2.82 height
lens layer: 6.02 wide x 2.82 height
Pool Party font: 1.50
Enjoy seeing all the different invites this week, I know they are all going to be awesome!!!
Brenda
February 18, 2012
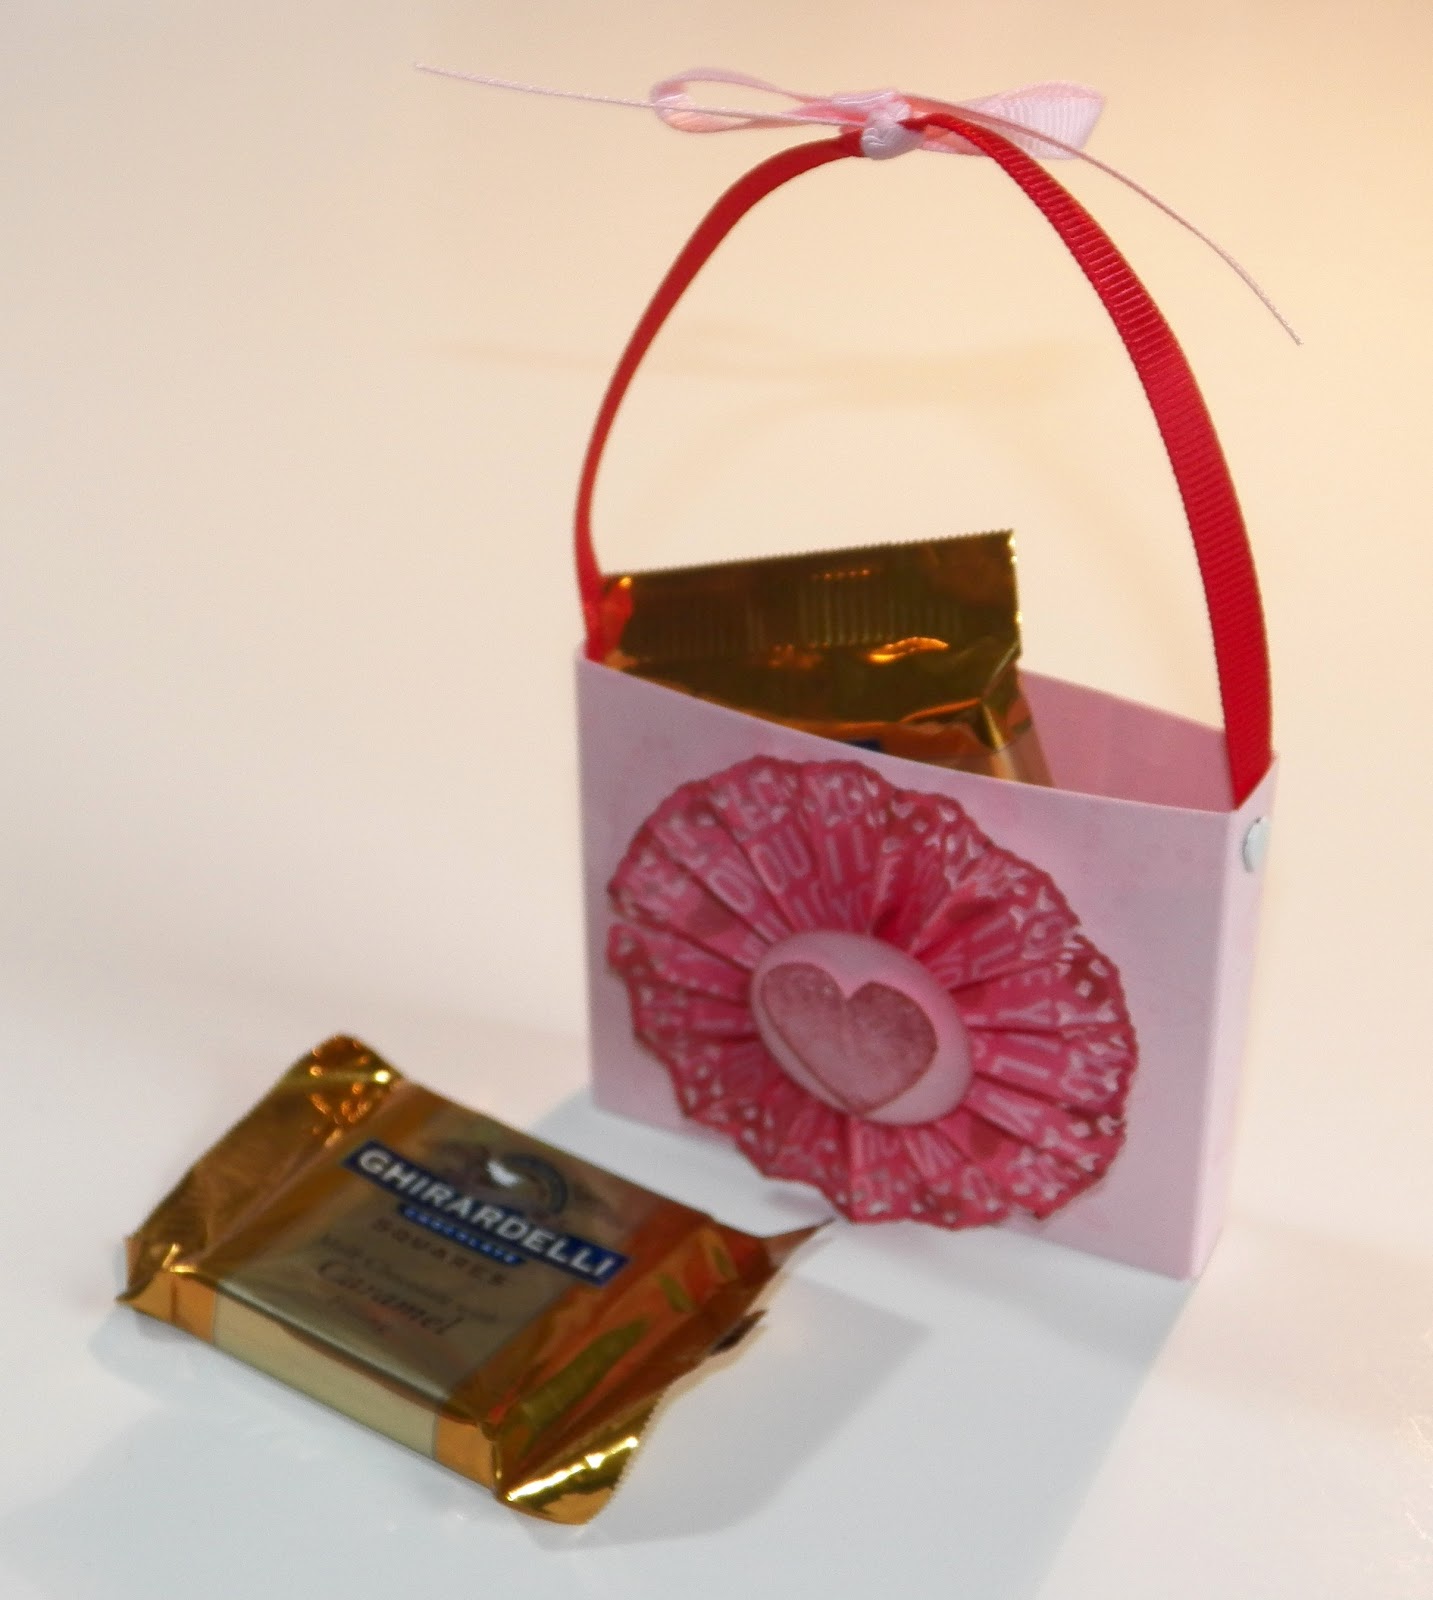
Treat Holder!
Make something fun....that's the theme here at SweetSassyDiva this week! Hello, Mindy from Grammies Craft Room with a quick and easy little candy holder. I made mine for Valentines Day, but it will work for any occasion. Start with a piece of card stock that is 3" x 7 3/4"
 Score as shown below:
 Fold on score lines and add adhesive
 To make the rosettte I used Ribbons and Rosettes. I welded 4 - 1.26" sections together.
 I scored this piece every 1/4" and attached the ends together with hot glue.
 I punched out 2 - 1" circles , inked the edges and glued to the center of the front and back of the rosette. I stamped a heart from Stampin Up and cut out and pop dotted to the circle. The rosette is attached to the front of the box with hot glue. I cut a piece of ribbon about 7" long and used heart brads to attach to the box.

 I put Ghiradeli squares inside and it's ready to give to my one and only valentine... my husband !


February 17, 2012
XOXO Door Hanger!

Hello ~ Lori here from ScrappinMyStressAway. This week at SweetSassyDiva's the theme is "Not a Card or Layout" so I decided to finish a project I started earlier. I saw something similar several months back and created a file in my Gypsy right away (so I did not forget) and never even did a test cut! I was thinking this would be cute for Valentine's Day.

I started with this box from Tags, Bags, Boxes and More and welded this layer of an ornament from Christmas. The box is sized at 10.90w x 6.88h and the layer of an ornament is sized at 4.81w x 29.12h.
On a side note, the layer of the ornament can be used as a wine bottle tag!

I cut out my box in red card stock.

I scored and creased on the fold marks and used my ATG to adhere it together.

I found an image from my Holiday Vignettes program and printed it out on white cardstock. I cut it out.

I had to guess at the size of the image and it turned out pretty well!

I wanted to put a doily behind the image, so I opened up Lacy Labels and found an oval shaped doily. I rotated it 90 degrees and sized it to fit the front of the box (4.91w x 3.47h).
I grabbed the "XOXO" from Sentimentals and sized it to 2.74w x 1.12h.
I cut both out of cream colored card stock.

I inked them both with Antique Linen ink to age them.

I wrapped some wide brown ribbon around the middle of the box and adhered the doily to the box. I pop-dotted the image to the doily. Now I just have to wait for my Valentines to be delivered!!!
-- Lori~ www.scrappinmystressaway.blogspot.com
February 16, 2012
Such a Sweet Box!
Good Morning! This is Jen from 3 Cats and a Bug. The theme for this week at sweetsassydiva's is something fun, but not a layout or a card. I found this Tutorial; over at Splitcoaststampers. While I don't have all the heart spellbinders they used ~ nor could I find them at this time of the year! ~ I was able to use my Sweetheart and MS Elegant cartridges. They do such an awesome job at SCS on their tutorials. I can't come close to explaining as well as they do, so I will just explain what I did differently. :) I made two boxes, one with the lid attached and one without. From MS Elegant cartridge, I cut 3 white hearts at 4.13 x 4.31 and 2 cardboard hearts the same size.
![]() From the Sweethearts cartridge, I cut 1 heart out of patterned paper at 4.43 x 6.40. I cut 2 smaller hearts of patterned paper at 4.08 x 5.89 and 2 of chipboard at the same size.
From the Sweethearts cartridge, I cut 1 heart out of patterned paper at 4.43 x 6.40. I cut 2 smaller hearts of patterned paper at 4.08 x 5.89 and 2 of chipboard at the same size.
![]() I also cut 1 piece of patterned paper at 2 x 12. (I did have to trim that piece to fit at the end.) On the scalloped hearts, I attached a white heart to each side of 1 scalloped chipboard and 1 white heart to one side of the remaining scalloped chipboard.
I also cut 1 piece of patterned paper at 2 x 12. (I did have to trim that piece to fit at the end.) On the scalloped hearts, I attached a white heart to each side of 1 scalloped chipboard and 1 white heart to one side of the remaining scalloped chipboard.
![]() I attached the 1 large patterned paper heart to the top of the first heart.
I attached the 1 large patterned paper heart to the top of the first heart.
![]()
![]() I attached the small patterned paper to one side of each small chipboard heart. On the Tutorial; there is a short video at the end that explains everything.
I attached the small patterned paper to one side of each small chipboard heart. On the Tutorial; there is a short video at the end that explains everything.
![]()
![]()
![]()
![]()
![]() ~~~~~~~~~~~~~~~~~~~~~~~~~~~~~~~~~~~~~~~~~~~~~~~~~~~~~~~~~~~ Because I ended up with a fair amount of paper scraps left over from this project, I decided not to add them to my already huge collect. I used what was left to make up some blank cards. (The butterfly 3D stickers are from K&Company, of course! lol)
~~~~~~~~~~~~~~~~~~~~~~~~~~~~~~~~~~~~~~~~~~~~~~~~~~~~~~~~~~~ Because I ended up with a fair amount of paper scraps left over from this project, I decided not to add them to my already huge collect. I used what was left to make up some blank cards. (The butterfly 3D stickers are from K&Company, of course! lol)
![]() I also did the inside of the cards.
I also did the inside of the cards.
![]()
![]()
![]()
![]() I did NOT glue down the inside pieces. There have been several times where I've wanted to add a type written note, but I already had the inside done and it wouldn't look good with white on white. The insides are all ready to go and inside the card, but I can switch out the white piece if I need to. To make things even easier/faster, I have a Modular stacking box with blank colored cards already made up.
I did NOT glue down the inside pieces. There have been several times where I've wanted to add a type written note, but I already had the inside done and it wouldn't look good with white on white. The insides are all ready to go and inside the card, but I can switch out the white piece if I need to. To make things even easier/faster, I have a Modular stacking box with blank colored cards already made up.
![]() It took me less than 10 minutes to make up 5 cards! The people I usually send cards to prefer the more basic cards. Not as much fun to make, but they like it and that's what counts. :) Thanks for looking!
It took me less than 10 minutes to make up 5 cards! The people I usually send cards to prefer the more basic cards. Not as much fun to make, but they like it and that's what counts. :) Thanks for looking!
February 15, 2012
Love is in the Air!
Hi Crafty friends, Brenda here from Friends Craftin with Friends. This week on Sweet Sassy Diva the DT was asked to make something fun, no layouts, no cards. So after thinking about it for a while I decided that I wanted to make a kissing ball. I started with a 5" styrofoam ball. Picked out my paper-old stack in my stash that was called Love Letters from Little Yellow Bicycle and then deciding on what flowers I wanted to use on my kissing ball. I decided on some spiral flowers from the Flower Shoppe, the spiral on page 12, the spiral on page 13 and the spiral on page 15. I my flowers at 2.25, 2.50 and 2.75.

 There are around 160-170 flowers on my ball. So I started cutting and rolling flowers, and cutting and rolling.


 I placed a piece of ribbon on my ball for my hanger using to straight pins with heads. After having a pile of flowers done, I started gluing them onto my ball.
 Taking care to get them as close to each other as possible, I kept working around and up the ball. After I got to the top I glued flowers to each side of the ribbon hanger making sure to glue tight up against it so the pins wouldn't show.
 Here it is with all the flowers in place.
 Now I thought that I would add a heart from the Sweethearts Cart, with the lips from Hannah Montana and the "muwah" from Smiley Cards. I glued this to the side of the kissing ball. Then I took some pink twine and punched to hearts using some old Creative Memories punches. I sandwiched the twine between the hearts and glued the other end in a crack of the kissing ball on the bottom. Here it is handing from my ceiling.
 Thanks for joing us here at Sweet Sassy Diva, be sure to keep checking in to see lots of inspiration from our fabulous design team, you won't be disappointed! You may even walk away with some inspiration!


February 14, 2012
Bee Mine!


I thought that I would share a project that was created by Summer from Cricut Diaries, . She created a banner using both her Cricut Expression and Imagine. Although unless it is using cardstock, all of it can be done using the cricut Imagine.
I hope you enjoy her creation and in her own words I give you Summer's project.
Recipe:
Birthday Bash
Create-A-Critter
Hopscotch (pattern cartridge)
2 Sheets white 12x12 card stock
2 Sheets pink glitter paper (DCWV)
Brown/Pink tulle
White Gel Pen
Clear Stickles


I started my Banner by cutting the 1st layer of the banner on my E using Birthday Bash. I cut them at 4 1/2 and when I hit auto-fill I was able to get 4 banners per 12x12 sheet. My paper was a bit thick so I also used the multi-cut option.

Then on my "I" I cut the 2nd layer of the banner (same size 4.5), the letters were also from Birthday Bash (cut at 2 inches) all colors and patterns were from the pattern cartridge Hopscotch. After my banners and letters were printed and cut I switch out the cartridges and cut the bee from Create-A-Critter again with colors from Hopscotch, the bee was cut at 3.5. Since I only used a small part of the 2nd 12x12 white sheet of card stock I hit the "load last" button and was able to have the bee printed and cut on the same sheet!


Once my bee was all put together, I added some clear Stickles to the wing and used my white gel pen on both the bee and the letters.

I used my Pink ATG to adhere the 2 layers of the banner together.
The Bee was pop doted on!

Again I just used my ATG to attach the letters.


I took strips of tulle twisted together and the knotted through the holes in each banner to string them together.


Hope you enjoyed my project, My girls and I always love Valentine's Day, what can be better than tons of PINK!
Subscribe to:
Posts (Atom)


