MyFreeCopyright.com Registered & Protected

May 19, 2012

Blog Hop!


Join Us for the hop!  I will be participating on May 20th.


May 18, 2012

Escape!

Tina here from tiggersscrapplace with another post for sweetsassydiva Design Team. Our challenge this week is to use 3 carts or more. Well that's never a problem for me. LOL

I'm still working on my disney albums and had these photos from the Tiki room up next to work on. I went looking for some birds and tiki theme stuff and began creating.


This bird came from the Life's a Beach cart. He looks black here but he really is blue. ;o) The flowers are from Pack Your Bags.


This little guy is from Birthday Bash. I used my cuttlebug to add some interest to the cuts and then my usual pen work.


I hope you enjoy my layout and visit me at my blog for more great Disney layouts!
supplies:
Cricut
Pack Your Bags cart
Birthday Bash cart
Life's a Beach cart
Cuttlebug
Embossing Folders

Hugz

Tina Gale

May 17, 2012

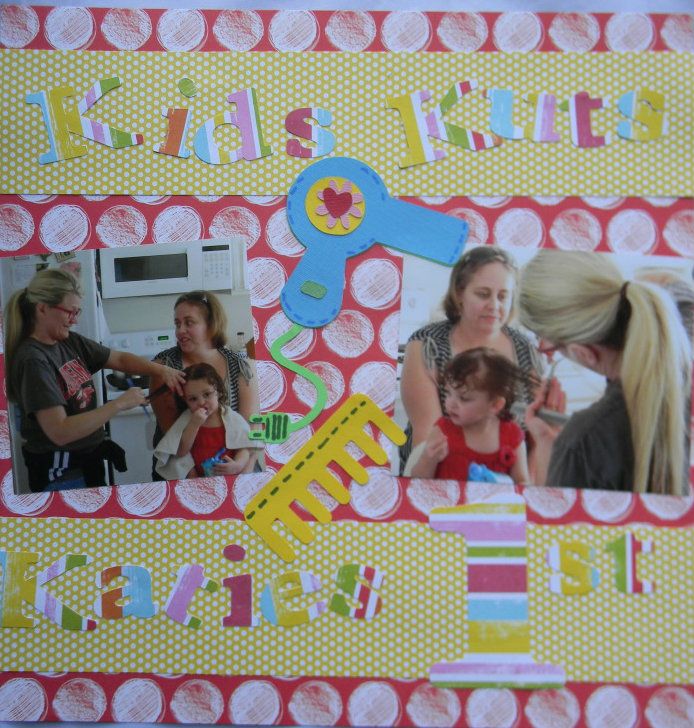
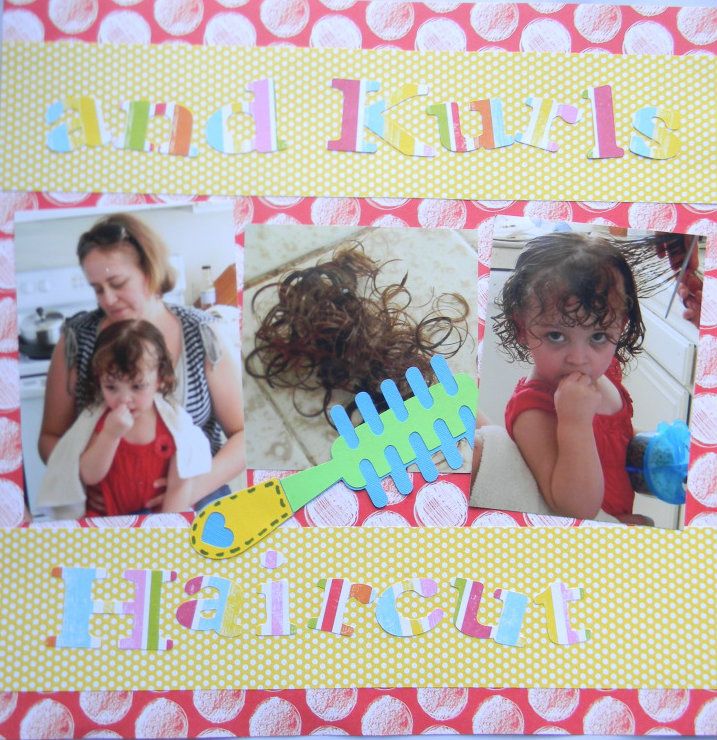
Kids, Kuts, and Kurls!

Hello everyone  I hope you all had a wonderful Mother's Day this past weekend.  
This week for Sweet Sassy Diva Design Team we were challenged to use three or more Cricut carts on our project.  I decided to work on a layout of my oldest granddaughter getting her first haircut.  
The paper I used is from Mambi and was purchased at Joanns.  
I wanted to make a bright cheerful layout and use the red in Katie's shirt. 
The pictures were taken in February when Katie was 25 months old.  
As most of you know who have seen my layouts before, Katie has the most gorgeous curly hair which runs in our family.  Everywhere we go people want to touch her hair but as you can imagine it gets quite tangled at times.  
My friend Liz is a beautician so we asked her to do the honors.  We weren't certain how she would react but she sat on Mom's lap eating her goldfish crackers and was fine through the whole process.  
The title Kids, Kuts, and Kurls I found in the awesome book Inspiration Station by Betsy Flot.  
This is an excellent book if you make a lot of layouts.  
I used the Plantin Schoolbook Roly Poly font cut at 1.5 inches and glued to 2 1/2 inch strips of yellow polka dot paper.  
The hair dryer comes from the Paisley cart page 59 cut at 5 inches. 
The comb and brush from the Slumber Party cart cut at 5 inches.
I added a few doodles to the cuts using my Spectrum Noir Alcohol Markers.  
I hope you enjoyed my layout and will come back this week to see what the other Design Team members create with their Cricut carts.  Happy craftin!  Suzanne


May 16, 2012

Creative Teacher Gift!

Lori here from ScrappinMyStressAway with my project for the challenge ~ 3 or more cartridges.

I wanted to make something special for Tanner's kindergarten teacher.  Mrs. Stock is an awesome teacher! I wanted to personalize something for her and kept coming back to a tile.

I started with gold vinyl, but the gold seemed thin and I had some issues with it bubbling and tearing.  I was ready to scrap the whole project and started removing the gold words and decided to leave the apple.  I kept thinking that a golden apple is kind of like an academy award for teachers.....so I kept going.

Here is my screen shot.  I used several words and icons from 15 cartridges:  Cheerful Seasons, Cindy Loo, George, Graphically Speaking, Gypsy Wandering, Hannah Montana, Home Accents, Home Decor, Locker Talk, Lovely Floral, Lyrical Letters, Makin' the Grade, Elegant Cake Art, Nursery Rhyme and Plantin' Schoolbook.

I opened a 12x24 mat and put all of the words and icons on my mat.  I started with Mrs. Stock (used a heart instead of a period) in the center.  I like subway art and wanted to make this look like some.  The words I chose are: discover, create, patience, inspire, transform, direction, explore, #1 Teacher, guide, adventure, learn details energy and 2011-2012.

It took some time to move words around and size them to get my final piece.

I erased the apple from my screen and cut out the rest in black vinyl.  

When you cut vinyl, set your Cricut to 3-3-3 (speed, pressure and blade depth) for a kiss cut.  I use my Cricut pokey tool (dental tool) to weed out the extra vinyl pieces.

I usually use clear contact paper with vinyl, but I was having trouble with the amount of stick and my pieces were tearing and not clinging to the tile.  I was getting frustrated not knowing if it was the gold vinyl or the contact paper or a combination of both.  I bought the ProvoCraft transfer tape and had much better luck!

I use my scraper to burnish the vinyl to the transfer tape.

I used my E2 and set it to cut on Vinyl.  You can see here that the blade did cut through the paper backing in a couple of places.  I honestly have better luck with my E cutting vinyl, but it is a pain to dig it out for one project!!

I bought my 12x12 tile at Home Depot.

  Here is my tile with the gold apple still on it.  I set the transfer tape right over it, burnished the vinyl into the tile and peeled the tape off.

Here is my tile all finished up!  I just need to get an easel so she can display it in her room.

Thanks for having me over today Bobbi Jo!!

May 15, 2012

Happy Birthday!

3 or More Cartridges! How fun is that!! I can't believe that I am saying this, but when I went to start this project I had a hard time finding images from 3 different cartridges that I thought I could put together. Sounds hard to believe, right?


 I started with a card base from Wild Card cut at 5.25". This cut includes the spine piece, which I wanted in a second color so I set it up on the Gypsy so I could hide the parts I didn't want. The doily is from CTMH Art Philosophy cut at 3.35" and the butterfly is from Paper Trimmings cut at 2". I put 3 self adhesive rhinestones down the center of the butterfly and 3 in the upper corner. The sentiment - from CTMH - was stamped on white and centered in the opening from the inside. Some where in blog land I saw a great tutorial on how to stamp inside a cut out like this, but of coarse when I actually wanted to do .... couldn't find it.

As little side note... The doily was cut from the textured cardstock that Walmart sells and It cut out great. I adjusted the settings so the blade was at 6 and the pressure was on high. The mat I used was still pretty sticky so I didn't have to worry about the paper sliding around. I think I am going to experiment and see how small I get it to cut and still look good. I will let you know.

I bet that after I finish this post, I will have a revelation of 3 cart combos I could have done... oh well, I'll save them for another time!

Join it here!

May 14, 2012

Chicks dig me!

Good Morning!
 This is Jen from 3 Cats and a Bug!  This week at SweetSaddyDiva's  the design team is doing anything that uses 3 or more Cricut cartridges. I went with the "or more" part and used 5 cartridges.

For Easter, my daughter bought my Grandson the cutest lil outfit! The shirt says "Chicks dig me" and he was so adorable in it. I had to buy him a huge bunny for Easter since he's too little for an Easter basket.   So, on to my layout.

 I cut out two different chicks, one from Easter 2010, cut @ 3 and one from A Child's Year, cut @ 4. I embossed the chick from ACY and debossed the other one and then colored it in.

I cut the bunny from Easter 2010, cut @ 6 and embossed that one also.

I added stickles to his ear, white enamel accents on his tail and black enamel accents for his eye.

Also from the Easter 2010 cartridge I cut out two eggs, cut @ 2.5.  I added stickles, gems and used my viva decor pen to decorate them.

I cut the words "Dig Me" from Cindy Loo, cut at 3.5. I embossed the D and M, added stickles and a gem to decorate them. I also cut out a bow for the chick, cut @ 1 from Easter 2010 and added a matching gem to that.

I cut out the word Chicks from Straight From The Next, cut @ 3.5. I embossed the heart and used my white gel pen to decorate the letter.

For the grass I used MS Birthday Cakes Cartridge. I welded two pieces together, each cut @ 2 twice for both layers. I only wanted each piece to go 12 inches.

On the light green grass I used my thumb nails to curl up the tips. When I glued the two pieces together, I just ran a strip of glue on the bottom half so that the grass would still stick up. I did it the same way when I glued it to my background paper.
Thanks for looking!

May 13, 2012

Sunshine and Sunflowers!

Happy Mother's Day from the entire Sweet sassydiva Design Team. This week is All About Moms! Tina here from tiggersscrapplace.blogspot.com with a card for my very own special mom.


She raised 6 kids all on her own, went to school to become a teacher and even went back for her masters. She's retired now and enjoying her days quilting. She enjoys sunflowers so I used this months Close to My Heart stamp of the month to stamp a sunflower and color it in with CTMH markers. The paper is all from the Dotty paper pack that you can get for just $5 this month. You can check out the entire pack of paper and more projects on my blog. I used our color ready seam binding to tie a bow on the tag and stamped my sentiment with Tag the Occasion stamp set from CTMH.

Supplies
CTMH cricut Art Philosophy cart
CTMH Dotty paper pack
CTMH Tag the Occasion stamp set
CTMH color ready seam binding
CTMH May stamp of the month
CTMH Cocoa Ink pad
CTMH Honey marker
CTMH Garden green marker

Hugz
Tina Gale